¶ ANEXSPOT RADIUS SERVER
¶ CUSTOMER/TENANT PORTAL
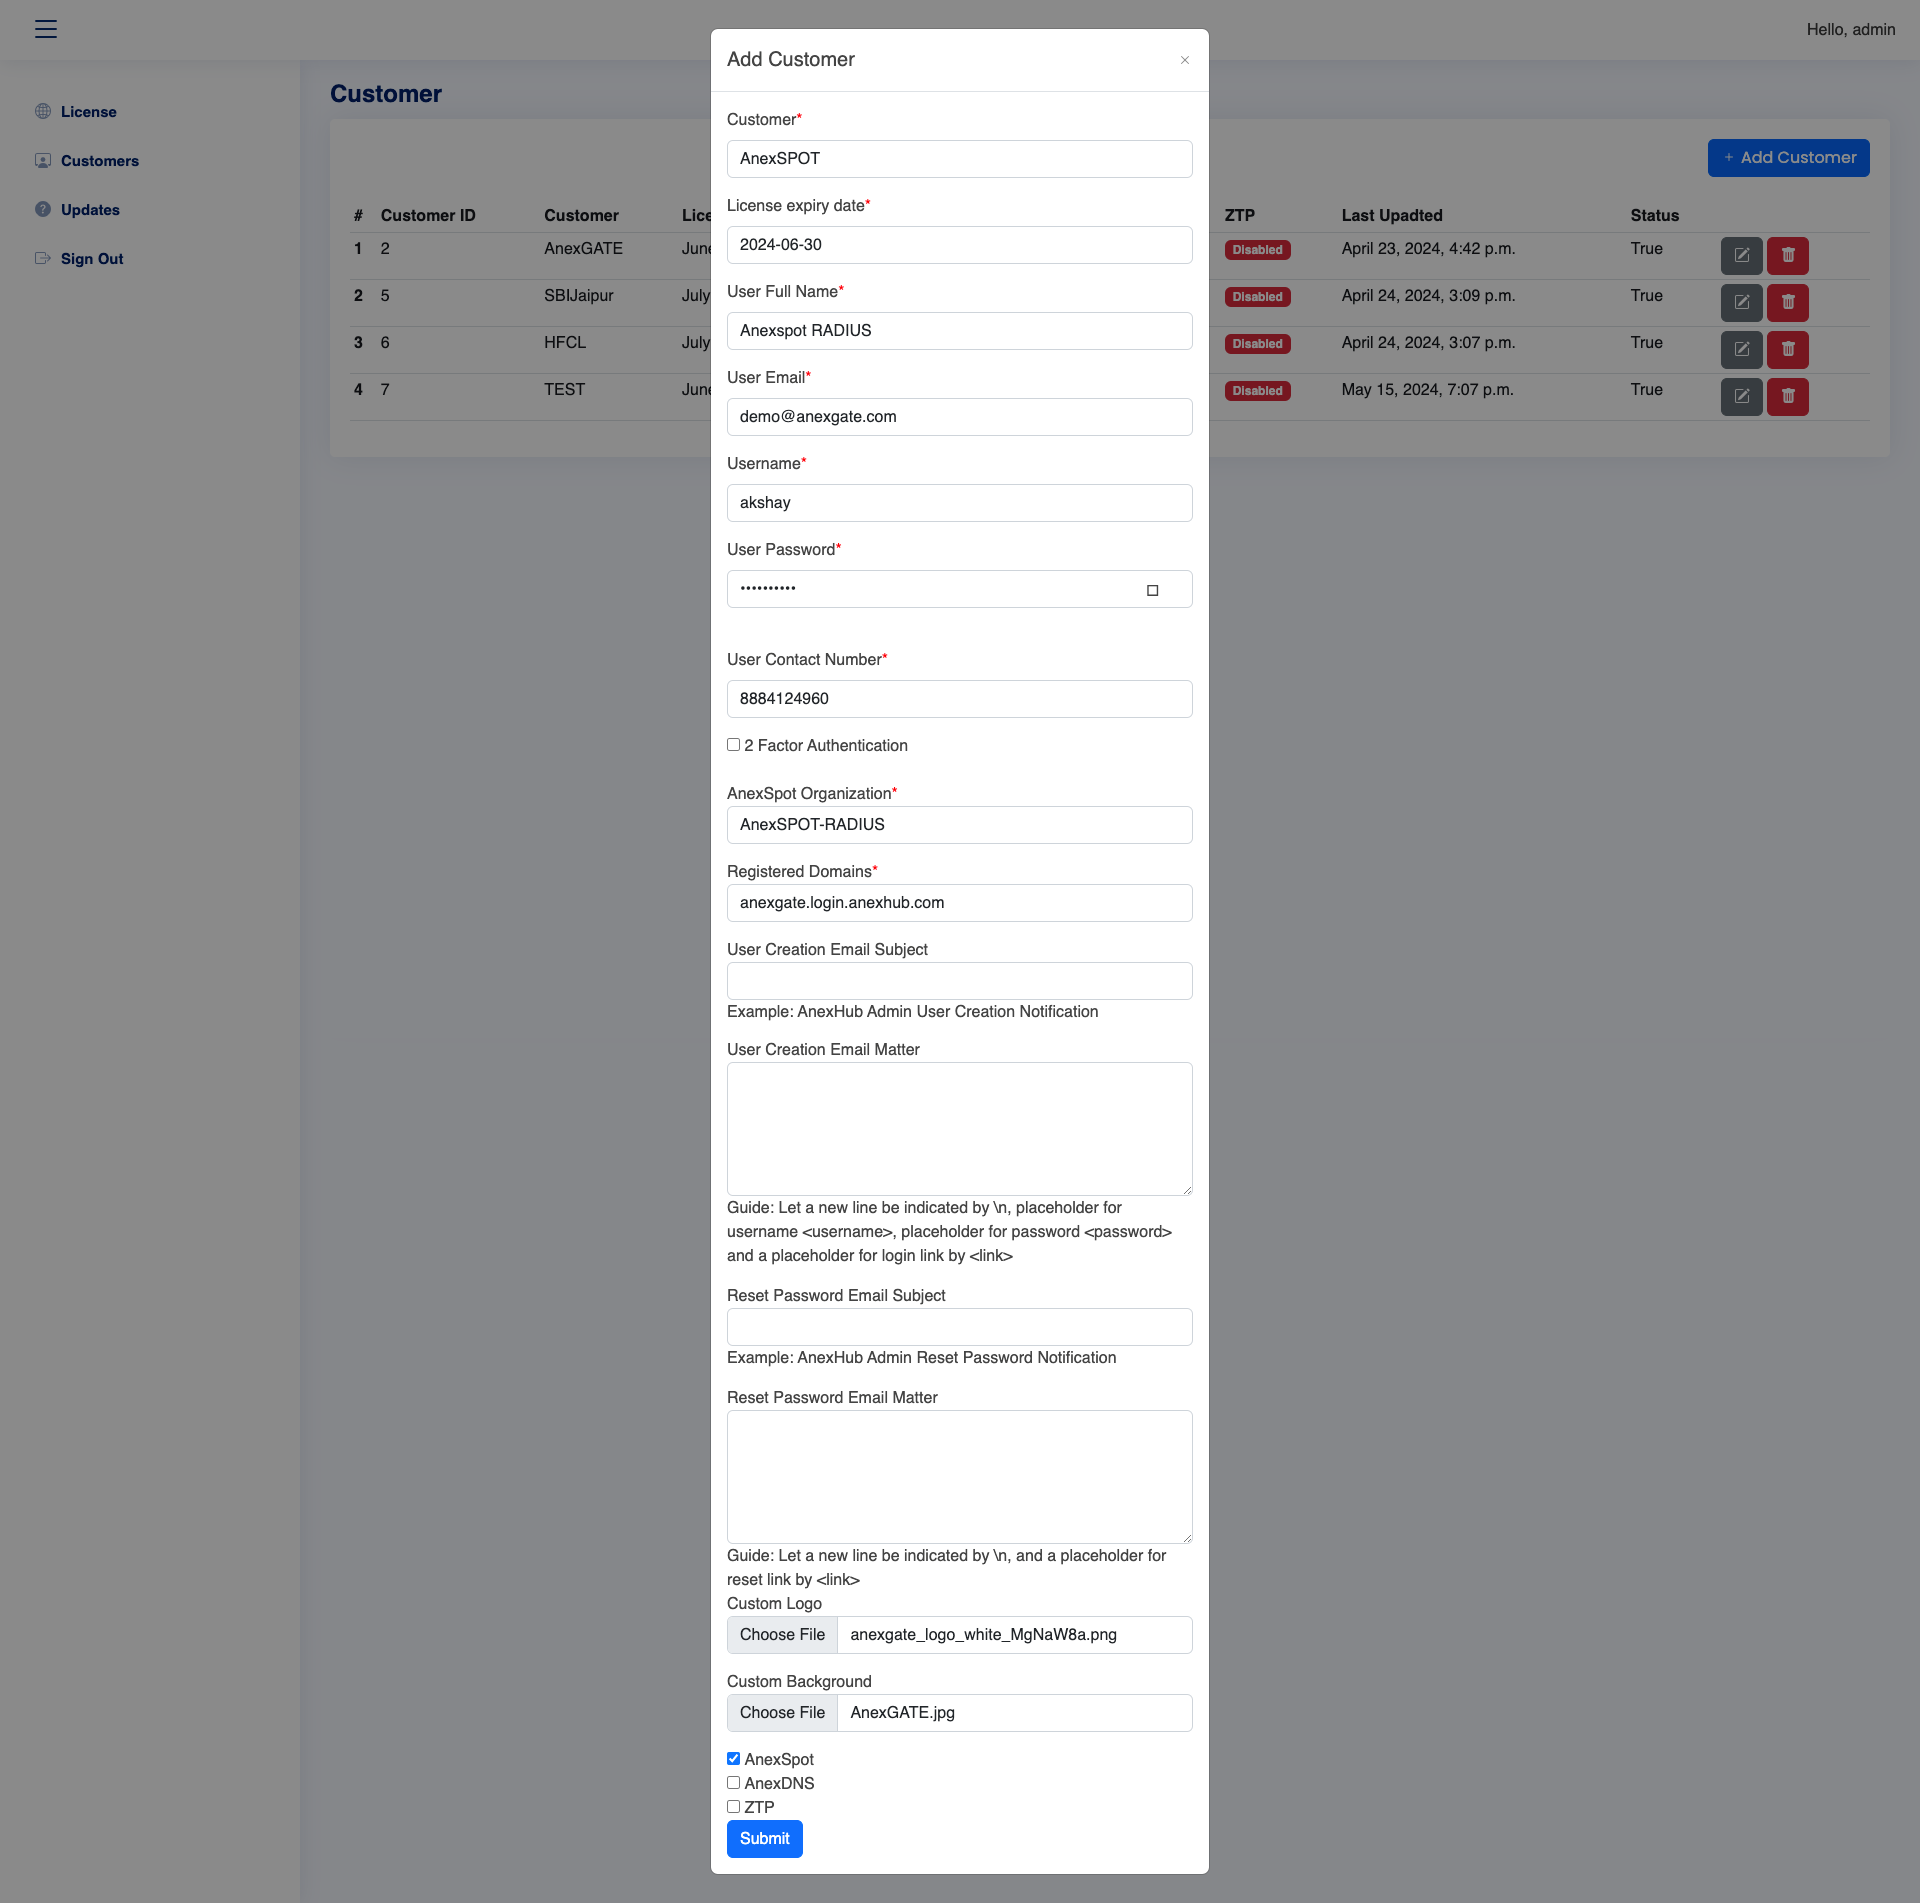
To create a Customer/Tenant Portal -
- Login to the Customer/Tenant Creation Portal
- Go to Customers and fill in the required information parameters required as follows.
|
Elements |
Description |
|---|---|
| Customer | Provide a customer name. |
| License Expiry Date | Specify the Expiry Date for the Customer Portal |
| User Full Name | Enter Full name of the customer. |
| User Email | Specify E-mail ID of the customer. |
| Username | Enter a username which will be unique for the Customer Portal Login. |
| User Password | Enter the password for the Customer Portal Login. |
| User Contact Number | Enter the mobile number of the customer. |
| 2 Factor Authentication | Enable/Disable 2 Factor Authentication for the Customer Portal Login. When Enabled, user login has to generate an OTP on the registered mobile number in order to login to the portal every time when logged out. |
| User Creation Email Subject and Email Matter | Enter customized email to be sent to the registered user email-id whose login credentials are generated by the Super Admin. |
| Reset Password Email Subject and Email Matter | Enter customized email to be sent to the registered user email-id when the user has resetted the password of their Login account. |
| AnexSPOT Organisation | Specify an Organisation for AnexSPOT or RADIUS. |
| Registered Domain | Assign a domain name for the Customer Portal. |
| Custom Logo | Upload customized logo for the Customer Portal. |
| Custom Background | Upload customised background for the Cutsomer Portal Login page. |
| Type of Service |
Select the Type of Service to be enabled for Customer Portal.
|
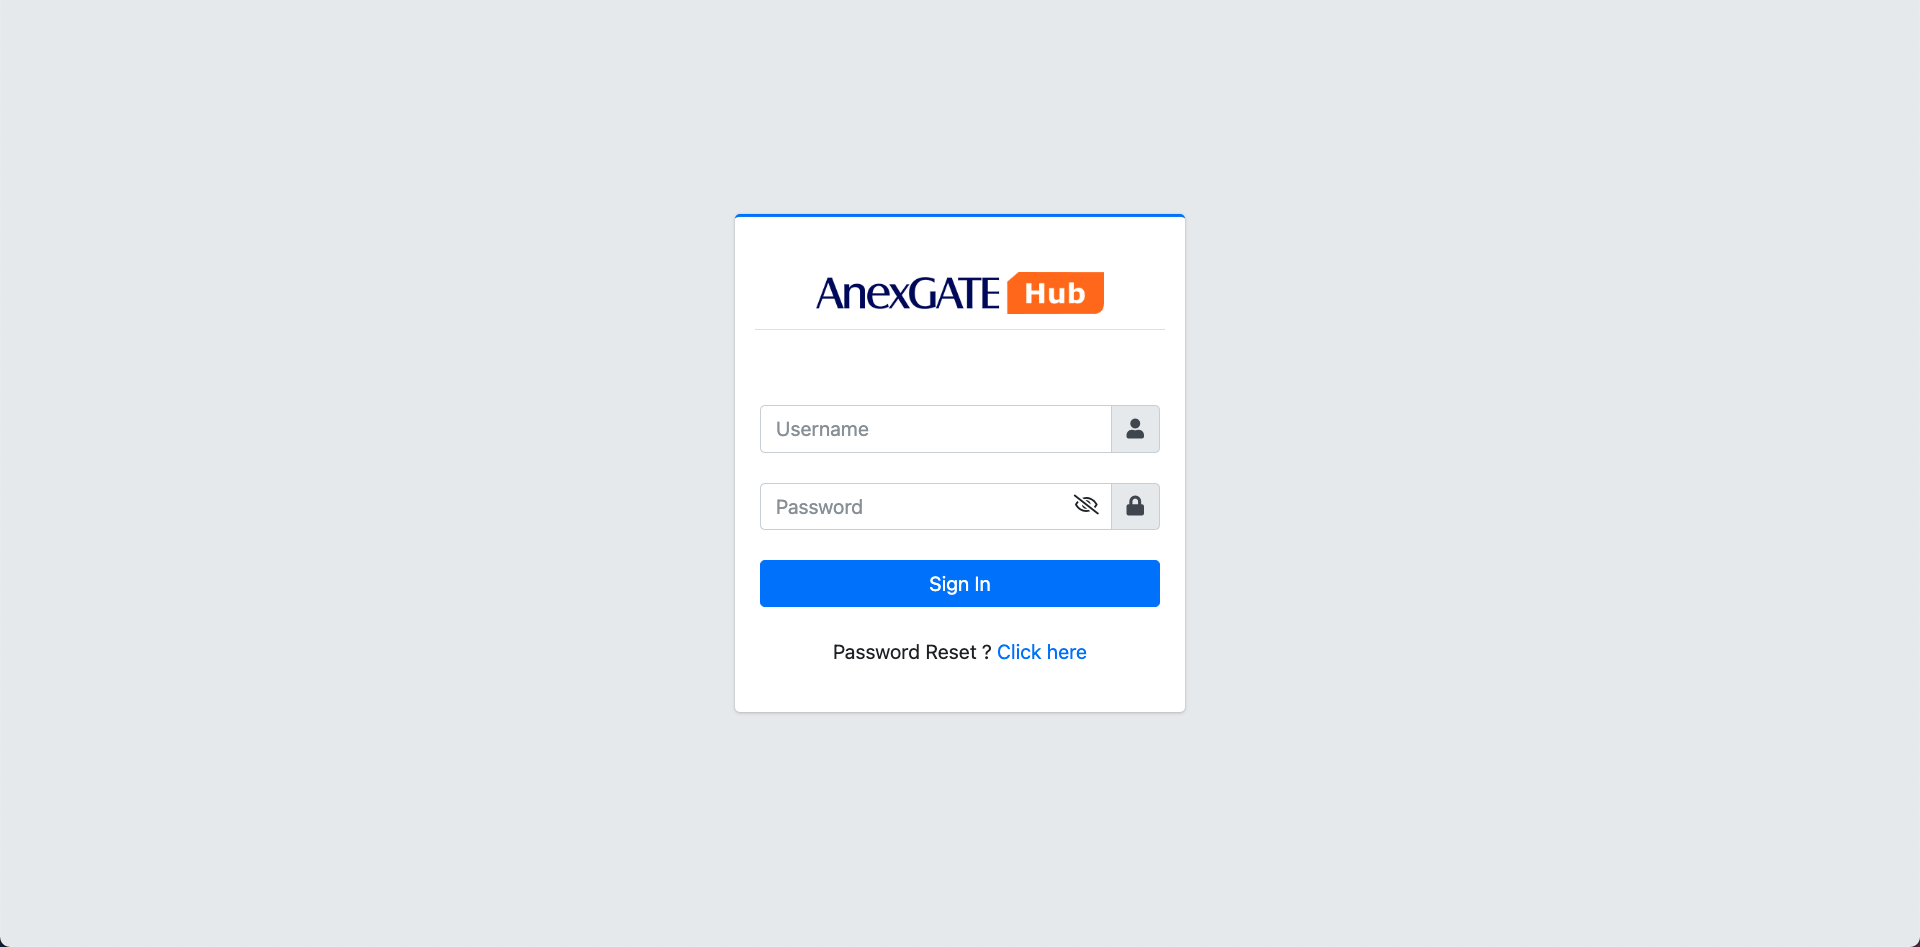
LOGIN TO PORTAL
Once the Customer Portal has been created with an valid Registered Domain name.
Open the customer portal with given Domain name.
Default Customer Portal View
¶ Customer Portal with custom Logo and Background View
The Master Portal has a provision for customizing the portal view by uploading the custom Logo and Background according the customer requirement.

¶ AnexSPOT ORGANIZATION
Configure an organization for RADIUS where set of NAS Clients would gather under under a same AnexSPOT organization.
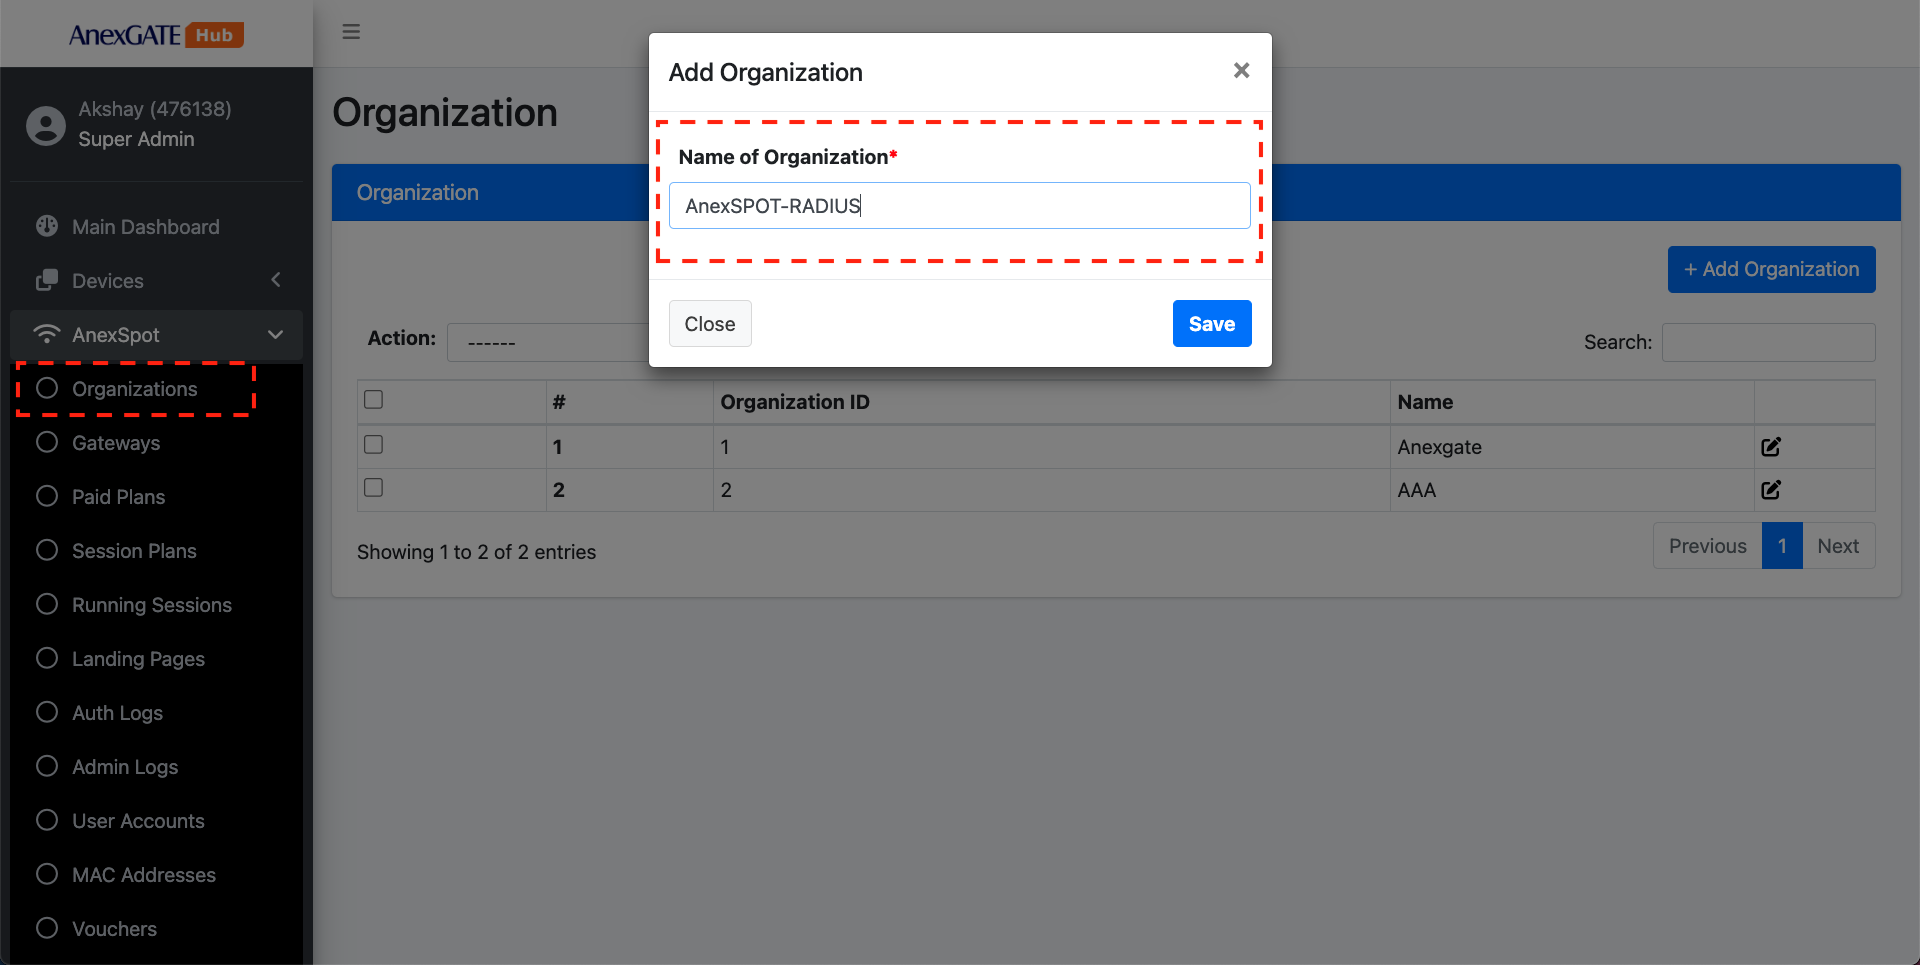
To add an Organisation in AnexSPOT RADIUS,
- Under AnexSPOT Go to
Organizations. - Click on
Add OrganizationTab at the top right. - Assign an Organization under
Name of Organizationfield.
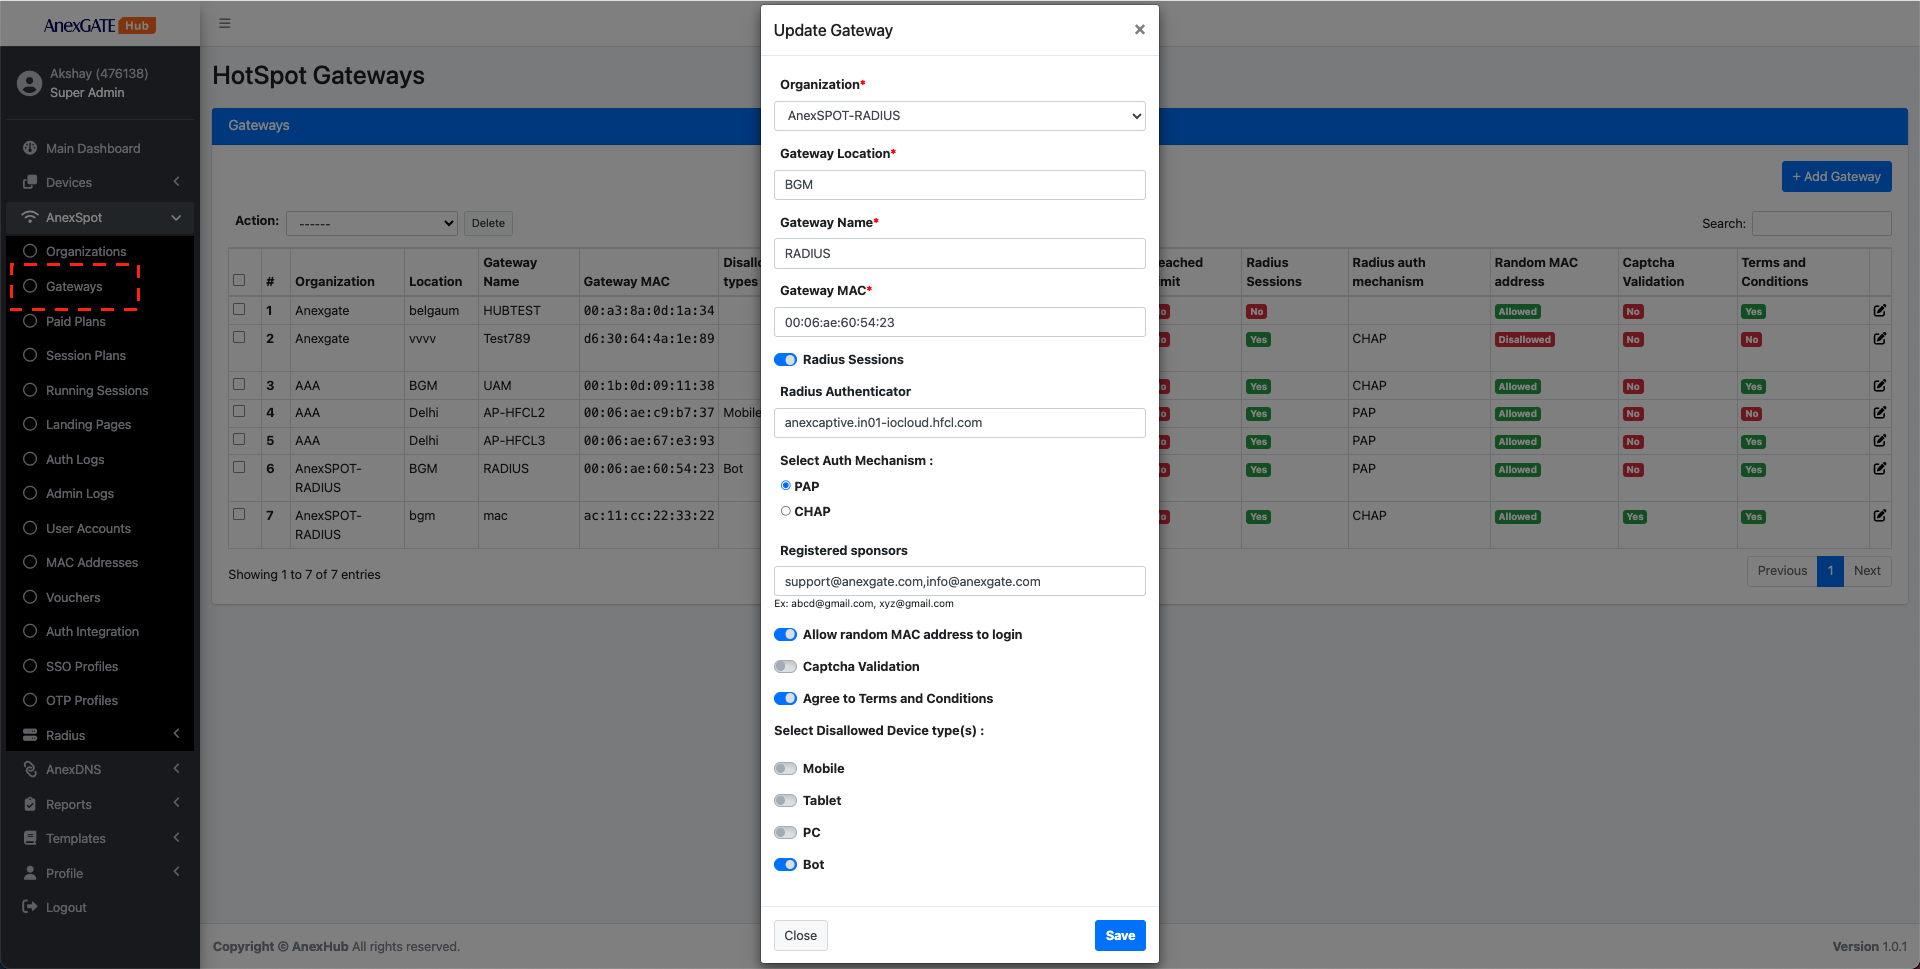
¶ AnexSPOT GATEWAY for RADIUS
AnexSPOT Gateways display the number of Radius Gateways configured under their respective Organization along with the Gateway Name, Gateway MAC (NAS ID of the client) and other required networking related parameters for AnexSPOT as well as RADIUS.
To configure the AnexSPOT Radius Gateway,
- Go to
Anexspot-Gateways. - Click on
Add GatewayTab. - For configuring a RADIUS Gateway, enable
Radius SessionsToggle button. - Add Controller URL under
Radius Authenticator. - Select Authentication Mechanism, i.e., either
PAPorCHAP. - Set other client related networking parameters as per requirement.
Following are the parameters needed to configure a Gateway under AnexSPOT RADIUS.
|
Elements |
Description |
|---|---|
| Organization | Select an organization from the drop down menu. |
| Gateway Location | Assign an unique name in Gateway Location field as shown in image. |
| Gateway Name | Assign an unique name under Gateway Name. |
| Gateway Identifier | Assign the Gateway MAC or the NAS ID of the RADIUS Client. |
| RADIUS Sessions | Toggle between AnexSPOT and RADIUS configuration by enabling/disabling the Radius Sessions toggle button. |
| Auto Redirect to Sponsor Approval Page | Displays the Sponsor based login directly on the Captive Portal Login page. |
| RADIUS Authenticator |
Insert the Controller URL of the NAS where the RADIUS Clients are being controlled. Example - |
| Select Auth Mechanism | Select the Authentication Mechanism between PAP (plaintext) and CHAP (encrypted). |
| Registered sponsors |
Assign Email Addresses for the Radius Clients to submit the information to authorized Sponsor Email IDs only, to validate and approve Clients to access the network. Example - |
| Allow random MAC address to login | Enabling Allow Random MAC Address will permit the radius clients with Random MAC Addresses enabled devices. |
| Captcha Validation | Enable this to add an extra protection from spamming, making sure only a human being with right password can login. |
| Agree to Terms and Conditions | Enable this to prompt the user to agree terms and conditions before login. |
| Select Disallowed Device Types |
Select the devices from the list to disallow them from login. Devices that can be blocked from Login - Mobile Devices, Tablet, PC, Bot. |
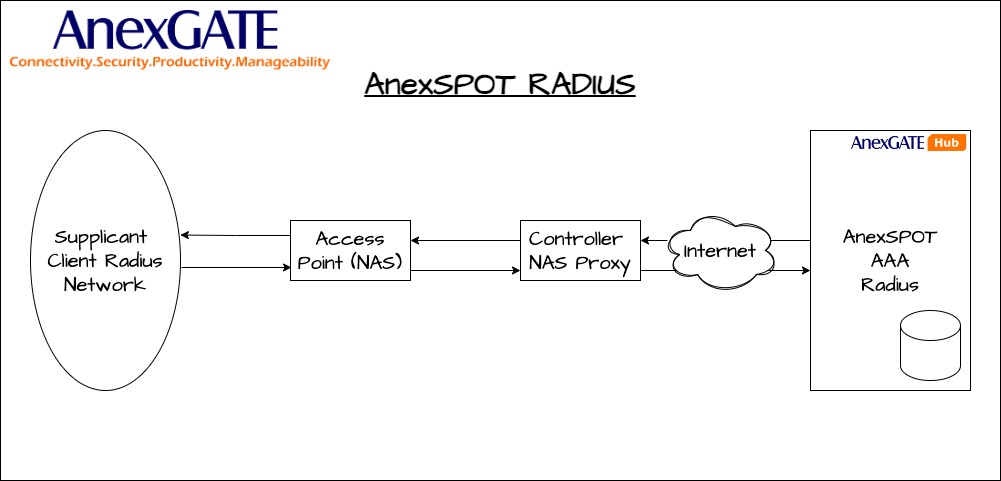
¶ AnexSPOT RADIUS
AnexSPOT RADIUS uses RADIUS protocol to serve NAS clients for the access of the network.
ANexSPOT Radius Server can be configured under AnexSPOT > RADIUS.
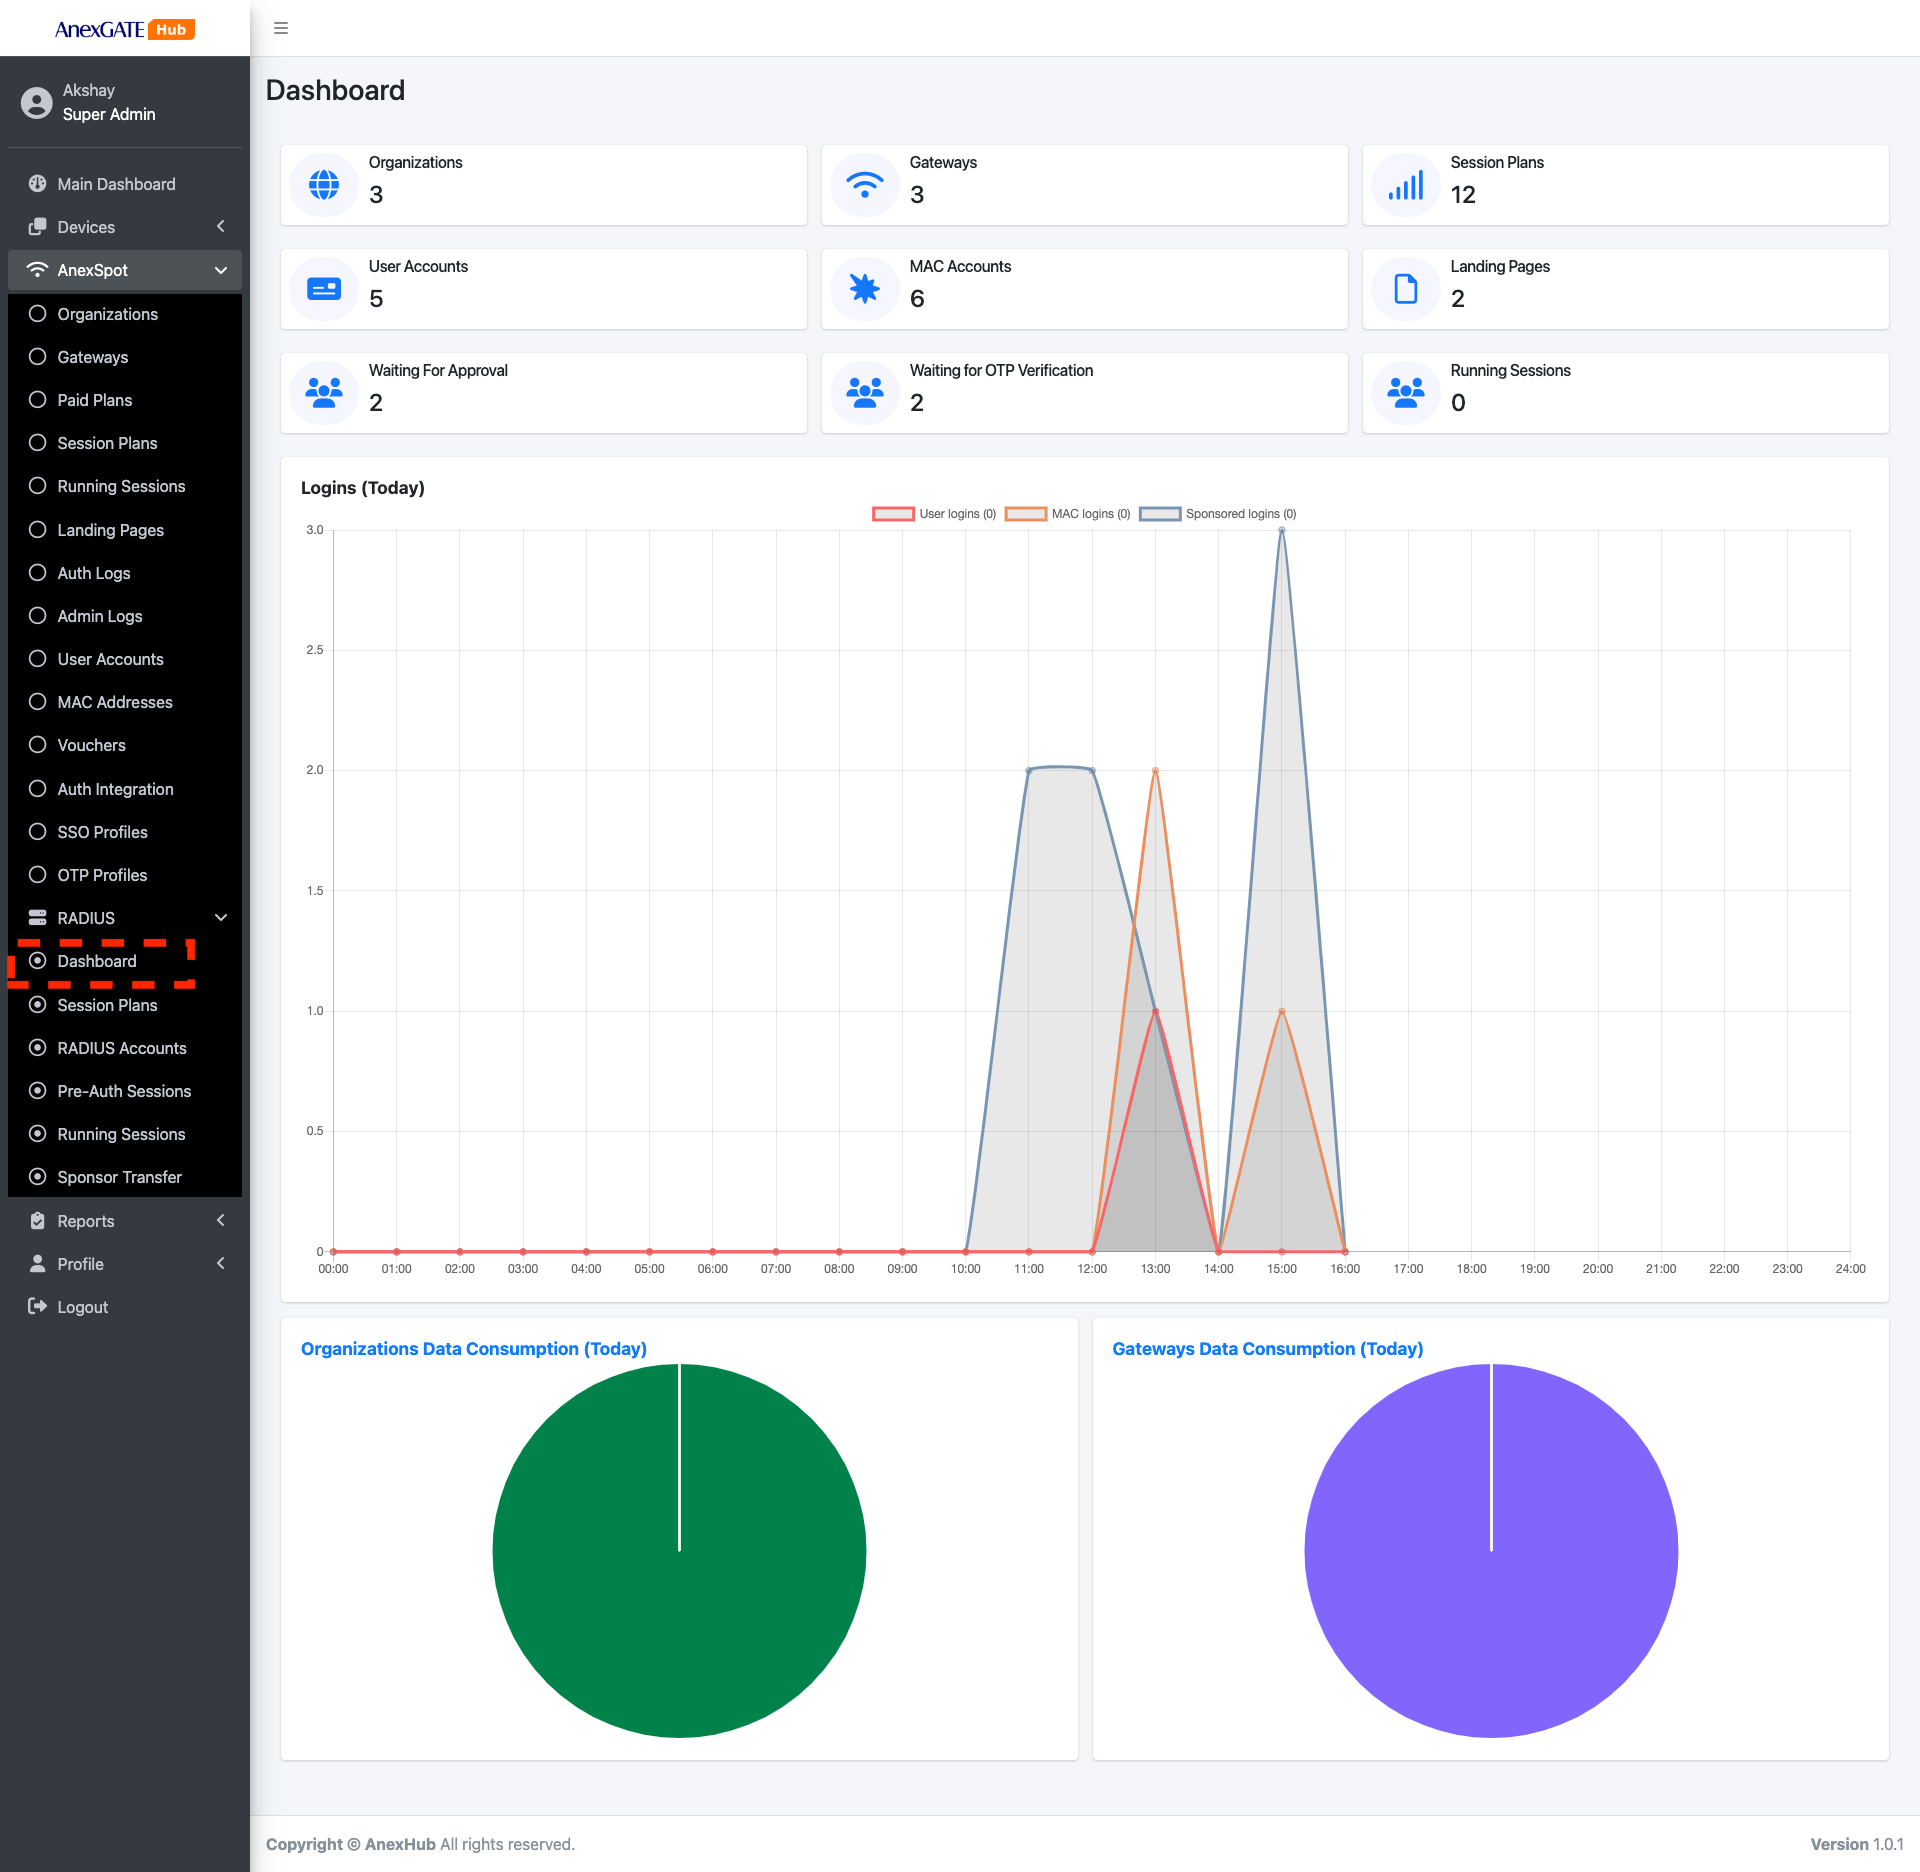
¶ RADIUS Dashboard
RADIUS Dashboard displays the summary of existing organisations, gateways and their respective which come under a single registered Domain.
The Dashboard provides a graphical view of the DATA Consumption in terms of individual Organisations and Gateways.
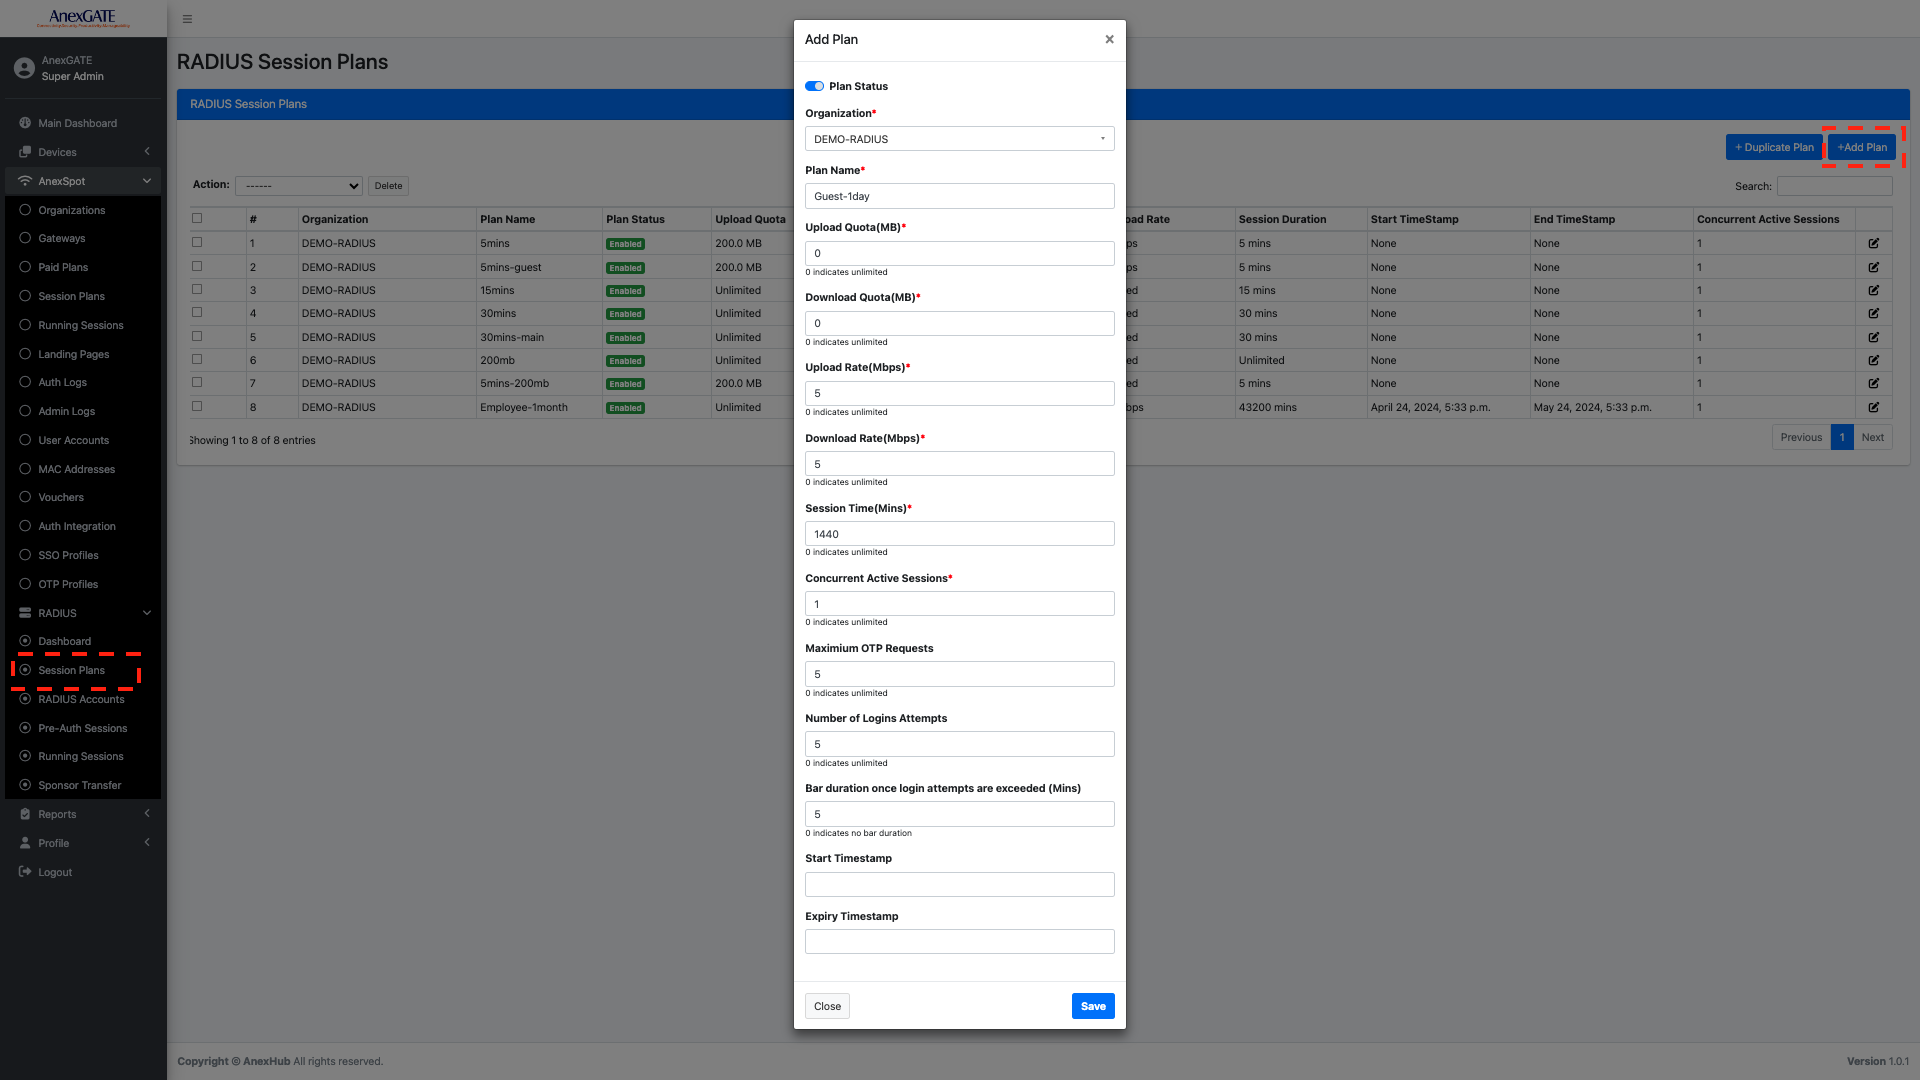
¶ Session Plans
RADIUS Session plans are pre-configured templates comprising of radius network parameters attributes applied to the user once they choose a Session plan in Login portal during login period and gets successfully authenticated with various login methods.
To create a RADIUS Session Plan, Go to -
AnexSPOT-RADIUS-Session Plan- Click on
+ADD Planlocated at the top right end.
Following are the parameters that can be configured as a network parameters -
|
Elements |
Description |
|---|---|
| Organization | Select an organization for the RADIUS Client from the drop down menu. |
| Plan Name | Specify a keyword for the session plan. |
| Upload Quota (MB) | Specify Upload Quota limit in terms of MB, for the user after successful login. Once the user crosses the limit, they will be logged out of the session. |
| Download Quota (MB) | Specify Download Quota limit in terms of MB, for the user after successful login. Once the user crosses the limit, they will be logged out of the session. |
| Upload Rate (MBPS) | Specify Upload Bandwidth/Speed Rate limit in terms of mbps, for the user after successful login. Once the user crosses the limit, they will be logged out of the session. |
| Download Rate (MBPS) | Specify Download Bandwidth/Speed Rate limit in terms of mbps, for the user after successful login. Once the user crosses the limit, they will be logged out of the session. |
| Session Time (Minutes) | Specify Session limit in terms of minutes for the user after successful login. Once the user crosses the limit, they will be logged out of the session. |
| Concurrent Active Sessions | Specify the number of Concurrent Active Sessions the user can have using the same login credentials or mobile number simultaneously. |
| Maximum OTP Requests | Number of valid OTP requests to be re-sent from the user captive portal to receive OTP. |
| Number of Login Attempts | Number of Login attempts to be considered till user gets invalid OTP exceed message. |
| Bar duration once login attempts are exceeded in Mins | Amount of time in minutes to disallow the user from entering OTP after the invalid login attempts are exceeded. |
| Start / Expiry Timestamp |
Assign the validity period for the session plan. The session plan will be valid for the given duration in terms of date and time. Note - Assigning Timestamp is optional. The timestamp will not be taken in account if left blank. |
| SAVE | Save the configuration. |
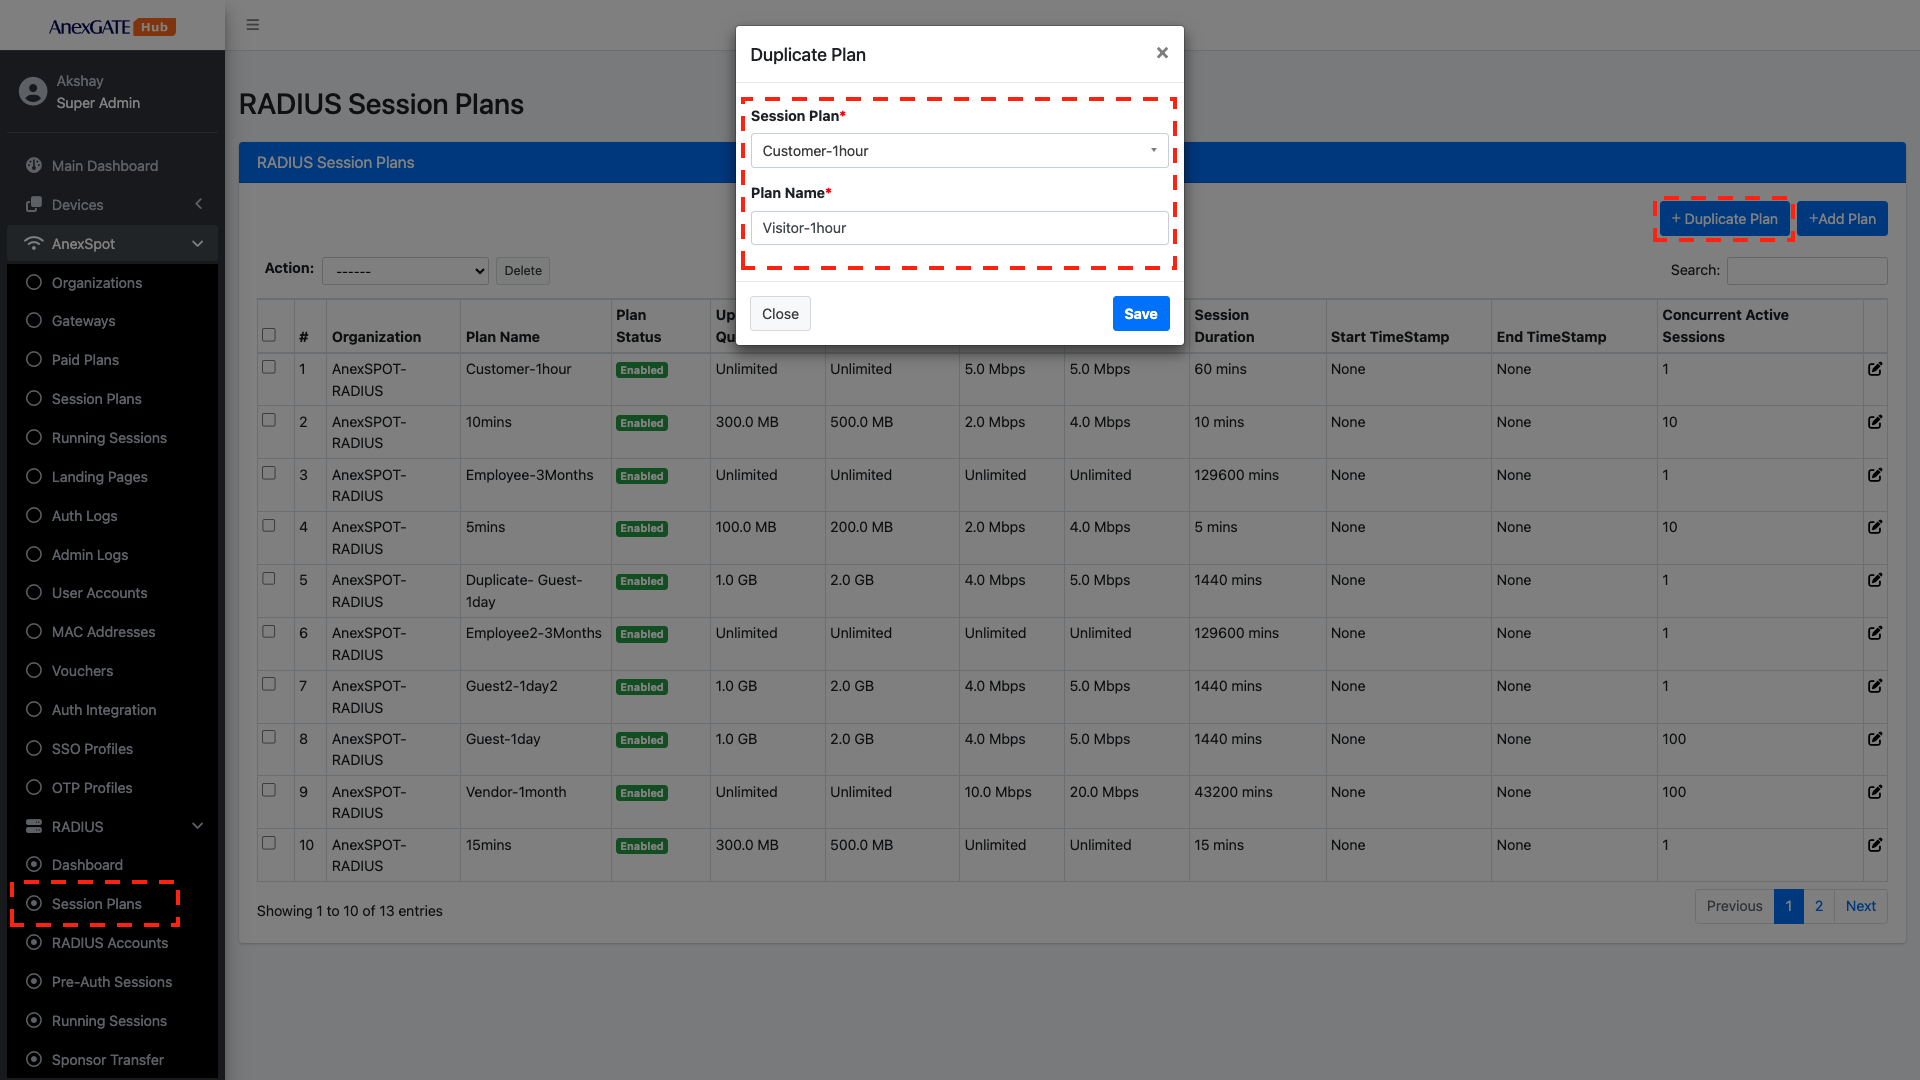
Duplicate Session Plans
To Duplicate an existing Session Plan, Go to -
AnexSPOT-RADIUS-Session Plans- Click on
+Duplicate Plan, located at the top right corner. - Choose the existing
Session Planfrom the drop-down list that needs to be Duplicated and assign uniquePlan Namefor the Duplicated Session Plan. - Click on
SAVE.
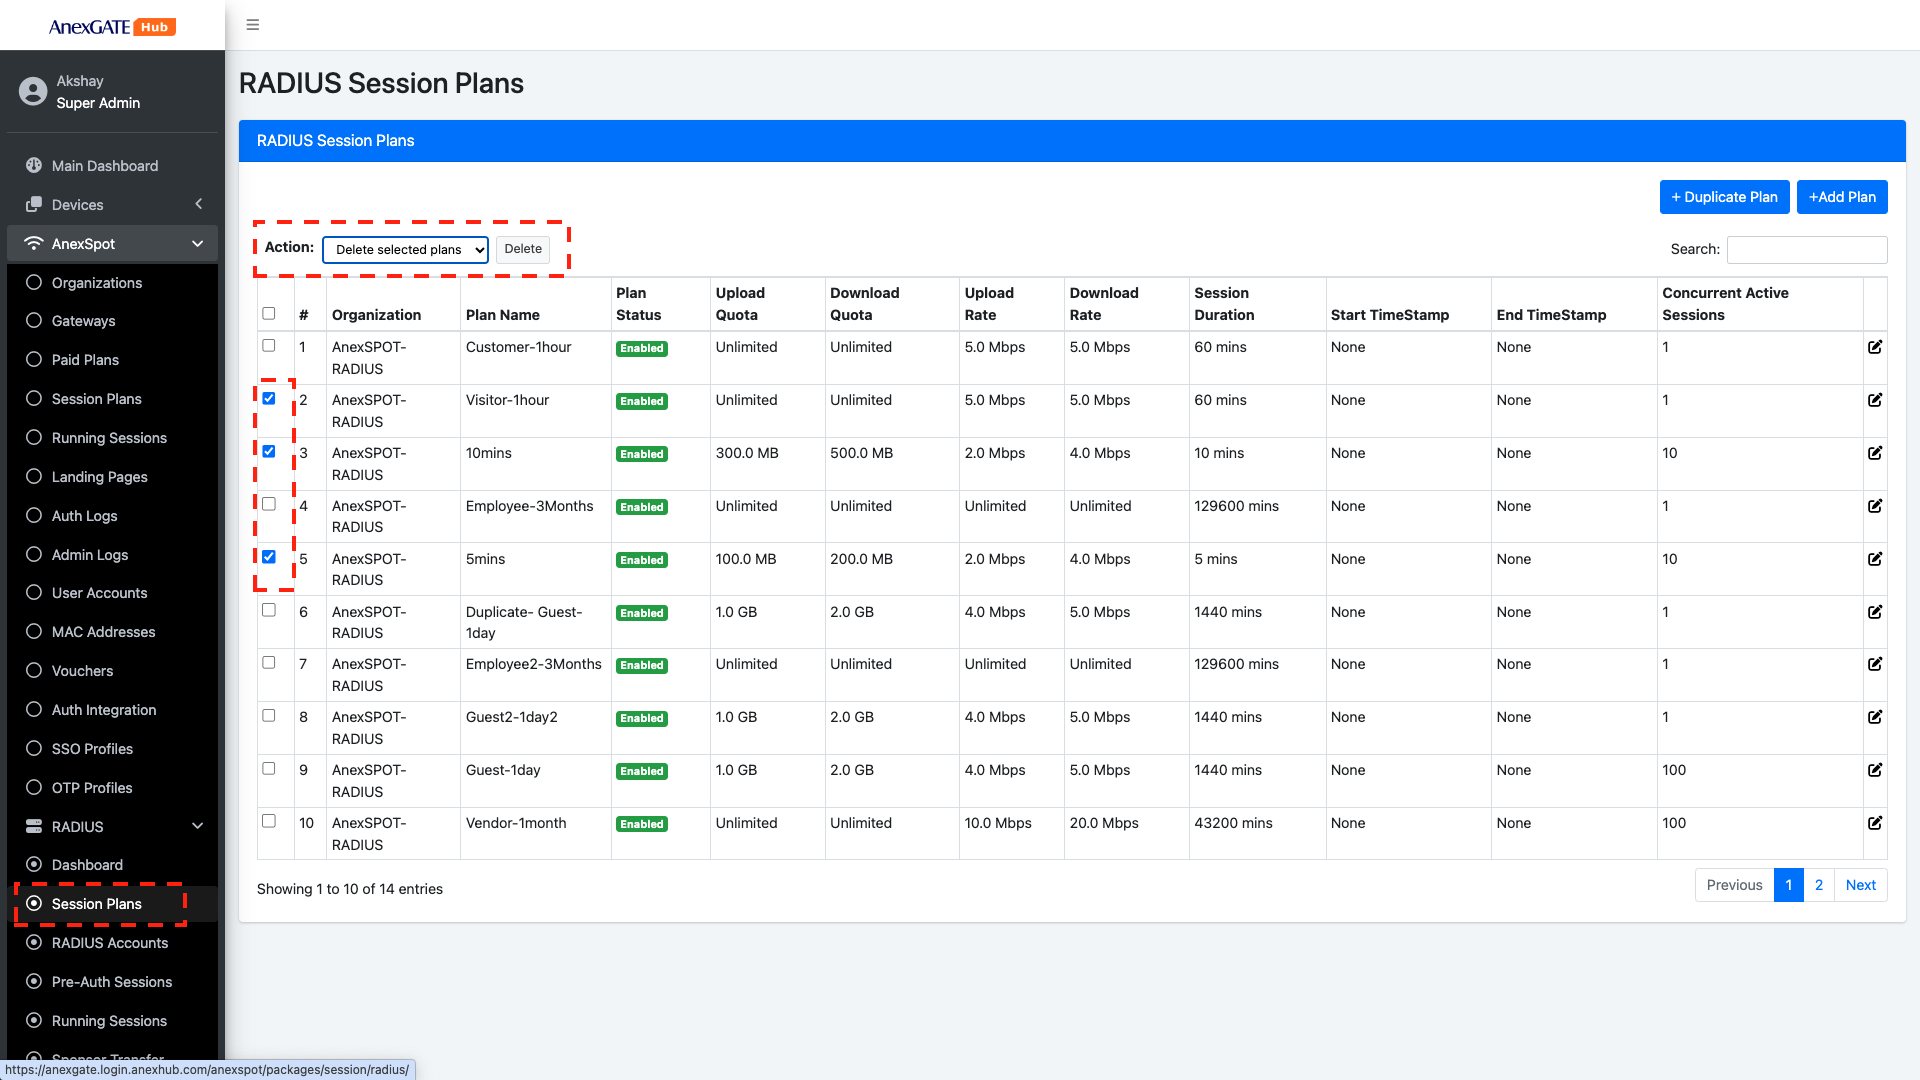
¶ Removing Session Plans
The configured Session plans can be deleted by selecting the plans and under Action Select Delete Selected Plans and click on Delete as shown in the image.
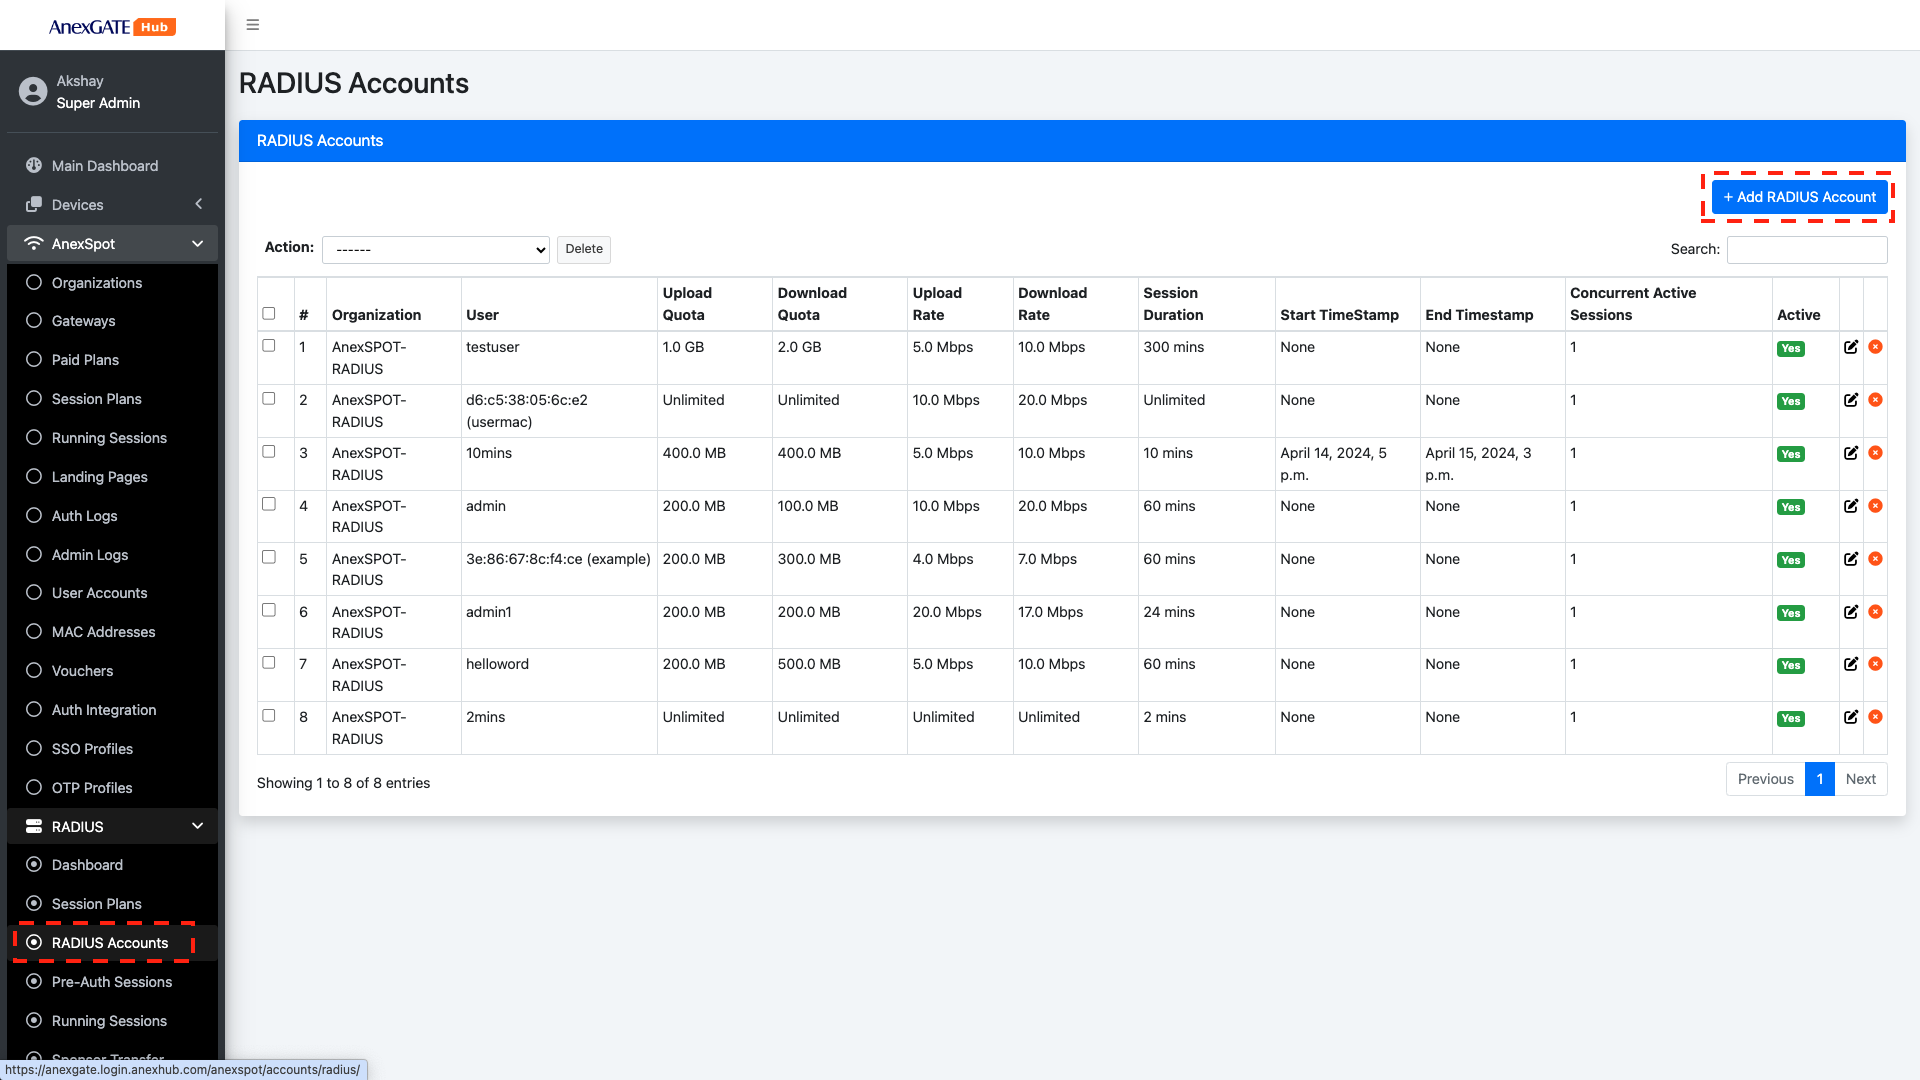
¶ RADIUS Accounts
Radius Accounts manage user credentials for login with other relative parameters for respective Organizations.
There are two types of RADIUS Accounts -
- Username/Password Based Auth
- MAC Based Auth
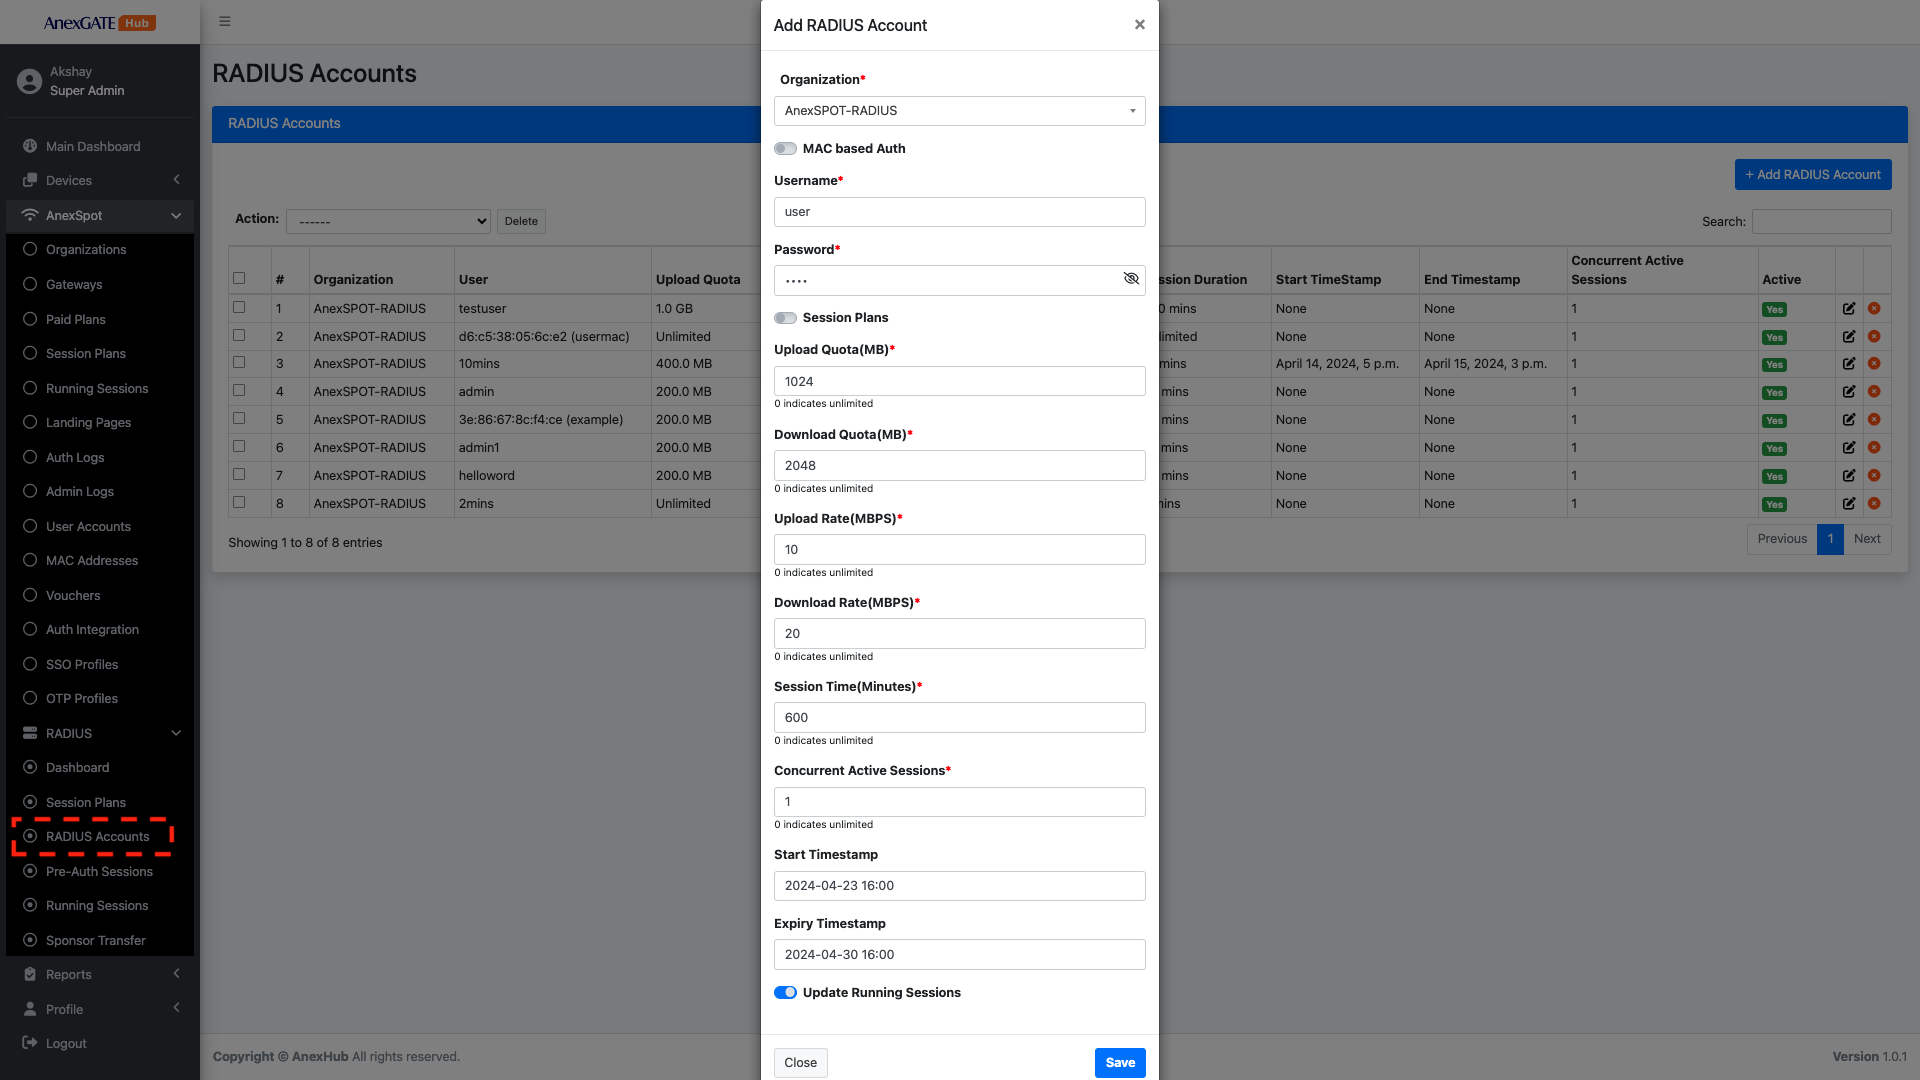
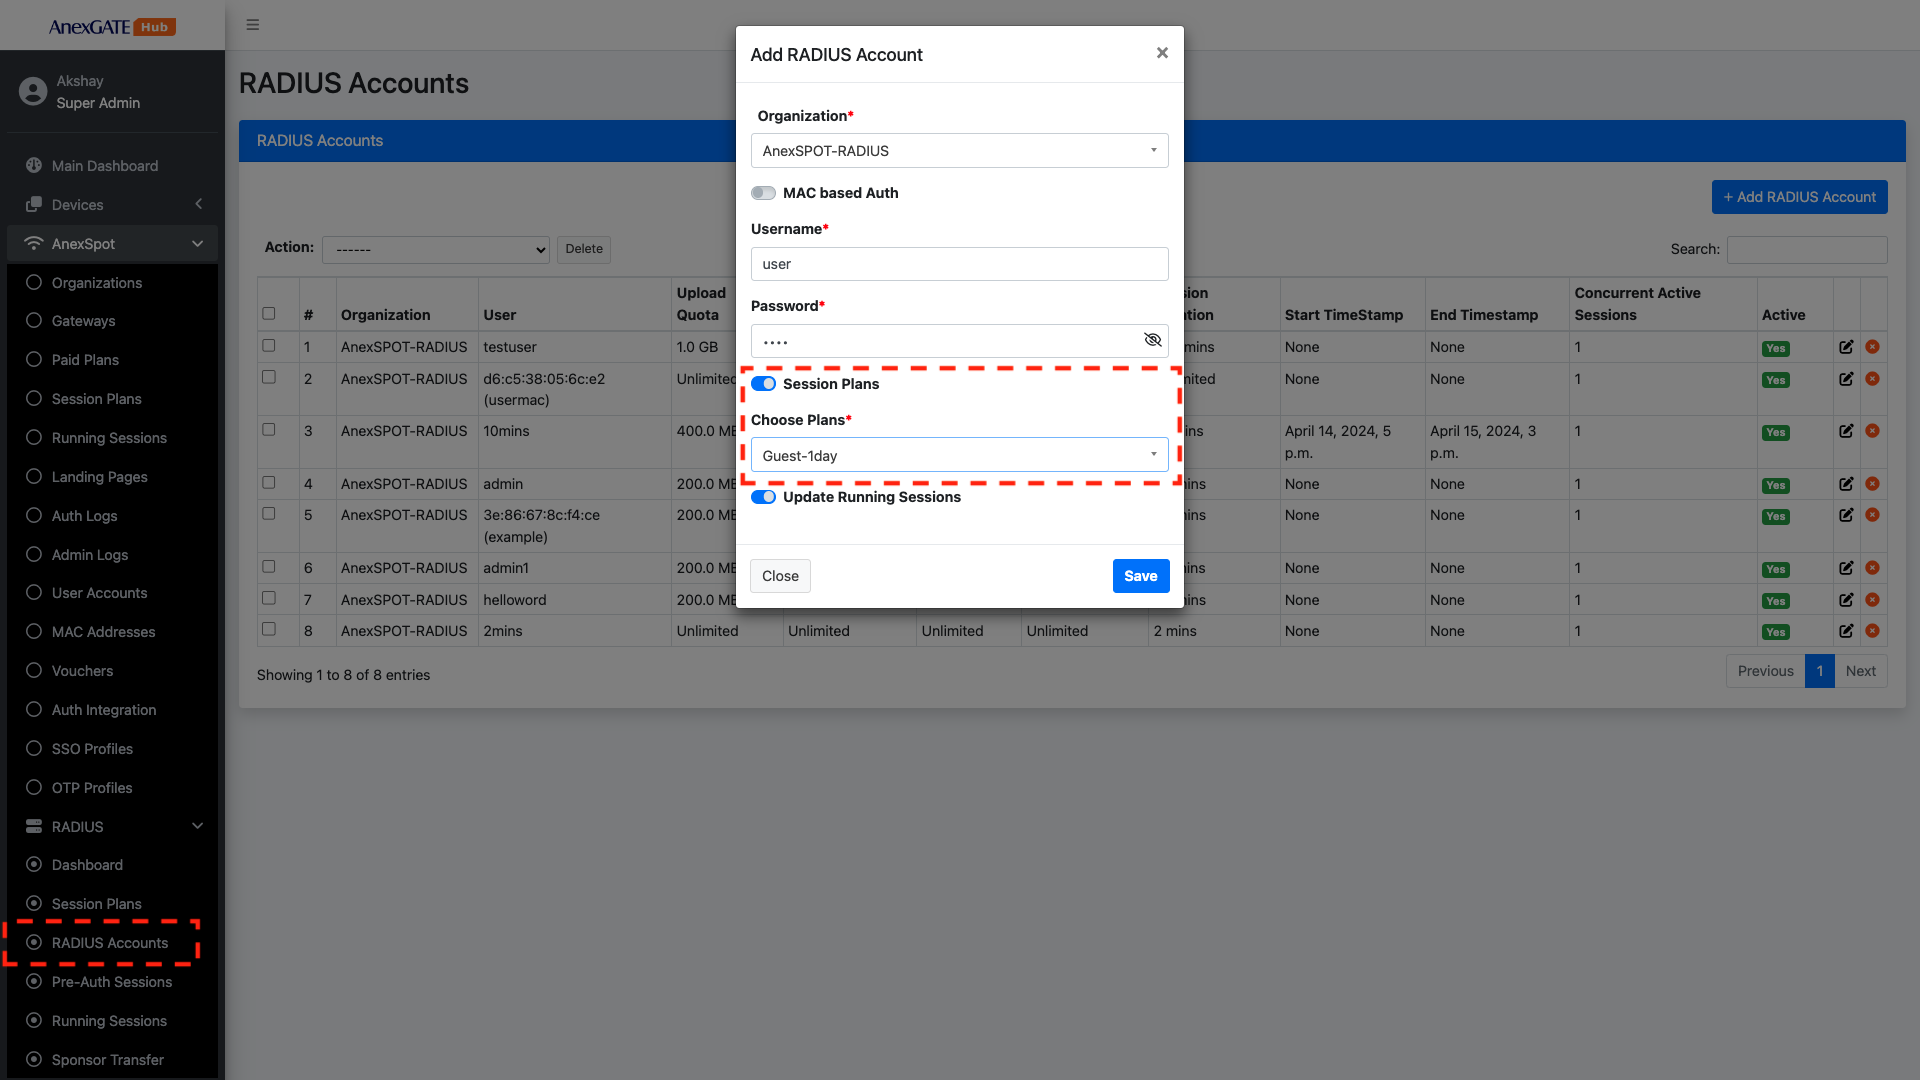
¶ RADIUS Account - Username/Password Based AUTH
To configure Username Based Auth, Go to -
AnexSPOT>RADIUS>RADIUS Accounts- Click on
+Add Radius Accountbutton located at the Top Right Corner. - Configure
Username Based Authwith their respective networking parameters.
Following are the parameters needed to configure a Username based Auth under AnexSPOT RADIUS.
|
Elements |
Description |
|---|---|
| Organization | Select an organization for the RADIUS Client from the drop down menu. |
| MAC Based Auth | Disable the Auto MAC Login for User Pass based AuthN/AuthZ. |
| Username | Enter Username credential for user Login. |
| Password | Enter Password credential for user Login. |
| Session Plans |
The Session plan are pre-configured network param templates which when enabled the user can be assigned a certain session plan which will save time of configured each network params manually. Toggle the session plan and choose any of the plans configured under Radius Session Plans shown in the drop-down. Note - If enabled, the network parameters like Upload/Download Quota/Rate gets hidden and session plans are displayed in the drop down. |
| Upload Quota (MB) | Specify Upload Quota limit in terms of mb, for the user after successful login. Once the user crosses the limit, they will be logged out of the session. |
| Download Quota (MB) | Specify Download Quota limit in terms of mb, for the user after successful login. Once the user crosses the limit, they will be logged out of the session. |
| Upload Rate (MBPS) | Specify Upload Bandwidth/Speed Rate limit in terms of mbps, for the user after successful login. Once the user crosses the limit, they will be logged out of the session. |
| Download Rate (MBPS) | Specify Download Bandwidth/Speed Rate limit in terms of mbps, for the user after successful login. Once the user crosses the limit, they will be logged out of the session. |
| Session Time (Minutes) | Specify Session limit in terms of minutes for the user after successful login. Once the user crosses the limit, they will be logged out of the session. |
| Concurrent Active Sessions | Specify the number of Concurrent Active Sessions the user can have using the same login credentials simultaneously. |
| Start/Expiry Timestamp | Assign the validity period for the Radius Account. The session plan will be valid for the given duration in terms of date and time. |
| Update Running Sessions | Enable this for COA requests to be validated for this USER/MAC based credentials to send to Radius Access Point. |
| SAVE | Save the configuration. |
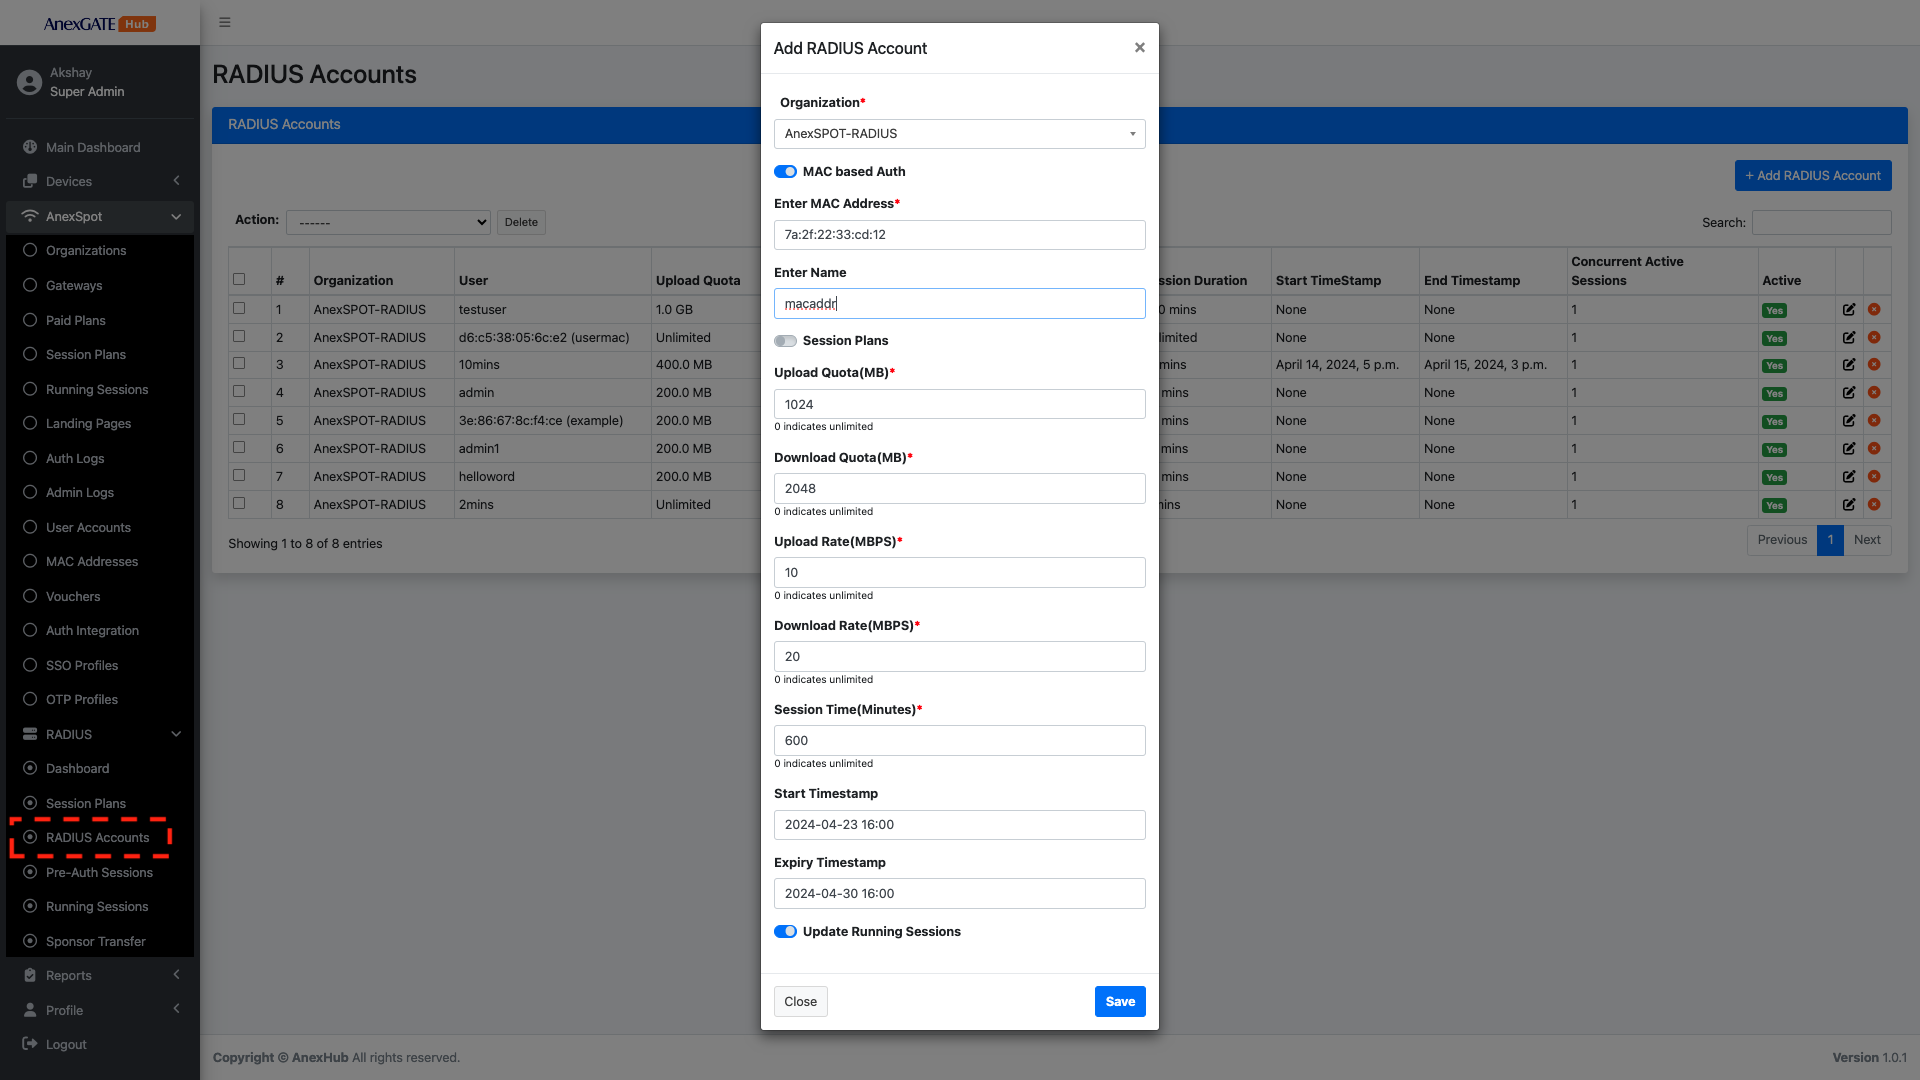
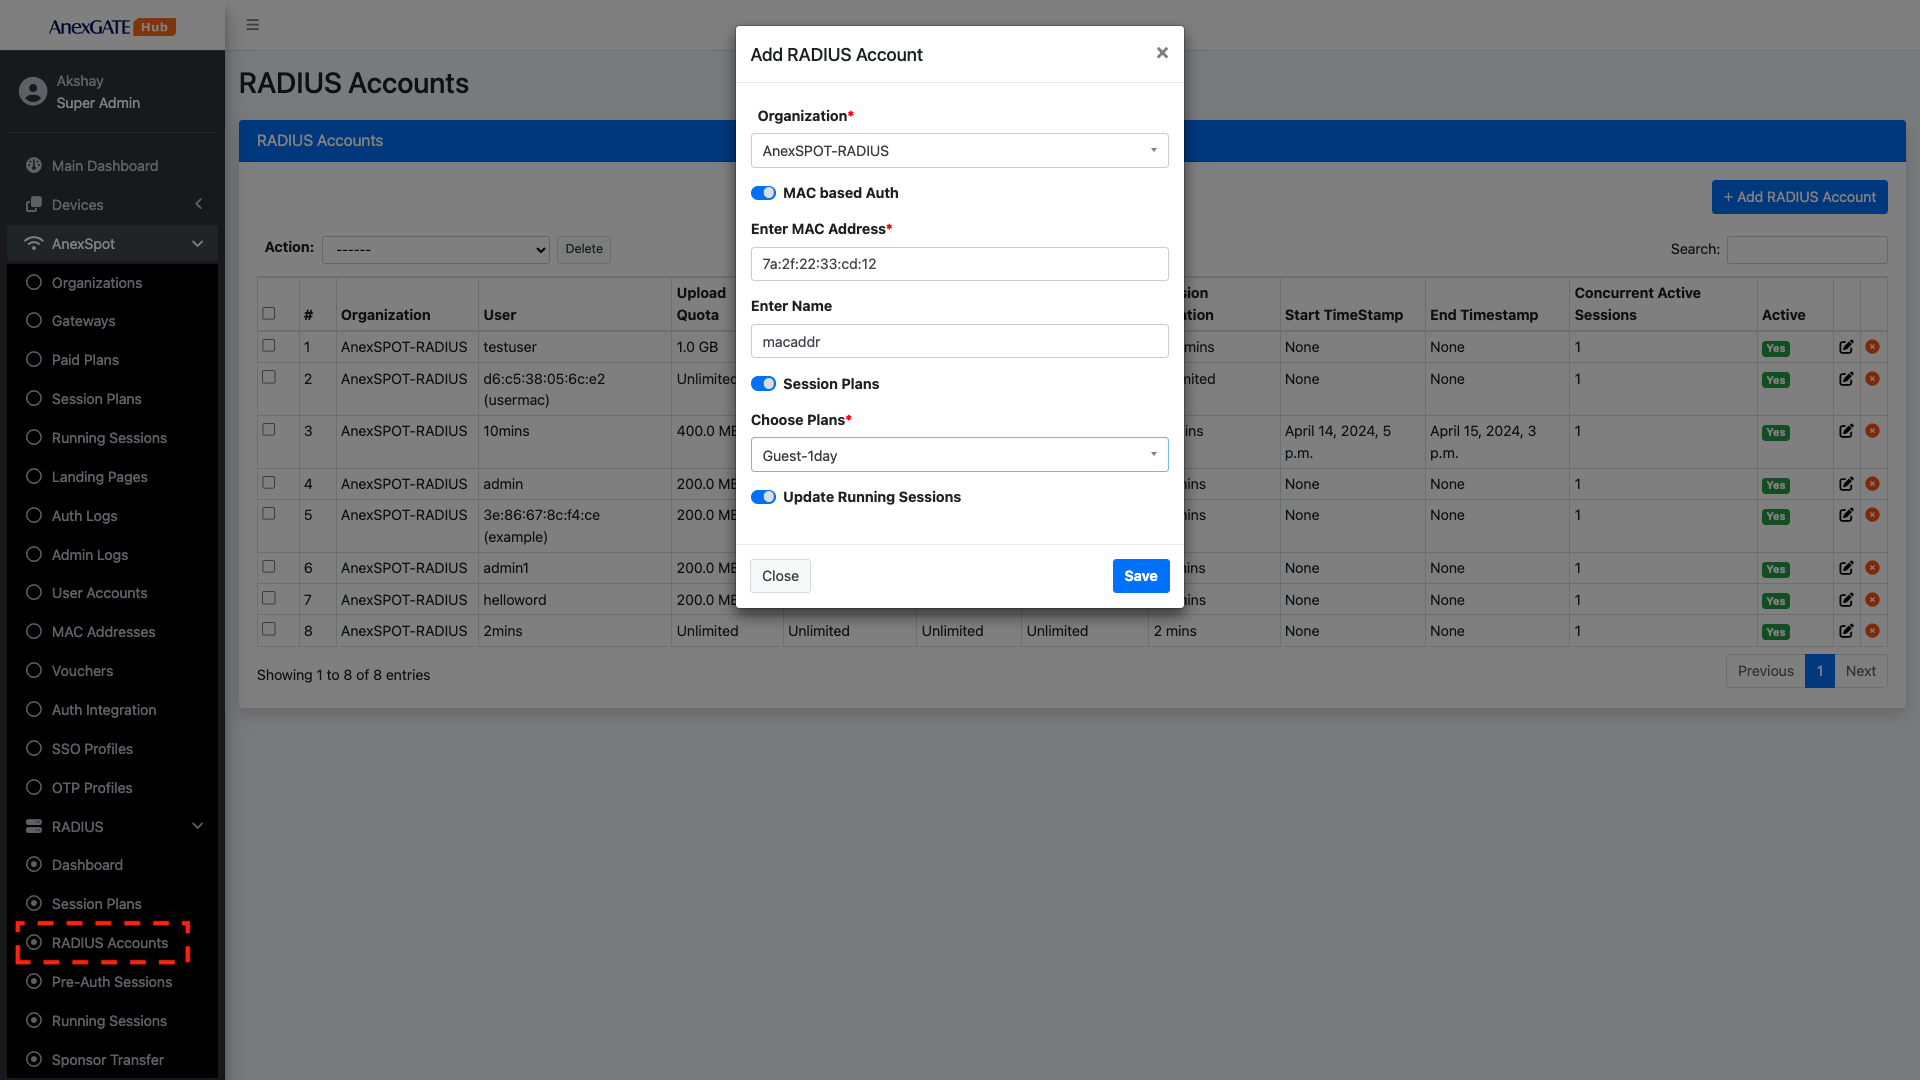
¶ RADIUS Account MAC Address Based AUTH
To configure Username Based Auth, Go to -
AnexSPOT>RADIUS>RADIUS Accounts- Click on
+ Add Radius Accountlocated at the Top Right Corner. - Configure
MAC Address based Authwith their respective networking parameters.
Following are the parameters needed to configure a Username based Auth under AnexSPOT RADIUS -
|
Elements |
Description |
|---|---|
| Organization | Select an organization for the RADIUS Client from the drop down menu. |
| Auto MAC Login | Enable the Auto MAC Login Toggle for MAC based AUTH. |
| Enter MAC Address | Enter MAC Address of the client device. |
| Session Plans |
The Session plan are pre-configured network param templates which when enabled the user can be assigned a certain session plan which will save time of configured each network params manually. Toggle the session plan and choose any of the plans configured under Radius Session Plans shown in the drop-down.
|
| Upload Quota(MB) | Specify Upload Quota limit in terms of mb, for the user after successful login. Once the user crosses the limit, they will be logged out of the session. |
| Download Quota(MB) | Specify Download Quota limit in terms of mb, for the user after successful login. Once the user crosses the limit, they will be logged out of the session. |
| Upload Rate(MBPS) | Specify Upload Bandwidth/Speed Rate limit in terms of mbps, for the user after successful login. Once the user crosses the limit, they will be logged out of the session. |
| Download Rate(MBPS) | Specify Download Bandwidth/Speed Rate limit in terms of mbps, for the user after successful login. Once the user crosses the limit, they will be logged out of the session. |
| Session Time(Minutes) | Specify the number of Concurrent Active Sessions the user can have using the same login credentials simultaneously. |
| Update Running Sessions | Enable this for COA requests to be validated for this USER/MAC based credentials to send to Radius Access Point. |
| SAVE | Save the configuration. |
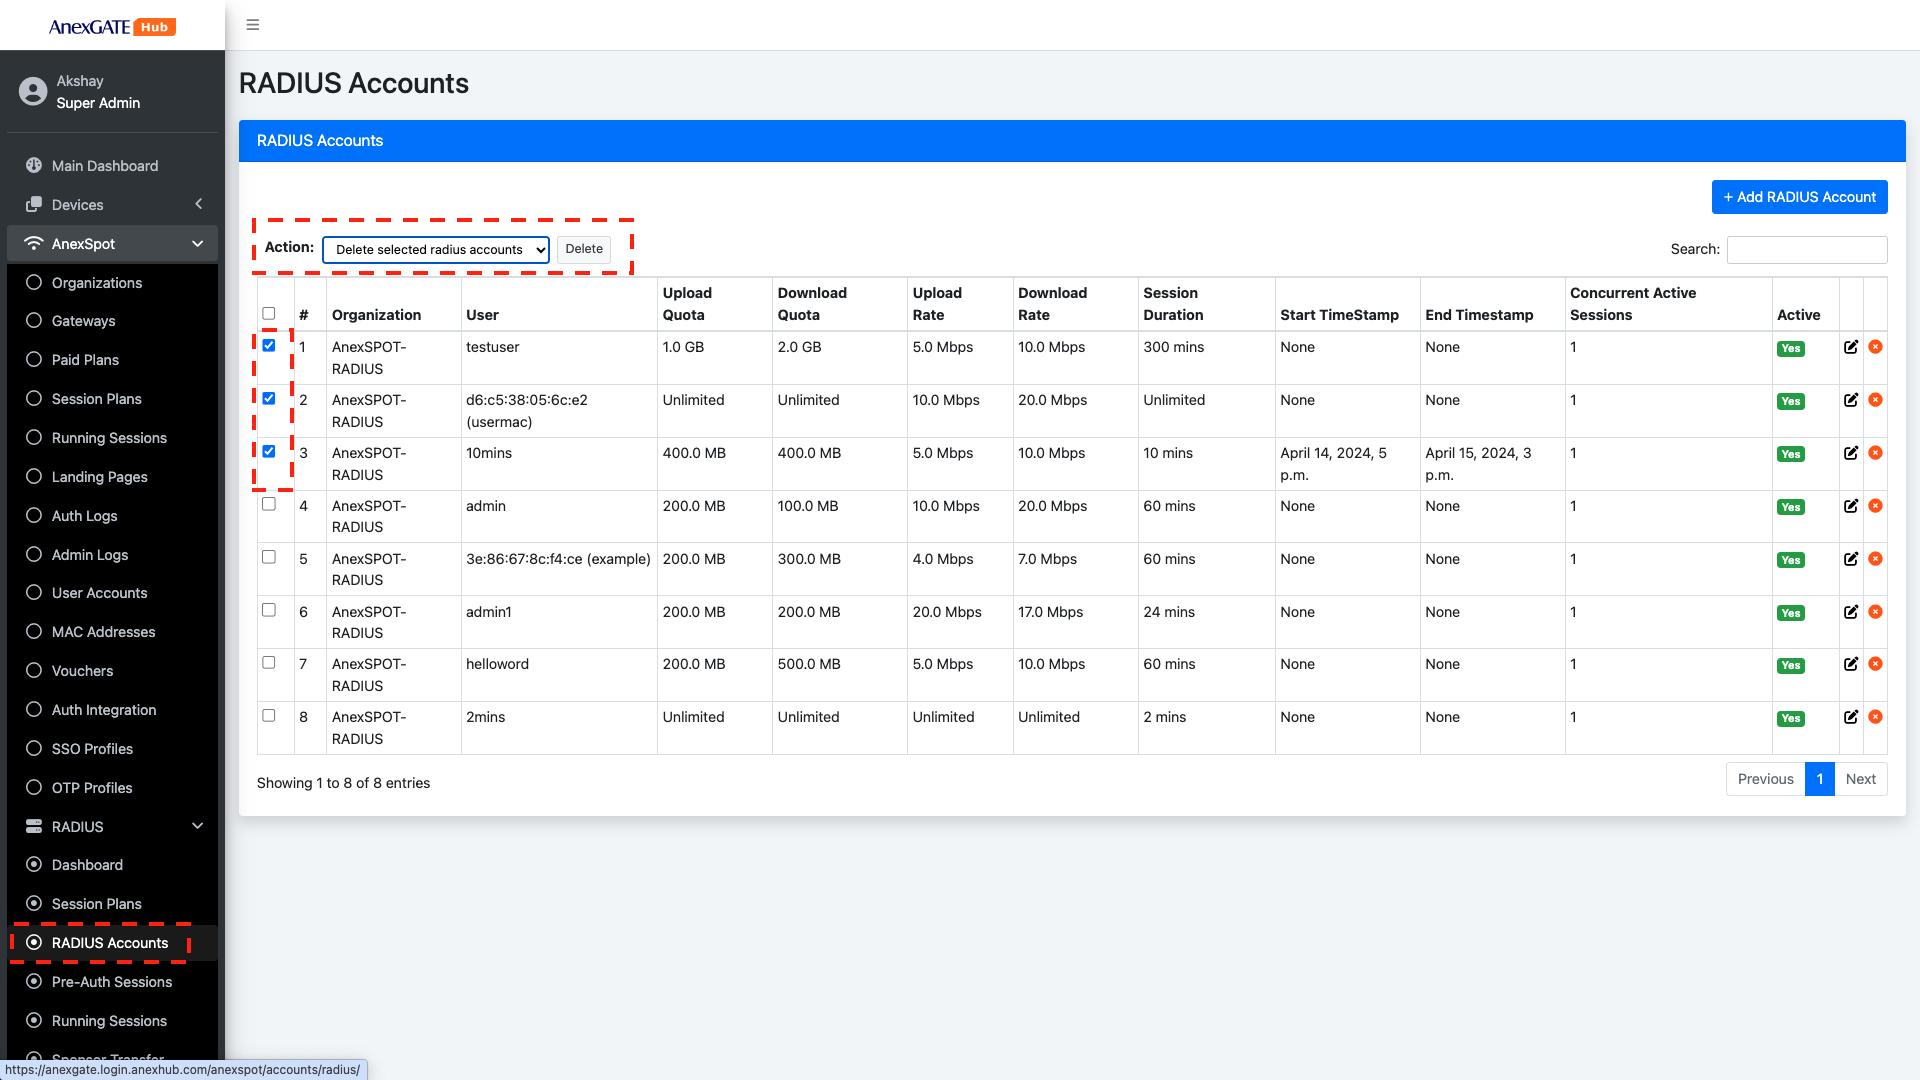
¶ Delete RADIUS Accounts
The configured RADIUS Accounts can be deleted by selecting the accounts and under Action, Select Delete RADIUS Selected Accounts and click on Delete as shown in the image.
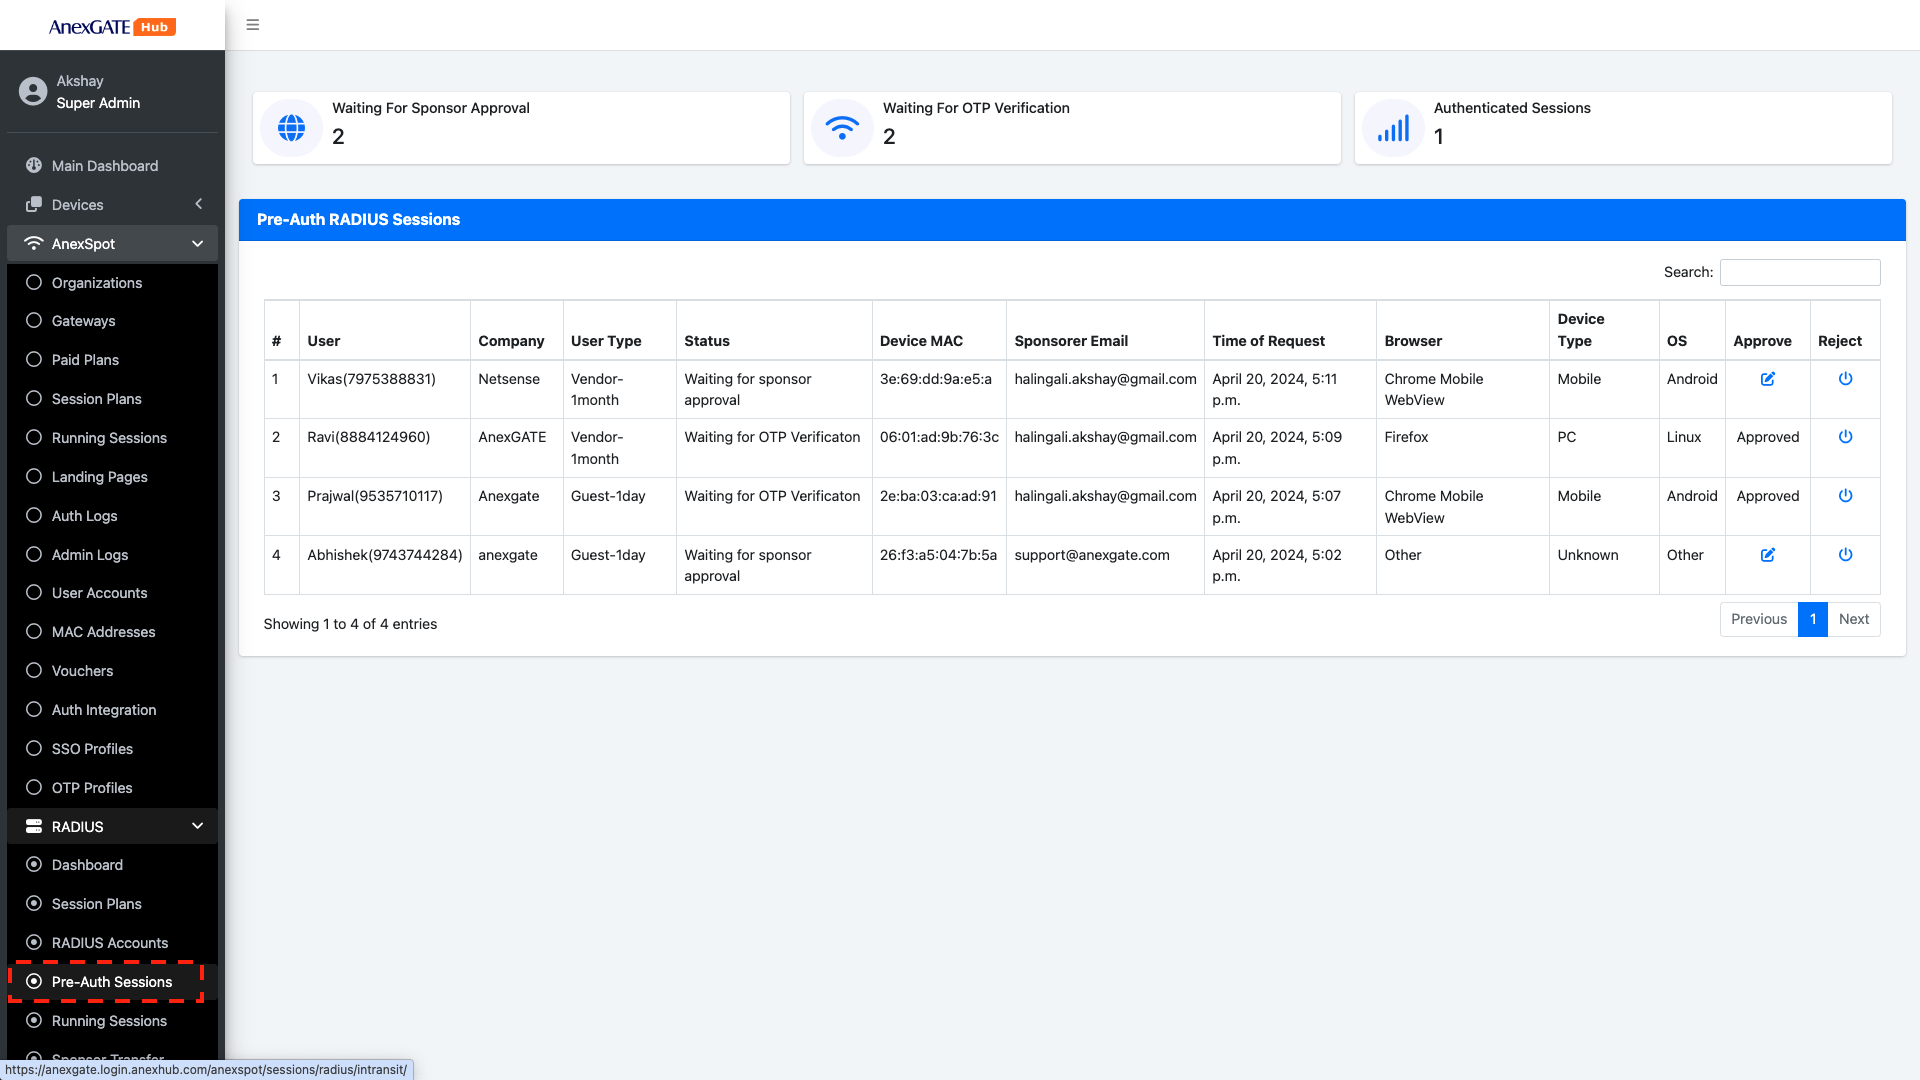
¶ RADIUS Pre-Auth Sessions
RADIUS Pre-Auth Sessions are the sessions captured by the RADIUS server where User submits required information and provides a valid Sponsor mail and requests for the Internet Access. Once the required information has been sent to the sponsor. The Sponsor will have a authority to ACCEPT or DENY the received request for Internet Access.
RADIUS Pre-Auth Session displays a summary of Users that are in the midway of Login process -
- Waiting for sponsor Approval - The user is expecting the sponsor to approve the request sent by his device including the required information for Internet Access.
- Waiting for OTP Verificaiton - The user has been approved by the Sponsor. The user must proceed to generate an OTP in order to login and get Internet Access.
- Authenticated Session - The user has been approved by the Sponsor and the user has successfully authenticated after generating OTP.
Following are the parameters displayed to the Sponsor once the User gets the Captive Portal Login Page and provides the information.
|
Elements |
Description |
|---|---|
| User | Displays the user entered username information with Mobile Number. |
| Company | Displays the Company name the user has input during the Login. |
| User Type | Displays the User Type plan chosen by the user during the Login process. |
| Status |
Displays the current Status of the USER Login process. The Status will be as follows -
|
| Device MAC | Displays the Device MAC Address of the user attempting to login. |
| Sponsorer Email | The Sponsorer email will be displayed where the user inputs a valid Sponsor mail id and submits the request for access to the internet. |
| Time of Request | Displays the Time of Login after Approval request sent to sponsor by the user for login process. |
| Browser | Displays the browser name used by the user for login process. |
| Device Type | Displays the Type of Device used for login process. Example - Mobile, Tablet, Laptop… |
| OS | Displays the operation system of the device used for login process |
| Approve | Allow the User by approving the request for Internet Access. Clicking Approve will display the login as Approved and will prompt the user to generate an OTP for verification purpose. |
| Reject | Deny the User from getting access to the Internet. |
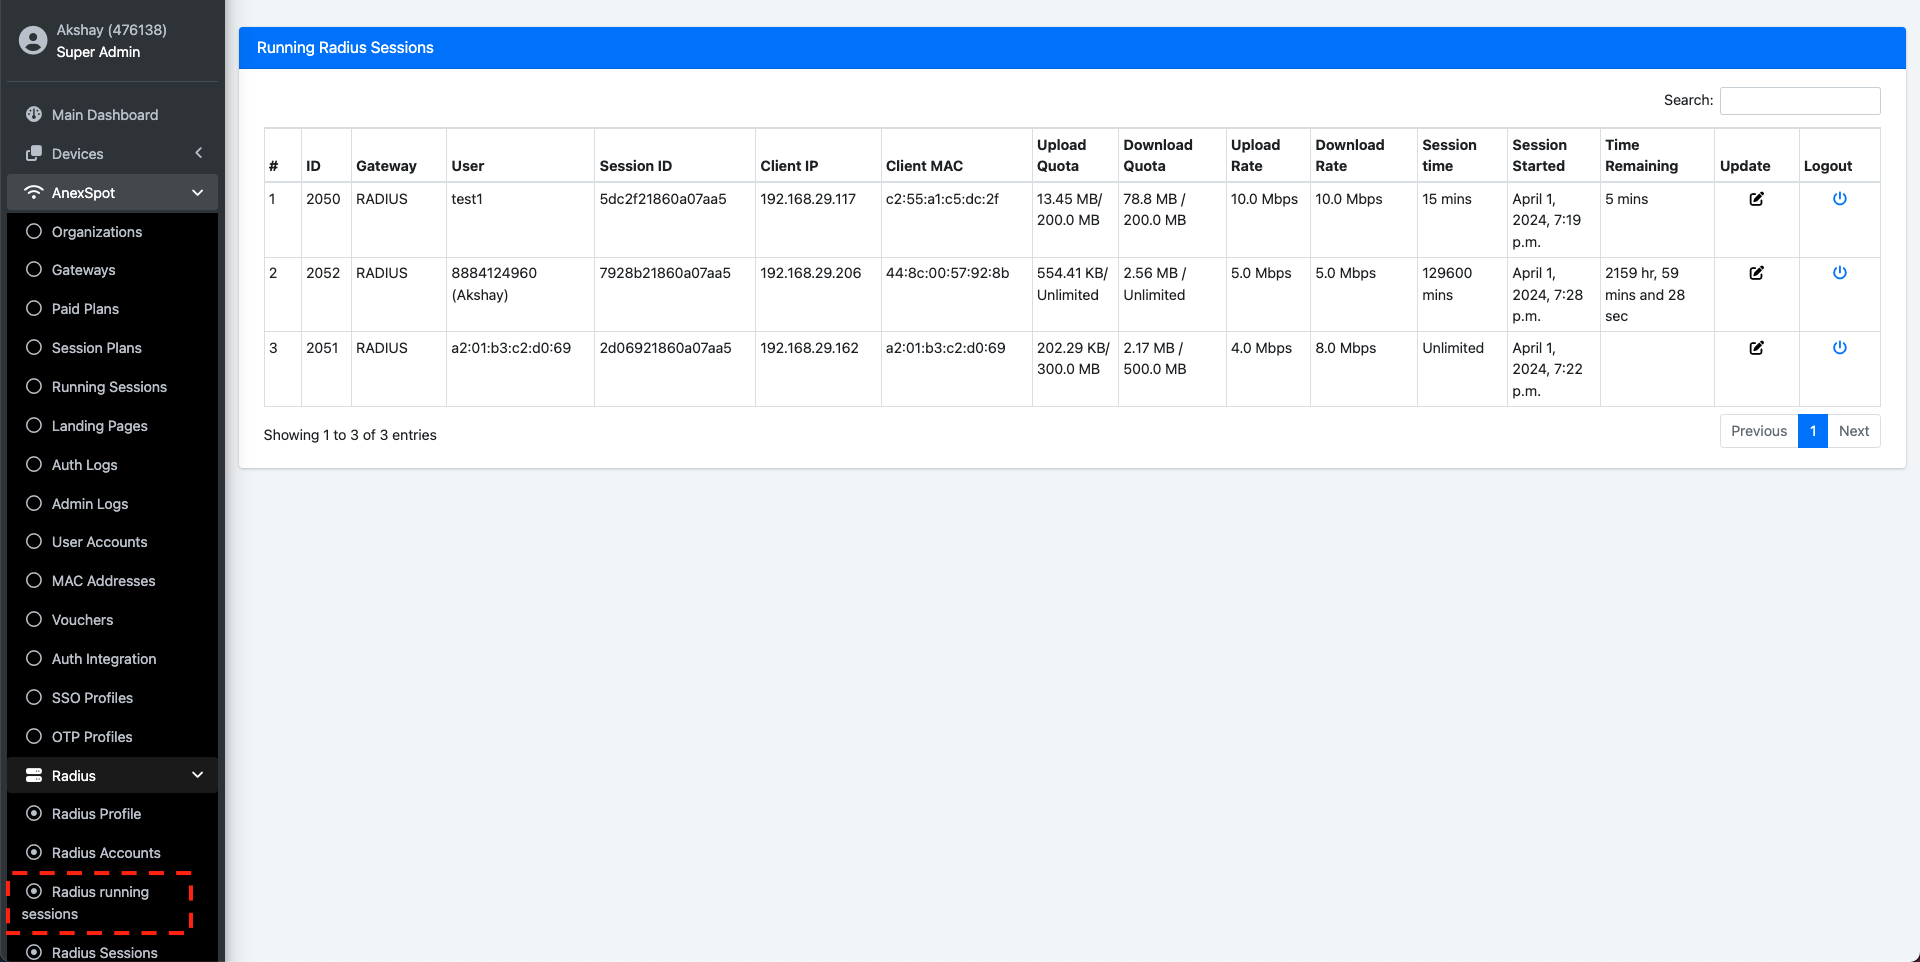
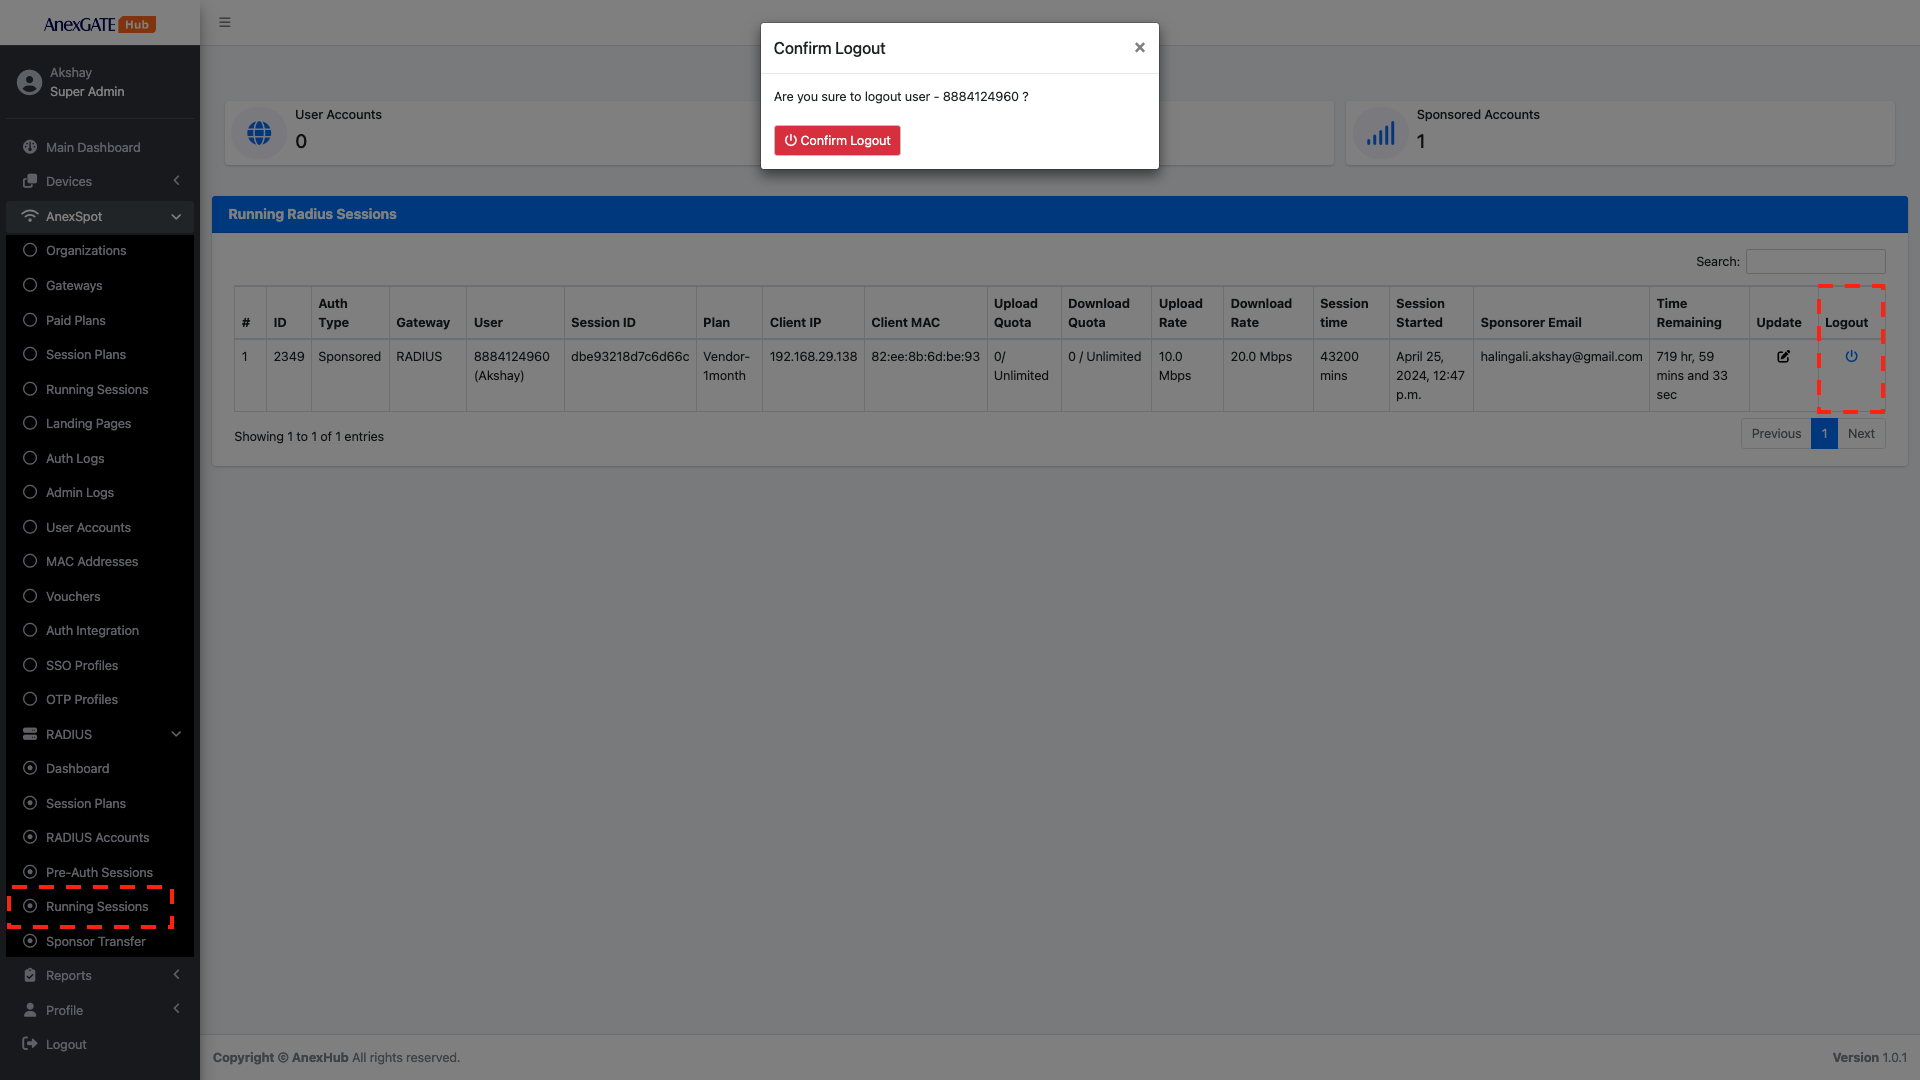
¶ RADIUS Running Sessions
Radius Running Sessions display current Live Running user session after the client devices have been successfully authenticated using various Login methods.
The Radius Running Sessions include various networking Parameters as below -
|
Elements |
Description |
|---|---|
| ID | Displays a unique ID assigned to successfully authenticated User via RADIUS Protocol. |
| User | Displays user information who has been successfully authenticated with the login credentials. |
| Session ID | Displays unique account session ID generated for the user after successful login. |
| Plan | Displays the Session plan type selected by the user. |
| Client IP | Displays IP Address of the user under client Radius network. |
| Client MAC | Displays MAC Address of the user under client Radius network. |
| Upload Quota | Displays Upload Quota limit in terms of mb, for the user after successful login. Once the user crosses the limit, they will be logged out of the session. |
| Download Quota | Displays Download Quota limit in terms of mb, for the user after successful login. Once the user crosses the limit, they will be logged out of the session. |
| Upload Rate | Displays Upload Bandwidth/Speed Rate limit in terms of mbps, for the user after successful login. Once the user crosses the limit, they will be logged out of the session. |
| Download Rate | Displays Download Bandwidth/Speed Rate limit in terms of mbps, for the user after successful login. Once the user crosses the limit, they will be logged out of the session. |
| Session Time | Specify Session limit in terms of minutes for the user after successful login. Once the user crosses the limit, they will be logged out of the session. |
| Session Started | Displays the Date and Time of the user session once the client has been successfully Logged in. |
| Sponsorer Email | Displays the Email id of the Sponsor who has approved the user for the Access of the internet resources. |
| Time Remaining | Displays the Time Remaining for the Successful Logged in Client if Limited Session Time has been assigned for the client. |
| Update | Click on update to modify the assigned networking parameters when the Session has been started initially. The COA Request is sent to the controller once the parameters have been modified and saved. |
| Logout | Click on Logout icon to force logout the successful authenticated client. |
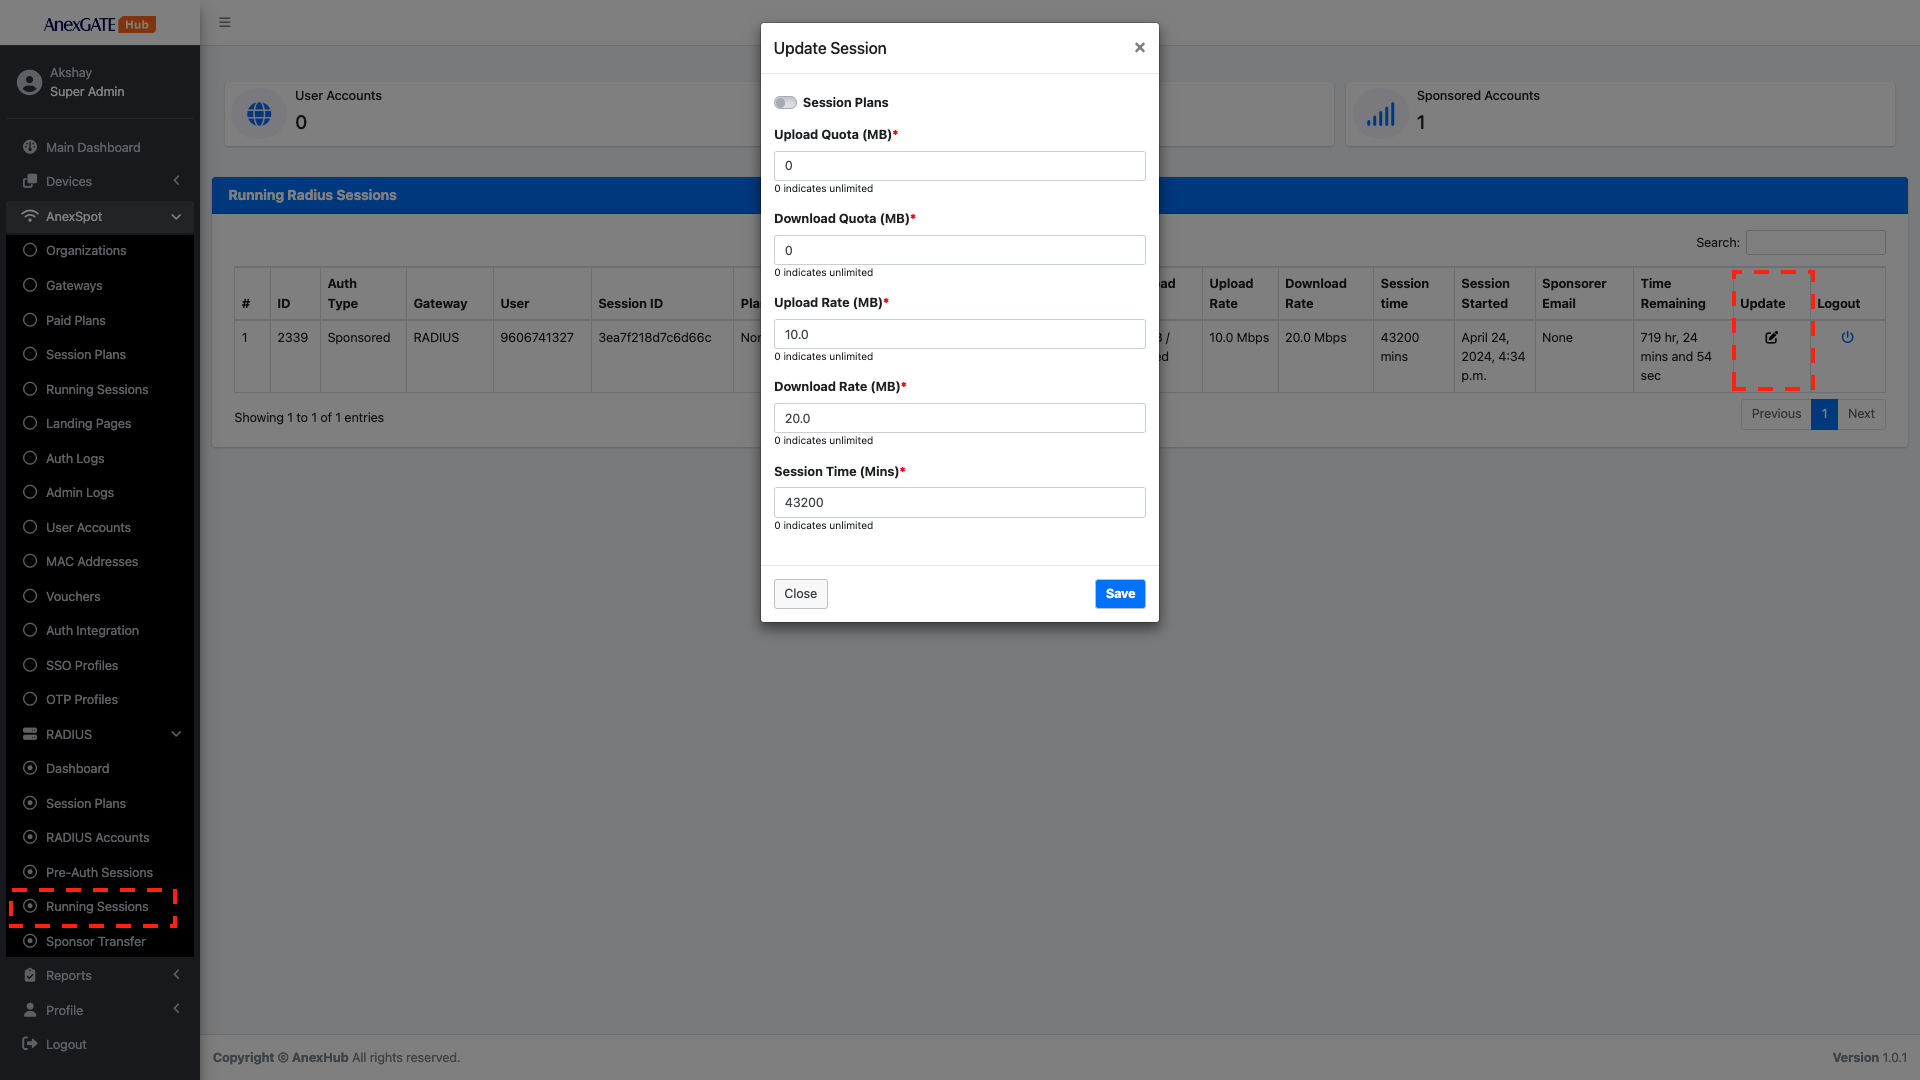
¶ RADIUS Change Of Authorization [COA]
Radius Running sessions provide an ability to modify user radius parameters (Attributes).
To modify the user radius parameters, Go to -
AnexSPOT>Radius>Radius Running Sessions- Under
Radius Running Sessions, Click on theUpdateIcon located under Update column at the right end of the Running Radius user session parameters. - The
Updateoption provides two methods for sending a COA to existing Authenticated RADIUS User.- Modify the Radius Parameters under
Update Sessionmanually and Click on SAVE. - Toggle
Session Plansbutton and choose pre-existing session plans configured under RADIUS Session Plans.
- Modify the Radius Parameters under
- A
COA Requestis sent from RADIUS to NAS Controller onport 3799.
RADIUS PARAMETERS FOR COA
Following are the Radius parameters under Live Running Radius Sessions that can be modified -
|
Elements |
Description |
|---|---|
| Upload Quota(MB) | Specify Upload Quota limit in terms of mb, for the user after successful login. Once the user crosses the limit, they will be logged out of the session. |
| Download Quota(MB) | Specify Download Quota limit in terms of mb, for the user after successful login. Once the user crosses the limit, they will be logged out of the session. |
| Upload Rate(MBPS) | Specify Upload Bandwidth/Speed Rate limit in terms of mbps, for the user after successful login. Once the user crosses the limit, they will be logged out of the session. |
| Download Rate(MBPS) | Specify Download Bandwidth/Speed Rate limit in terms of mbps, for the user after successful login. Once the user crosses the limit, they will be logged out of the session. |
| Session Time(Minutes) | Specify the number of Concurrent Active Sessions the user can have using the same login credentials simultaneously. |
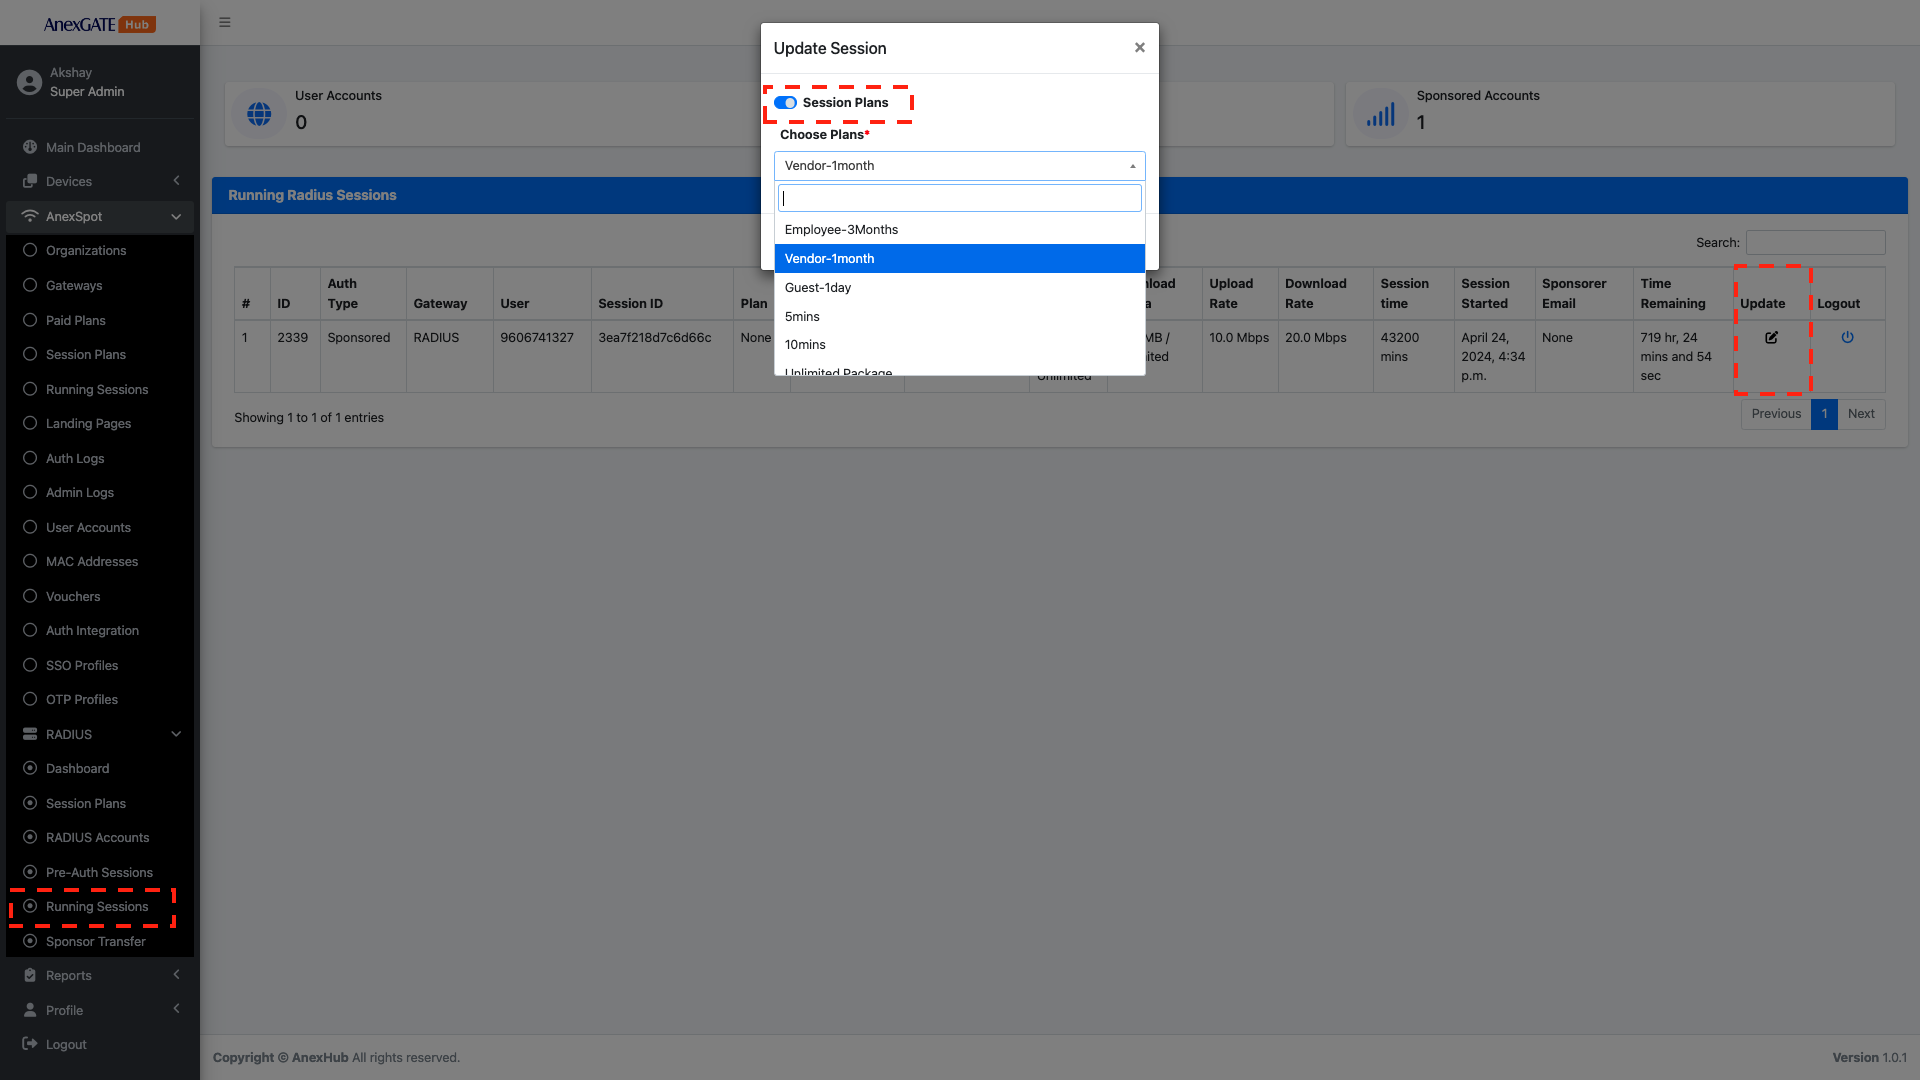
¶ SESSION PLAN USER TYPE COA
Click on the Toggle key and enable Session Plans.
- Select a Session Plan from the existing Choose UserType/Session Plans drop-down menu.
NOTE - Sessions Plans must be pre-configured under RADIUS Session Plans in order the Session plan type to show under the drop-down menu.
¶ RADIUS [LOGOUT SESSION]
Radius Packet of Disconnect is a COA Request message that is sent from the RADIUS Server to NAS Controller or Client in order to block the access of the network of a specific Authenticated client by sending a Force logout/disconnect message COA.
To Logout a Radius Client from the AnexSPOT Radius Server. Go to -
AnexSPOT>Radius>Radius Running Sessions- Under
Radius Running Sessions, Click on theLogoutIcon locate at the right end of the Running Radius user session parameters. - Click on
Confirm Logoutprompt to successfully force Logout a session from the Admin end.
¶ SPONSOR TRANSFER
Sponsor Transfer is basically the transferring of authority of sponsor approved running sessions to another sponsor.
For Sponsor Transfer, Go to -
AnexSPOT-RADIUS-Sponsor Transfer
Sponsor Transfer can be carried out by both Super Admin as well as the Partner under their respective Portal accounts.
- Super Admin has an ability to choose the sponsor approved accounts to be transferred from one sponsored account mail to another sponsored account mail. The admin can choose from displayed emails from the drop-down under
Transfer from EmailandTransfer to Email. - In the partner account, the partner user will have the provision to select the mail of the sponsor from the drop under
Transfer To Emailto transfer the authority of approved user logins.
Note - In order to transfer the sponsor approved accounts, the email id must be already present under Registered Sponsors under Gateway configuration.
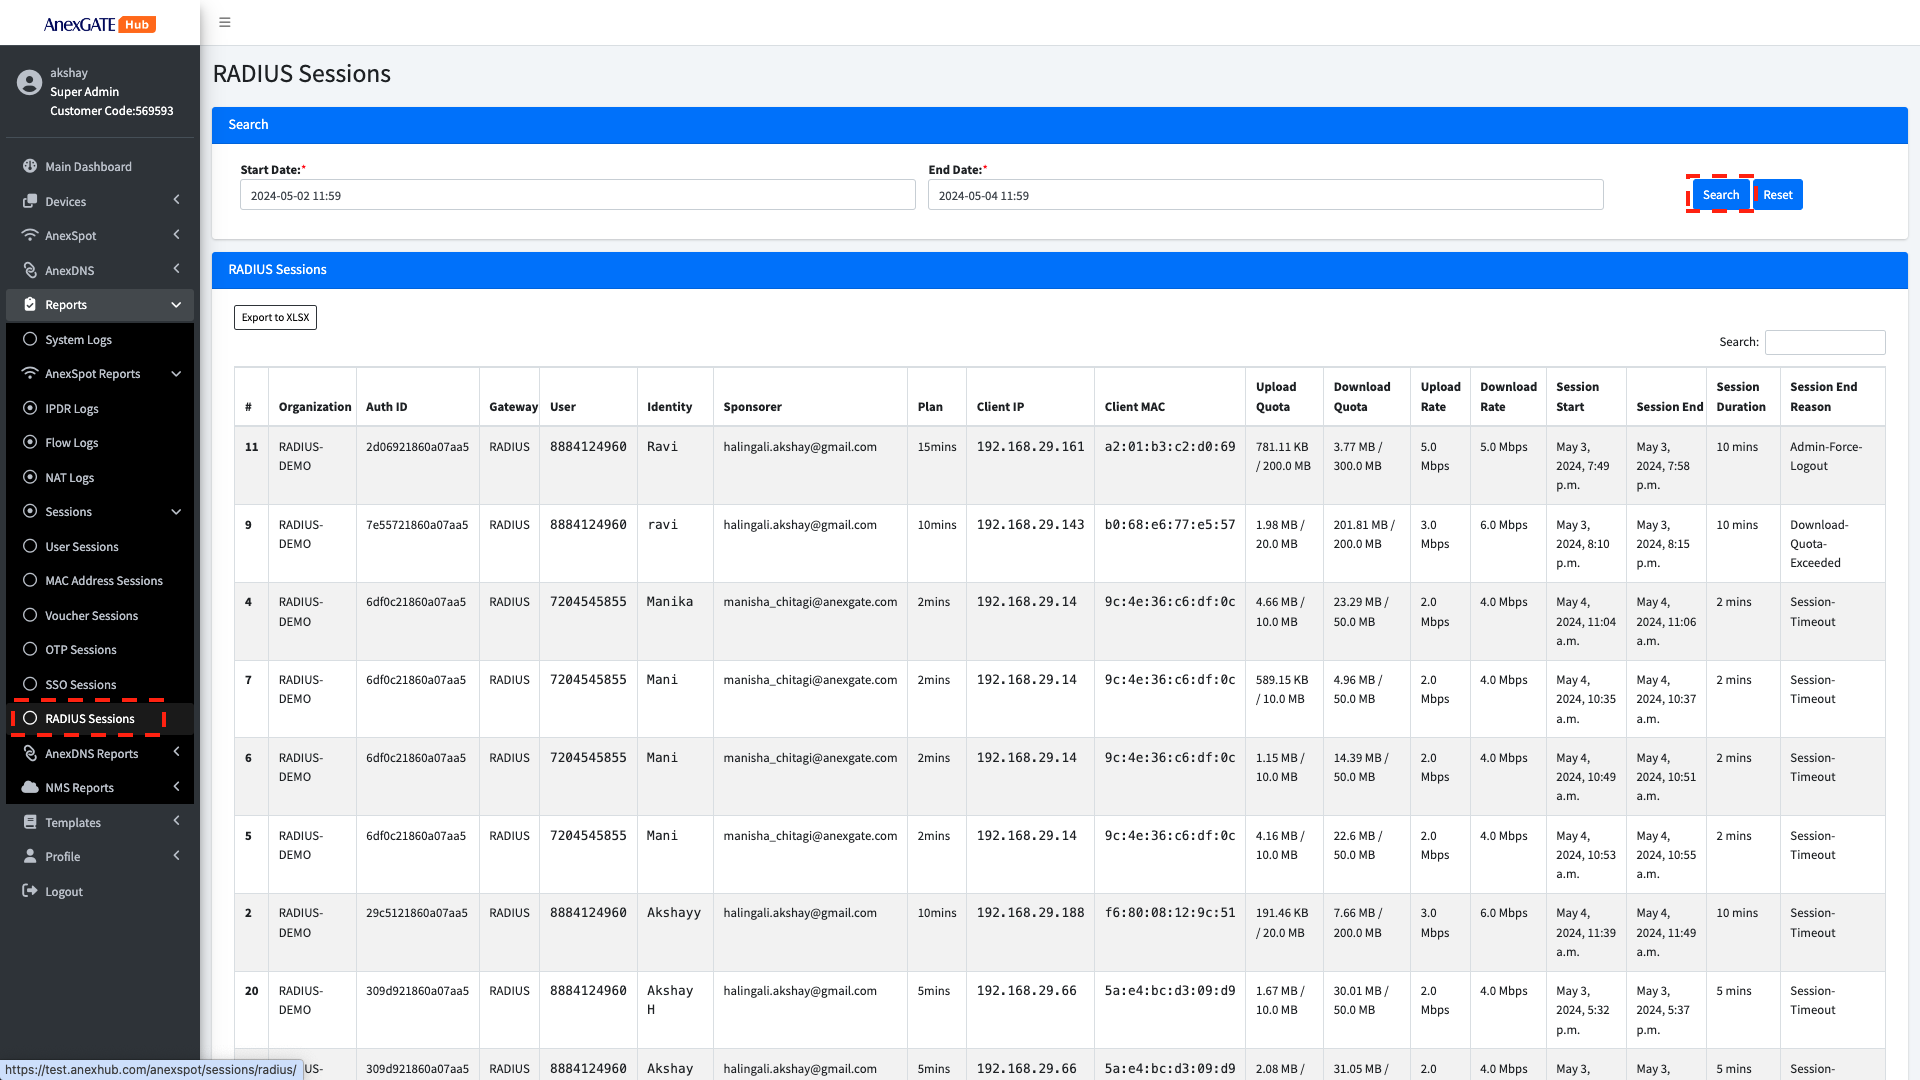
¶ RADIUS Sessions
RADIUS Sessions display the detailed report of old sessions which have been logged out.
To view previous Radius Session Go to -
Reports>AnexSPOT Reports>Radius Sessions- Specify
Start dateandEnd dateunder Search to view older Radius Sessions. Radius Sessionslogs can be exported in XLSX Format.
Following are the radius parameters, that are displayed under RADIUS Sessions -
|
Elements |
Description |
|---|---|
| Organization | Displays the organization of the successfully authenticated User credentials via RADIUS Protocol. |
| Auth ID | Displays the Authentication ID who was successfully authenticated with provided login credentials. |
| Gateway | Displays the RADIUS Gateway of the user after successfull logout. |
| User | Displays the user/mobile provided during authentication. |
| Identity | Displays the name or identity of the user. |
| Sponsorer | Displays the sponsorer mail id for the approved user session. |
| Plan | Displays the Plan/Usertype allocated for the user session. |
| Client IP | Displays the IP Address of the user under client Radius network. |
| Client MAC | Displays the MAC Address of the user under client Radius network. |
| Upload Quota | Displays total Upload Quota consumed in terms of mb, during the user's session till it was logged out. |
| Download Quota | Displays total Download Quota consumed in terms of mb, during the user's session till it was logged out. |
| Upload Rate | Displays Upload Bandwidth/Speed Rate limit in terms of mbps. |
| Download Rate | Displays Download Bandwidth/Speed Rate limit in terms of mbps. |
| Session Start | Displays Session Start for user after successful login. |
| Session End | Displays Session End for the user session once the client got logged out. |
| Session Duration | Displays the total Session Duration of the user from Session Start till Session End. |
| Session End Reason |
Displays the reason for the user session Logout. Following are the Logout Reasons for the user session -
|
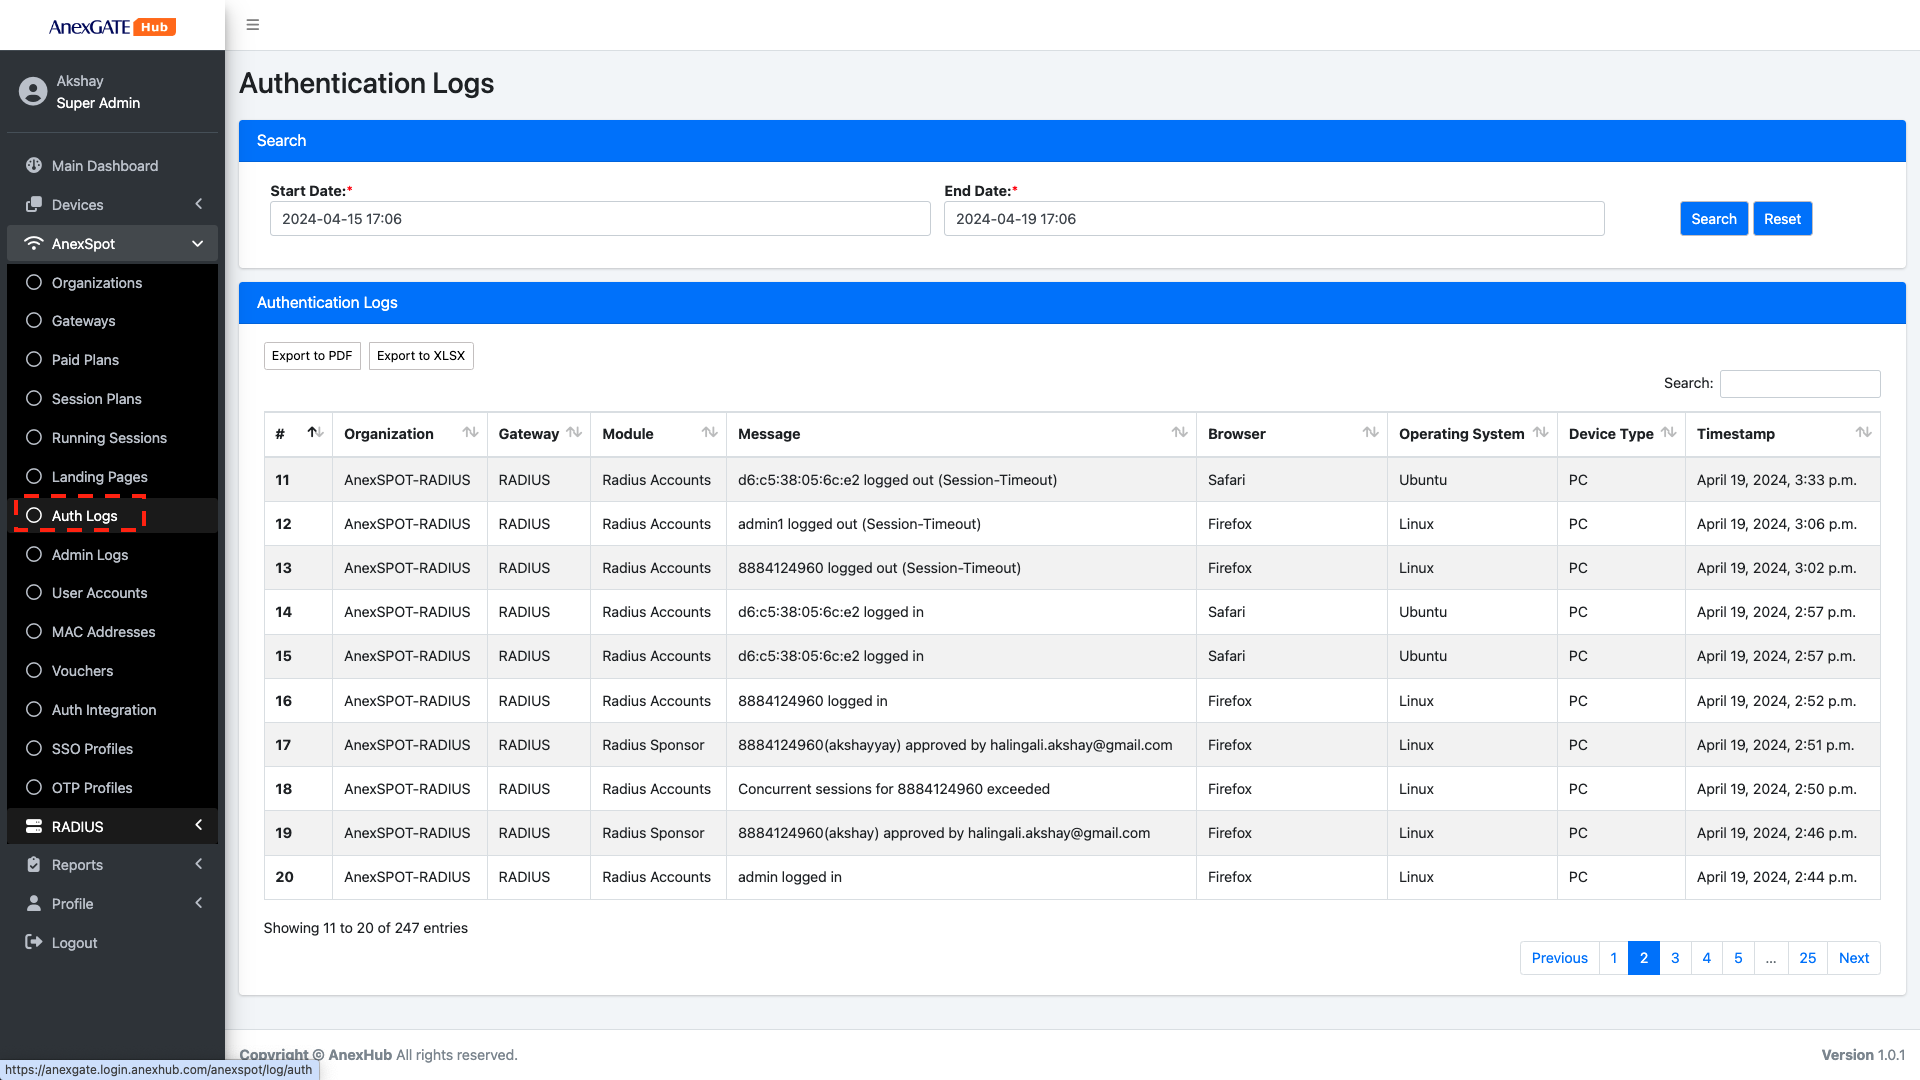
¶ RADIUS AUTH LOGS
RADIUS Auth logs maintain the logs for the User Authentication and Authorisation of RADIUS.
The old logs retrieved by specifying Start and End Date/Time and click on Search button.
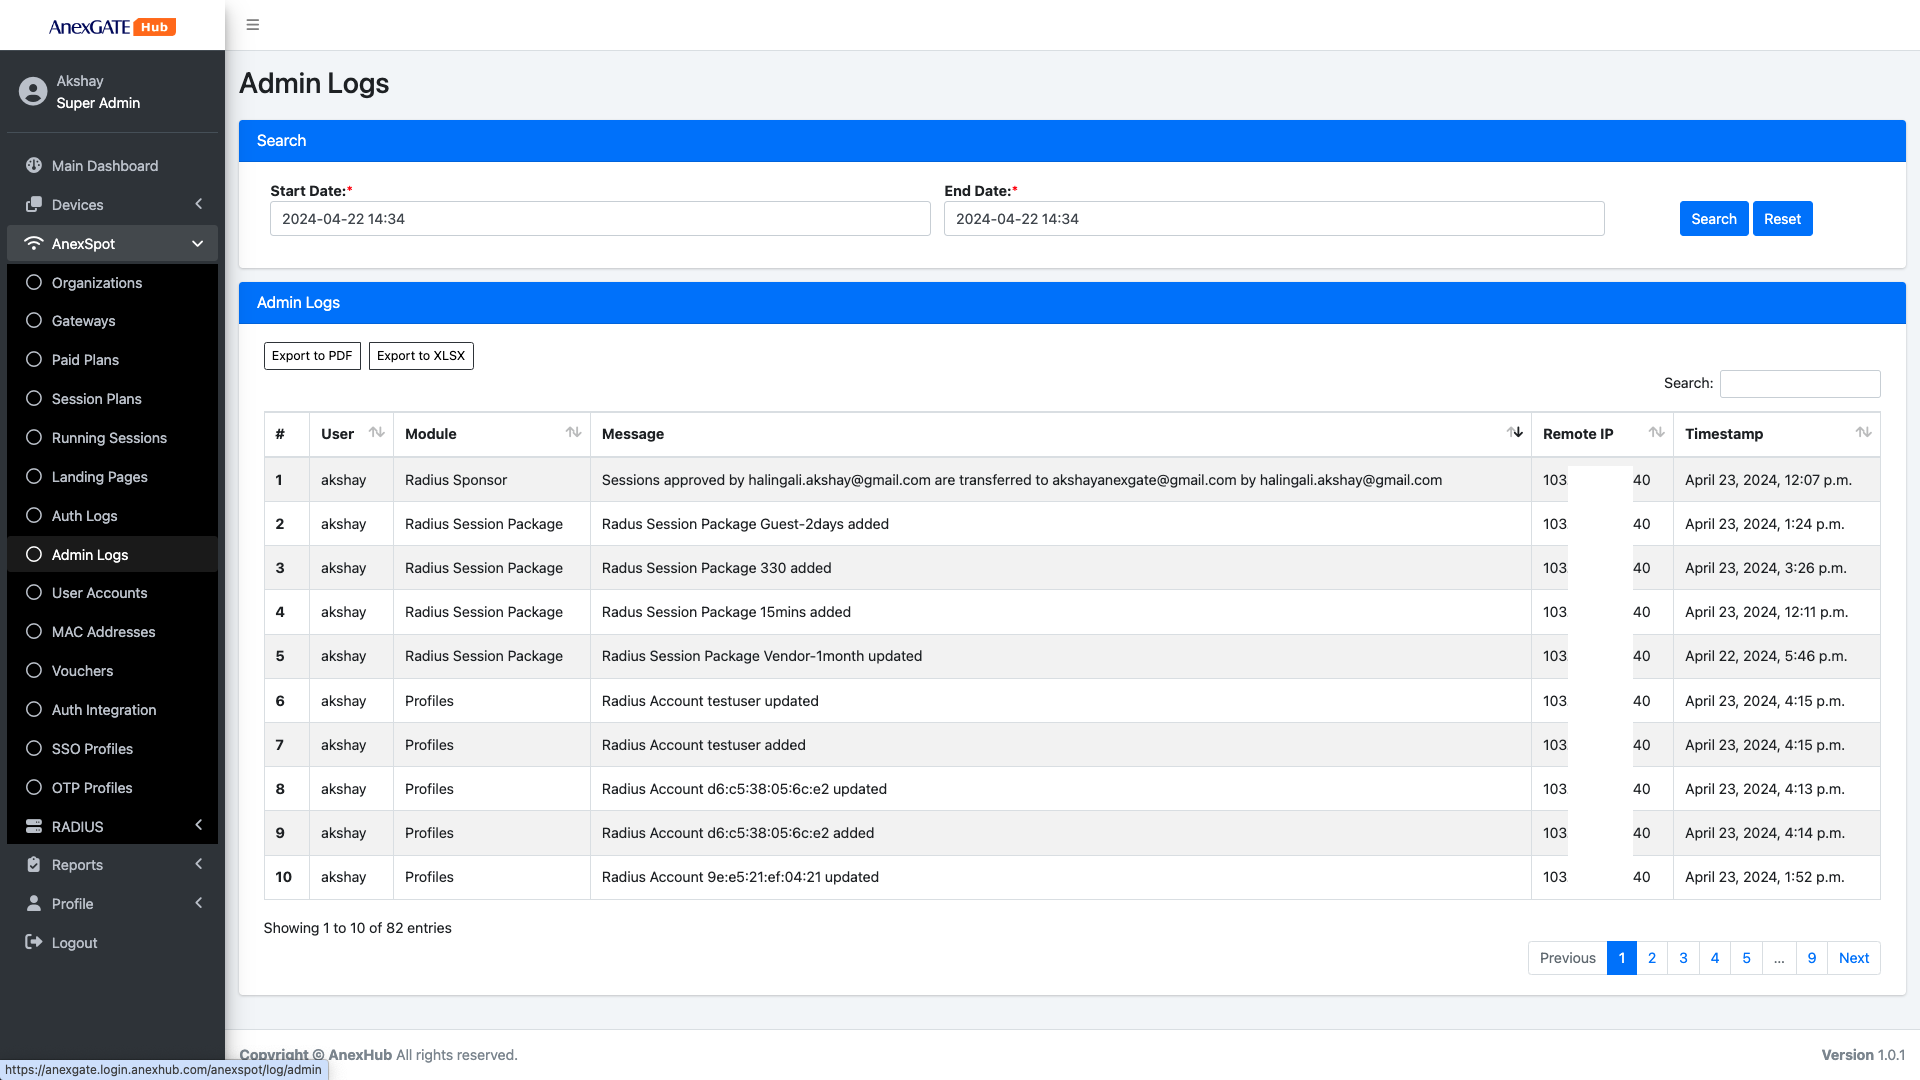
¶ RADIUS ADMIN LOGS
RADIUS Admin Logs maintain the changes performed in with respect to RADIUS Session Plans, Accounts, Sponsor Transfer.
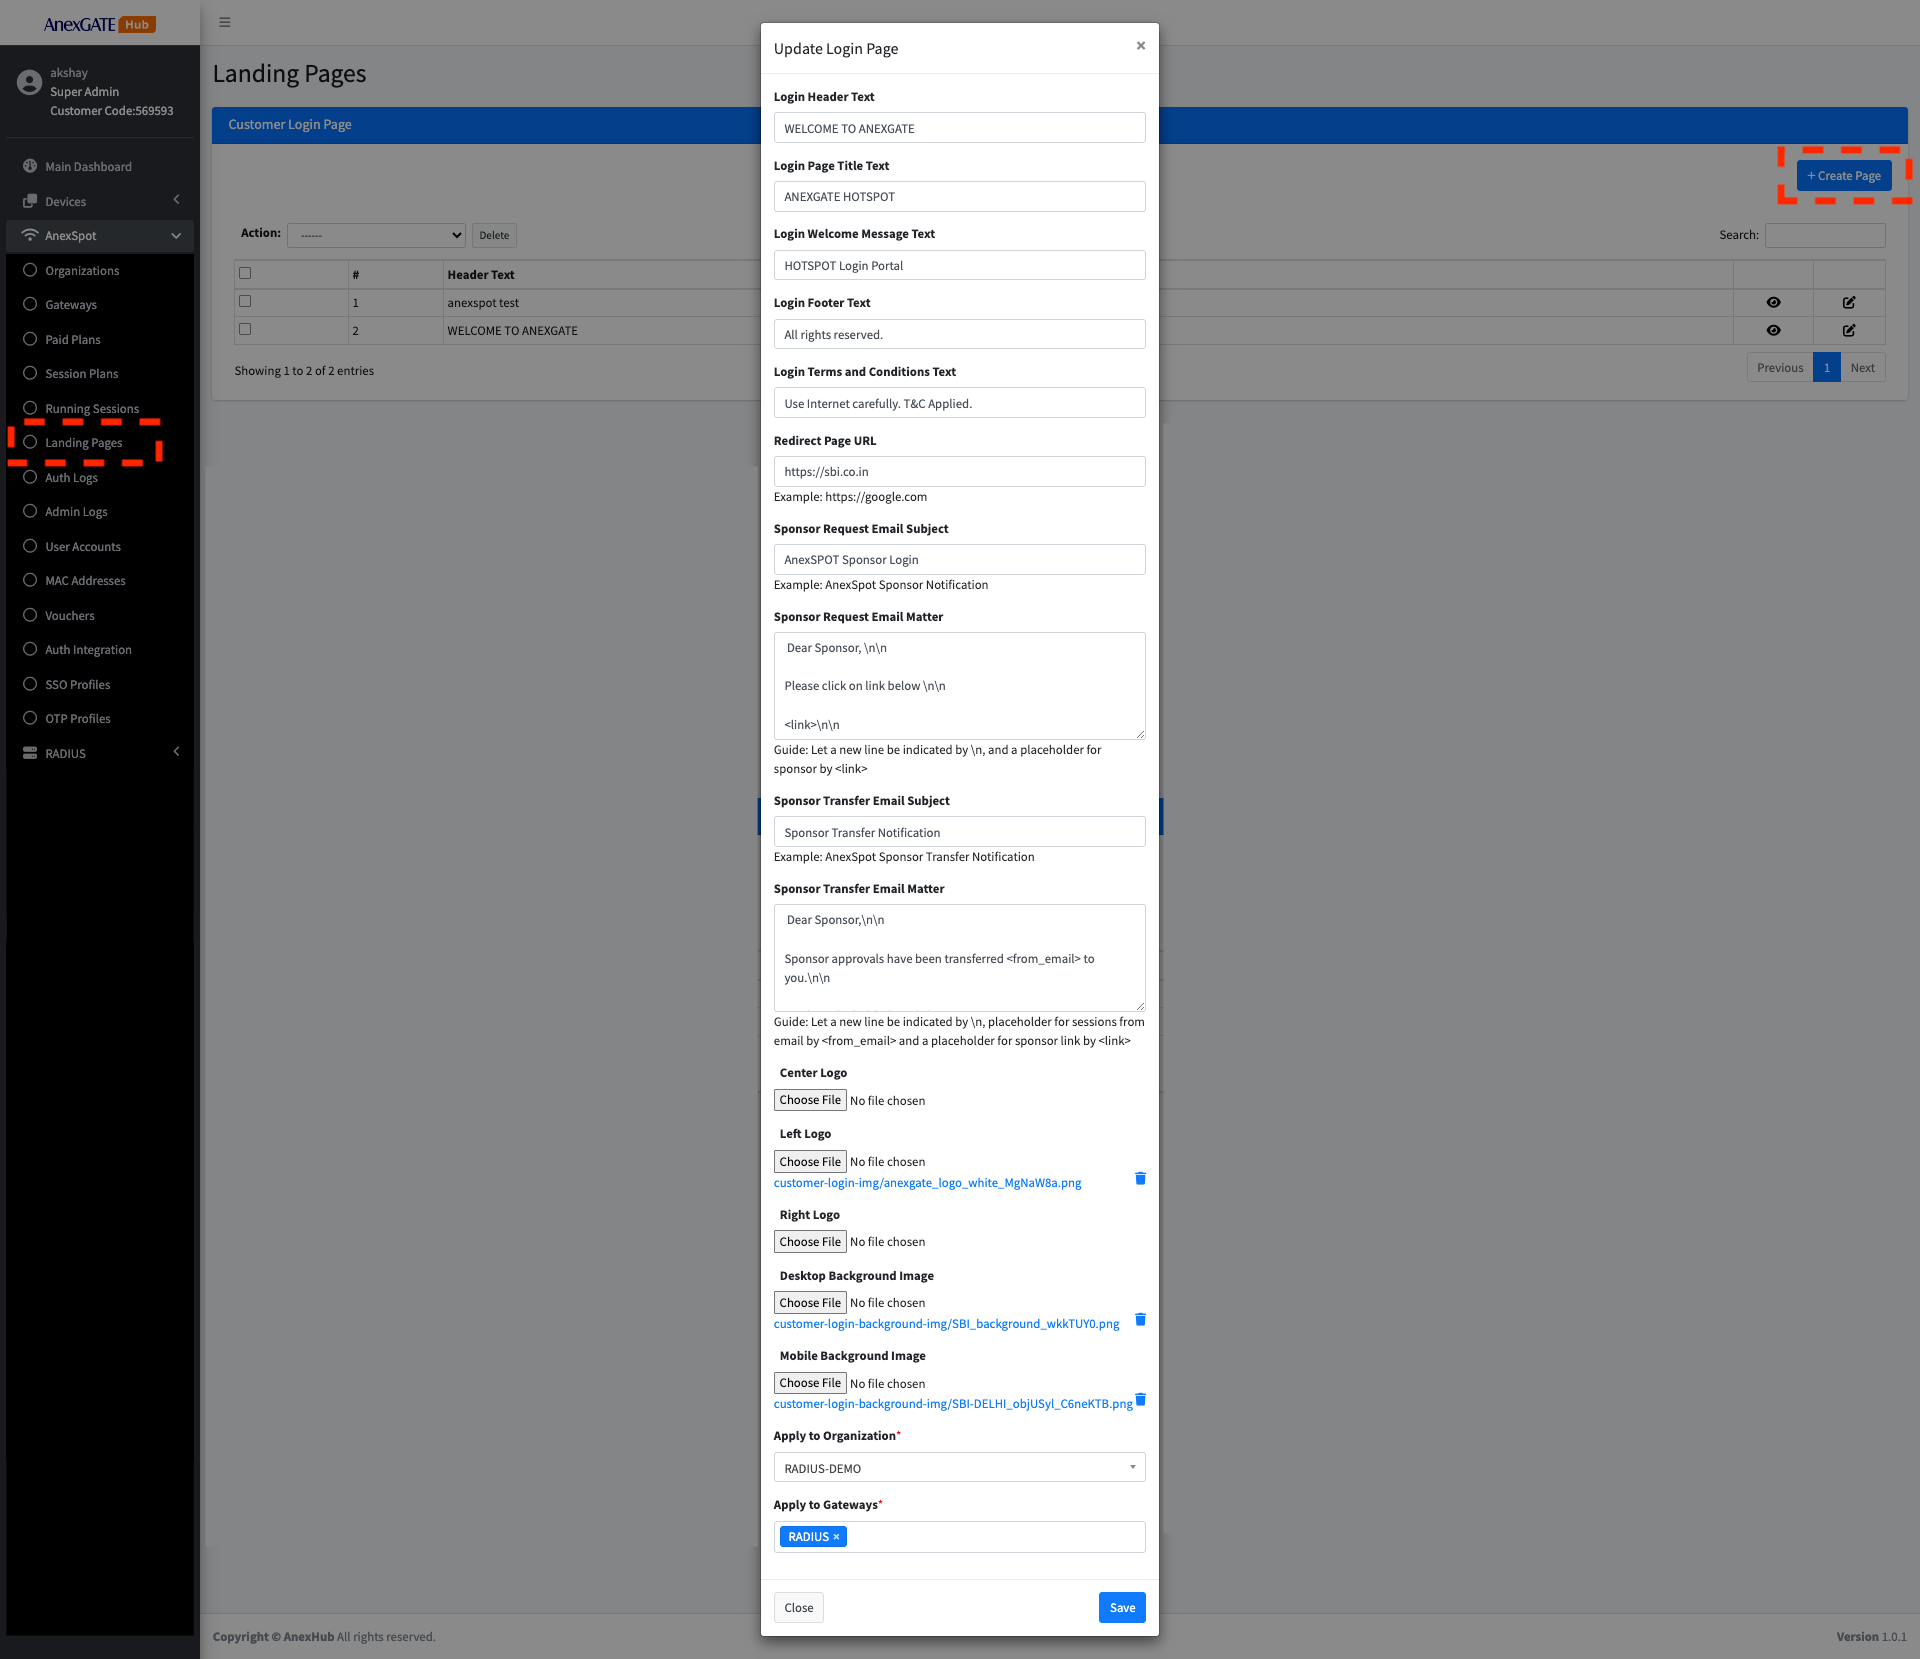
¶ LANDING PAGES
To customise Landing Login Page, Go to -
AnexSPOT>Landing Pages- Click on
+ Create Pagelocated at the top right end corner. - Configure the
Landing Pageusing given parameters.
Following are the parameters to configure Custom Login Page -
|
Elements |
Description |
|---|---|
| Login Header Text | Enter Login Header Text for the login page. |
| Login Page Title Text | Enter Login Page Title Text for the login page. |
| Login Welcome Message Text | Enter Login Welcome Message Text for the login page. |
| Login Footer Text | Enter Login Footer Text for the login page. |
| Login Terms & Conditions Text |
Enter Customized Login Terms & Conditions Text for the login page. Note - Terms & Conditions must be enabled under AnexSPOT Gateway configuration for prompting the user for agreeing Terms & Conditions |
| Redirect Page URL | Enter Redirect Page URL for the user to redirect to specific web page after Successful login. |
| Sponsor Email Subject | Enter the Email Subject for the customized email to be sent to the sponsor. |
| Sponsor Email Matter |
Enter the E-mail body matter for the customized email to be sent to the sponsor. Example: Regards,\n |
| Sponsor Transfer Email Subject | Enter the Email Subject for the customized email to be sent to the transfered sponsor. |
| Sponsor Transfer Email Matter |
Enter the E-mail body matter for the customized email to be sent to the sponsor transfer. Sponsor approvals have been transferred Click on the link below - \n\n
Regards,\n Akshay\n AnexGATE \n |
| Center/Left/Right Logo | Upload Customized logo to be displayed on the Login page. |
| Background Image | Upload Background Image to be displayed on the Login page. |
| Apply to Organization | Select the Organizations where customized Login page must be displayed for the User as a login page after joining the network. |
| Apply to Gateways | Select the Gateways of the organizations selected earlier where customized Login page must be displayed for the User as a login page after joining the network. |
| SAVE | Save the configuration. |
¶ CUSTOMISED USER LOGIN PAGE [SPONSOR APPROVAL]
¶ PARTNER LOGIN PORTAL
Partner Login Portal has a limited view and operations that can be performed by the user.
The Partner login portal users have the ability to Approve or Deny the Sponsor Approval requests made by the end users for the internet access.
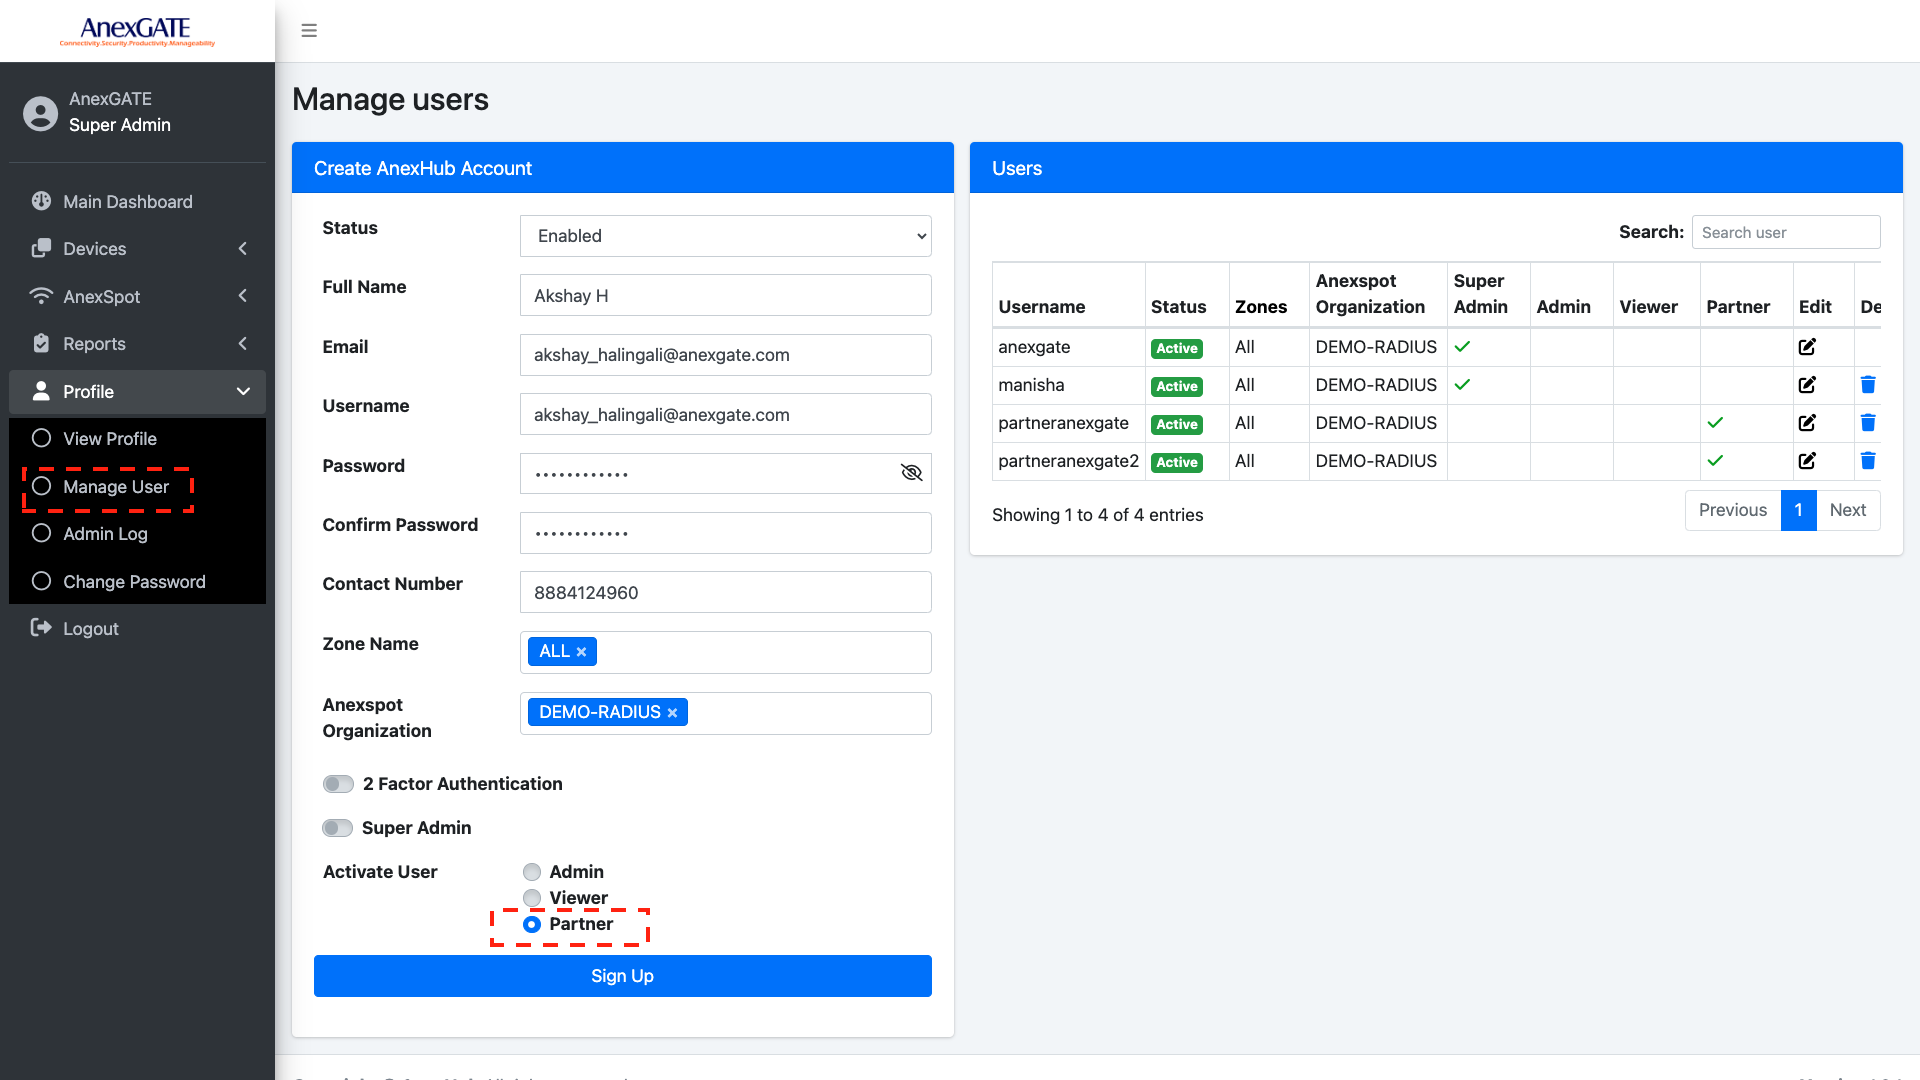
¶ PARTNER LOGIN CREATION
To create a Partner Portal for a user. Go to -
Profile-Manage User- Under Manage User, fill all the required user information.
- Select
Partneroption from Activate User as a login opton for the user account. - Click on
Sign Uponce all the given information are properly validated.
Following are the Parameters provided for creating a User Account.
|
Elements |
Description |
|---|---|
| Status | Enable/Disable the User Account |
| Full Name | Provide full name of the user. |
| Provide valid Email ID of the user. As once the User has been created, an email will be sent with the login credentials to the user's mail id. | |
| Username | Enter a username. |
| Password |
Enter the password for the user. Note - The password must contain at least two uppercase characters, a number, a special character and should be 8 characters long. |
| Confirm Password | Confirm the password for the user. |
| Contact Number | Enter the contact number of the user. |
| Zone Name | Select the zone for the user. Select as ALL under Zone for RADIUS. |
| AnexSPOT Organization | Select the AnexSPOT Organisation on which the RADIUS Gateway has been configured. |
| 2 Factor Authentication | Select this to enable the 2 Factor OTP based authentication every time when the account user tries to login to the portal. |
| Super Admin | Enable this if the user Account has to have a Super Admin Authority to manage everything on the portal. |
| Activate User |
Select the authority based login on the permissions to be granted for user account when logged into the portal.
|
| Sign Up | Click on Sign up to generate a user account. |
LOGIN TO PARTNER PORTAL
Login to the Partner portal using the generated login credentials with partner permissions, the partner user is provided with set of tools where the user can perform the operations limited to the partner account.
The image shown below is a customer portal with custom uploaded Background and Logo.
¶ PARTNER PORTAL LOGIN PAGE
¶ PARTNER PORTAL
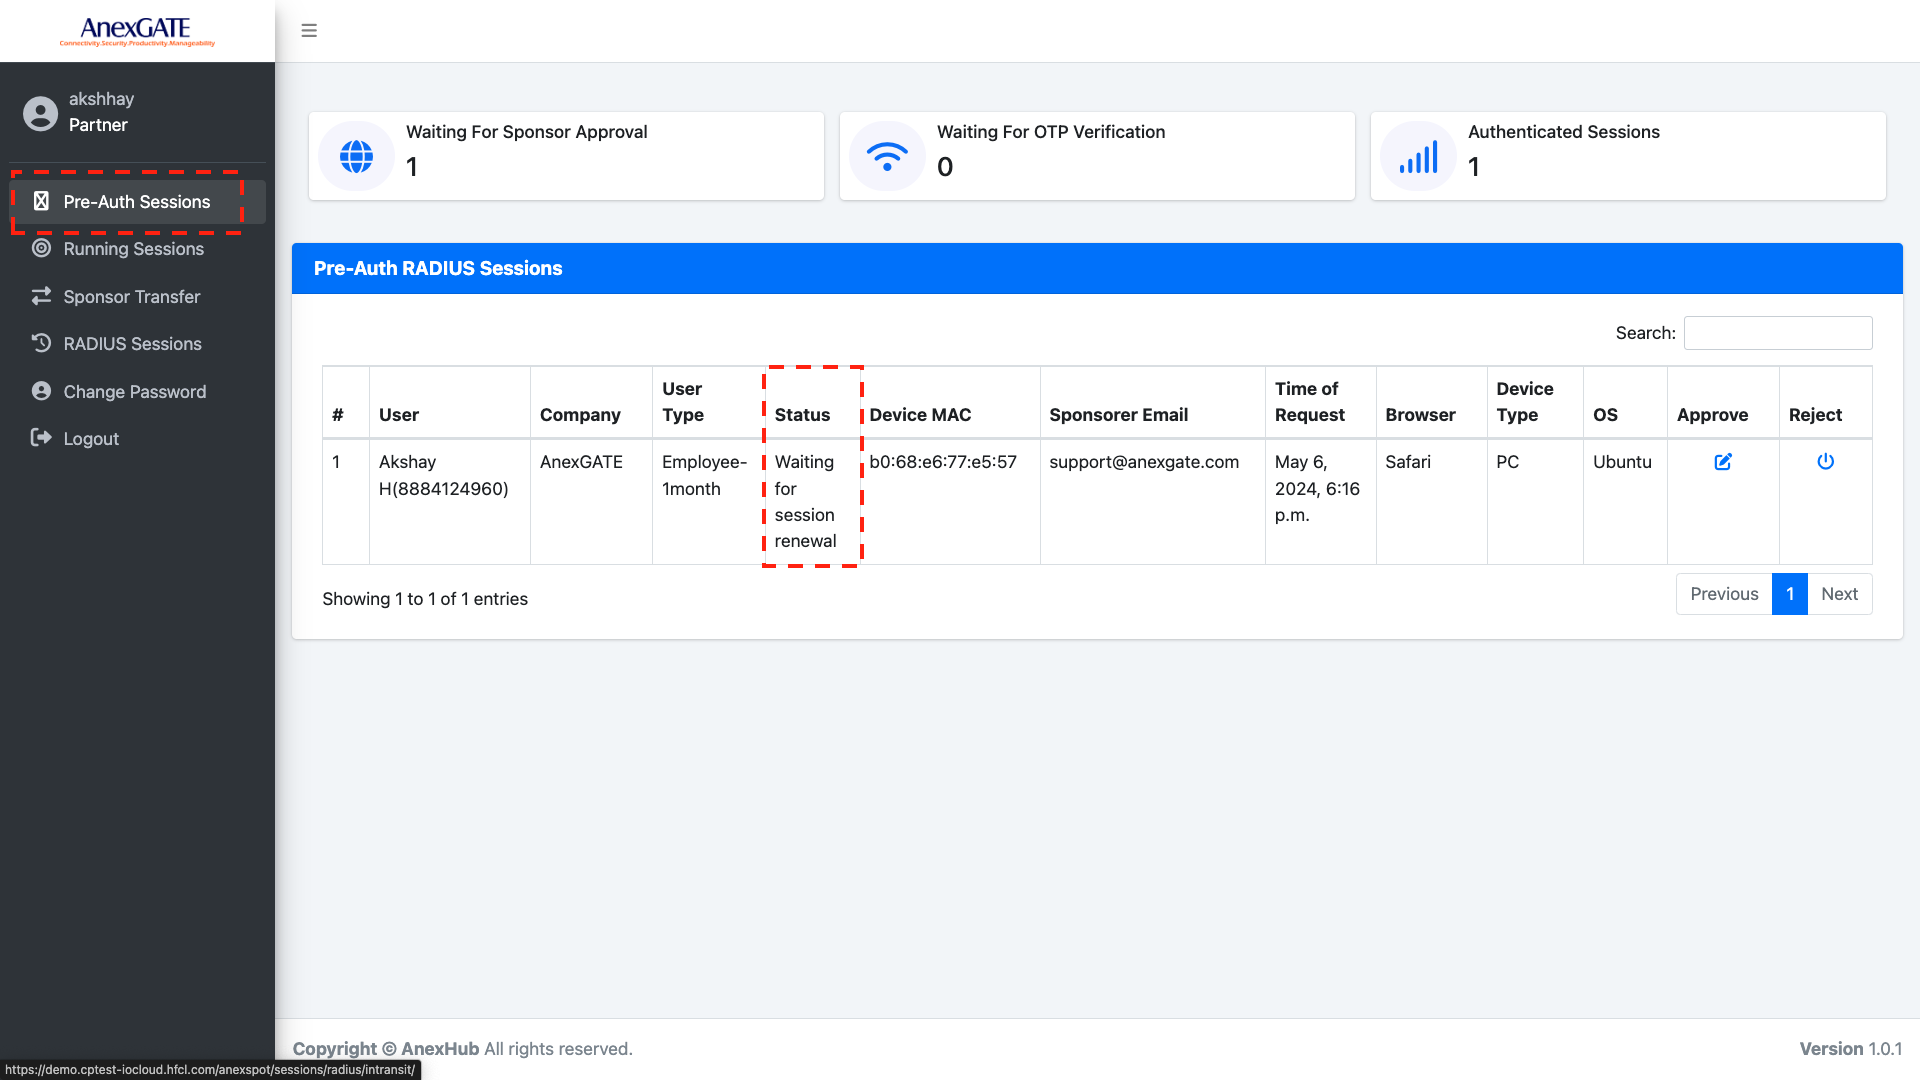
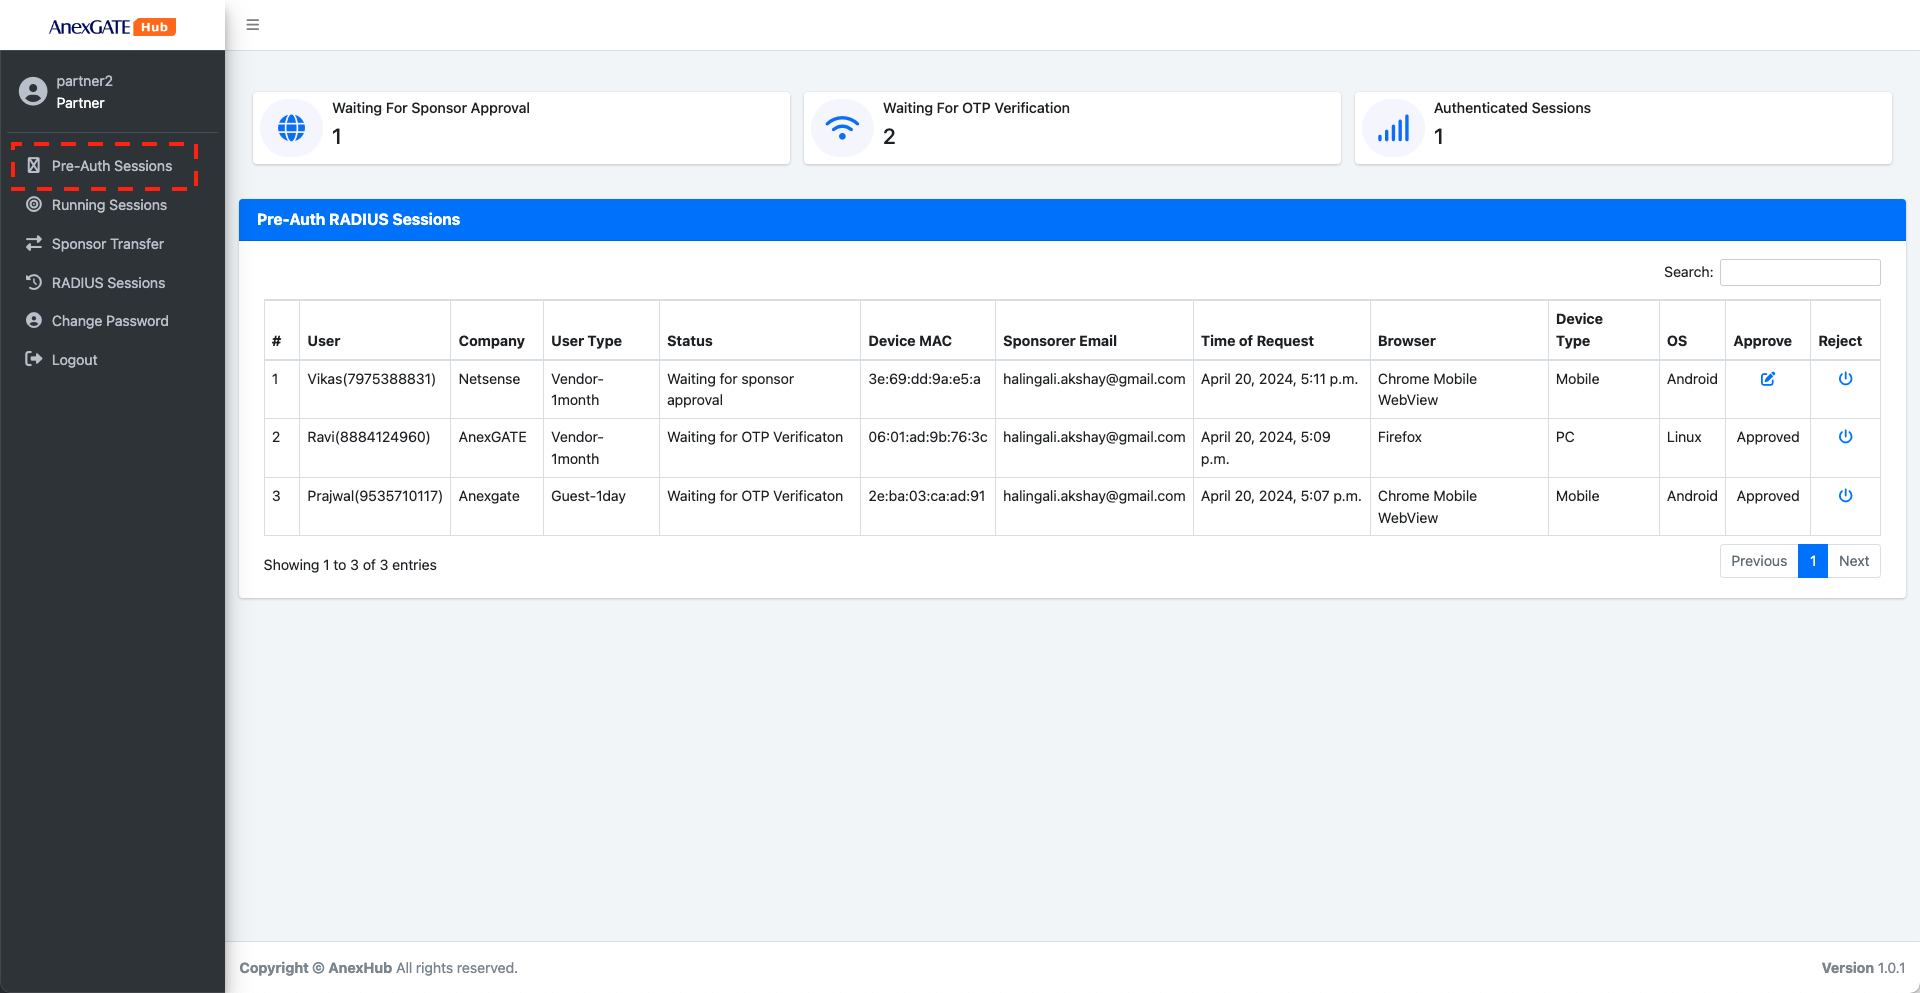
¶ RADIUS Pre-Auth Sessions
RADIUS Pre-Auth Sessions are the sessions captured by the RADIUS server where User submits required information and provides a valid Sponsor mail and requests for the Internet Access. Once the required information has been sent to the sponsor. The Sponsor will have a authority to ACCEPT or DENY the received request for Internet Access.
RADIUS Pre-Auth Session displays a summary of Users that are in the middle of Login process -
- Waiting for sponsor Approval - The user is expecting the sponsor to approve the request sent by his device including the required information for Internet Access.
- Waiting for OTP Verificaiton - The user has been approved by the Sponsor. The user must proceed to generate an OTP in order to login and get Internet Access.
- Authenticated Session - The user has been approved by the Sponsor and the user has successfully authenticated after generating OTP.
Following are the parameters displayed to the Sponsor once the User gets the Captive Portal Login Page and provides the information.
|
Elements |
Description |
|---|---|
| User | Displays the user entered username information with Mobile Number. |
| Company | Displays the Company name the user has input during the Login. |
| User Type | Displays the Session Plan choosen by the user during the Login interval. |
| Status |
Displays the current Status of the USER Login process. The Status will be as follows -
|
| Device MAC | Displays the Device MAC Address of the user attempting to login. |
| Sponsorer Email | The Sponsorer email will be displayed where the user inputs a valid Sponsor mail id and submits the request for access to the internet. |
| Time of Request | Displays the Time of Login after Approval request sent to sponsor by the user for login process. |
| Browser | Displays the browser name used by the user for login process. |
| Device Type | Displays the Type of Device used for login process. Example - Mobile, Tablet, Laptop… |
| OS | Displays the operation system of the device used for login process |
| Approve | Allow the User by approving the request for Internet Access. Clicking Approve will display the login as Approved and will prompt the user to generate an OTP for verification purpose. |
| Reject | Deny the User from getting access to the Internet. The user's session will be rejected and will prompt to submit the user information from start. |
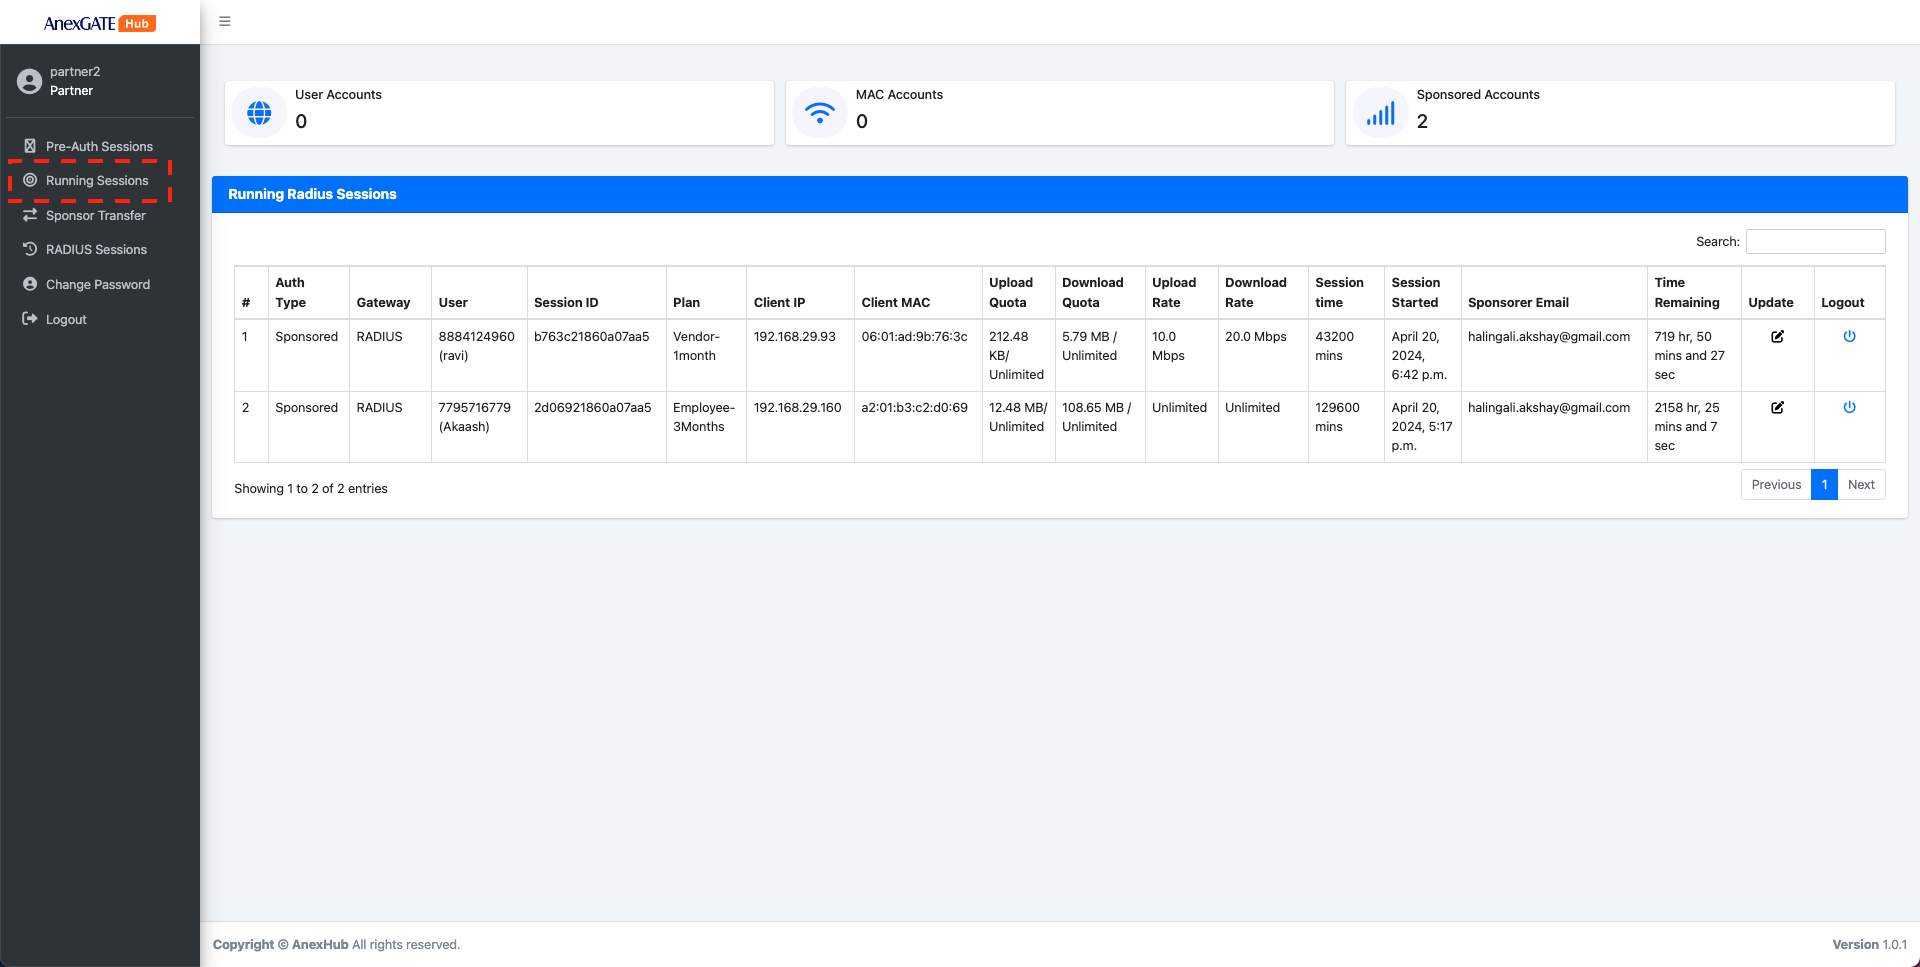
¶ RADIUS Running Sessions
Radius Running Sessions display current Live Running user session after the client devices have been successfully authenticated using various Login methods.
The Radius Running Sessions include various networking Parameters as below -
|
Elements |
Description |
|---|---|
| ID | Displays a unique ID assigned to successfully authenticated User via RADIUS Protocol. |
| User | Displays user information who has been successfully authenticated with the login credentials. |
| Session ID | Displays unique account session ID generated for the user after successful login. |
| Plan | Displays the Session plan type selected by the user. |
| Client IP | Displays IP Address of the user under client Radius network. |
| Client MAC | Displays MAC Address of the user under client Radius network. |
| Upload Quota | Displays Upload Quota limit in terms of mb, for the user after successful login. Once the user crosses the limit, they will be logged out of the session. |
| Download Quota | Displays Download Quota limit in terms of mb, for the user after successful login. Once the user crosses the limit, they will be logged out of the session. |
| Upload Rate | Displays Upload Bandwidth/Speed Rate limit in terms of mbps, for the user after successful login. Once the user crosses the limit, they will be logged out of the session. |
| Download Rate | Displays Download Bandwidth/Speed Rate limit in terms of mbps, for the user after successful login. Once the user crosses the limit, they will be logged out of the session. |
| Session Time | Specify Session limit in terms of minutes for the user after successful login. Once the user crosses the limit, they will be logged out of the session. |
| Session Started | Displays the Date and Time of the user session once the client has been successfully Logged in. |
| Sponsorer Email | Displays the Email id of the Sponsor who has approved the user for the Access of the internet resources. |
| Time Remaining | Displays the Time Remaining for the Successful Logged in Client if Limited Session Time has been assigned for the client. |
| Update | Click on update to modify the assigned networking parameters when the Session has been started initially. The COA Request is sent to the controller once the parameters have been modified and saved. |
| Logout | Click on Logout icon to force logout the successful authenticated client. |
¶ SPONSOR TRANSFER
In the partner account, the partner user will have the provision to select the mail of the sponsor from the drop under Transfer To Email to transfer the authority of approved user logins. Once the transfer of Sponsor is successfully the user to which the Sponsor was transfered to will receive a mail notification.
Note - In order to transfer the sponsor approved accounts, the email id must appear under Drop-down menu of the Transfer Sponsor list. In order for that to happen the sponsor mail id must be added under Registered Sponsors under Gateway configuration.
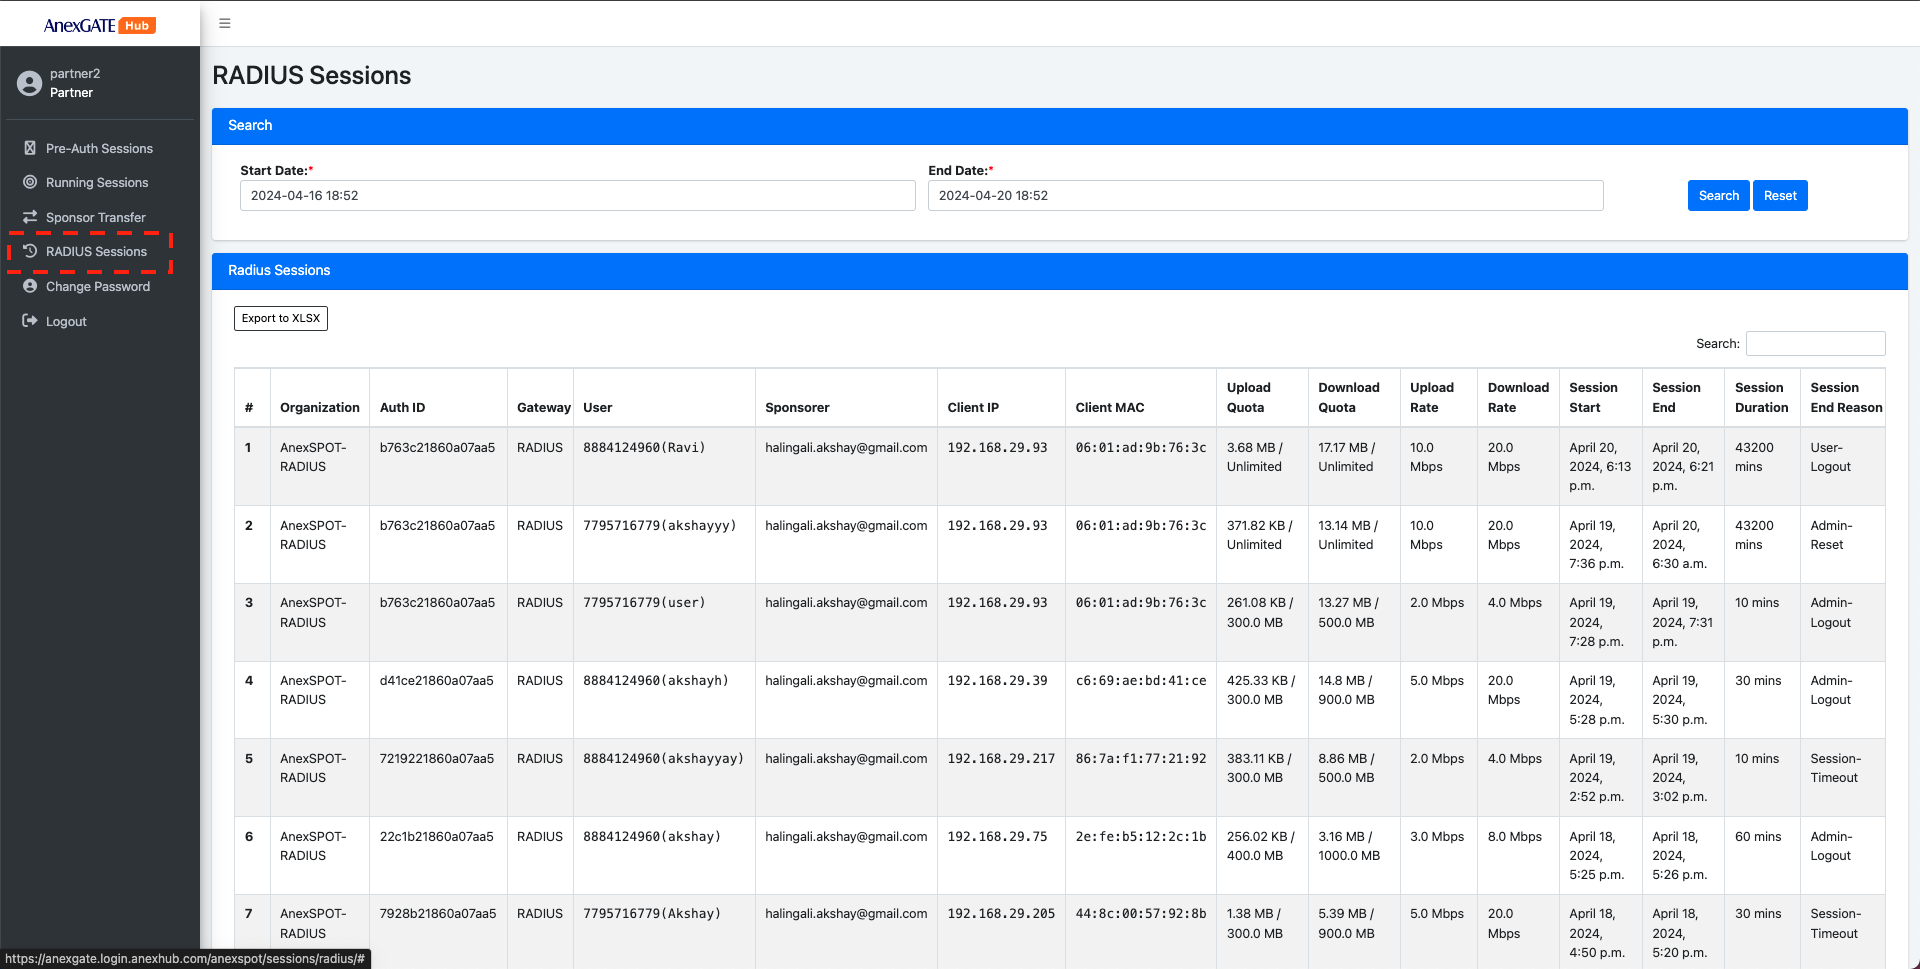
¶ RADIUS Sessions
RADIUS Sessions display the detailed report of old sessions which have been logged out.Radius Sessions in Partner Account will display only specific radius sessions which have been approved by the partner/sponsor user account.
- The search bar provides the user to get the past Radius Session by adding the Start and End Date/Time in the time interval.
Following are the radius parameters, that are displayed under RADIUS Sessions -
|
Elements |
Description |
|---|---|
| Organization | Displays the organization of the successfully authenticated User credentials via RADIUS Protocol. |
| Auth ID | Displays the Authentication ID who was successfully authenticated with provided login credentials. |
| Gateway | Displays the RADIUS Gateway of the user after successfull logout. |
| User | Displays the username provided during authentication. |
| Client IP | Displays the IP Address of the user under client Radius network. |
| Client MAC | Displays the MAC Address of the user under client Radius network. |
| Upload Quota | Displays total Upload Quota consumed in terms of mb, during the user's session till it was logged out. |
| Download Quota | Displays total Download Quota consumed in terms of mb, during the user's session till it was logged out. |
| Upload Rate | Displays Upload Bandwidth/Speed Rate limit in terms of mbps. |
| Download Rate | Displays Download Bandwidth/Speed Rate limit in terms of mbps. |
| Session Start | Displays Session Start for user after successful login. |
| Session End | Displays Session End for the user session once the client got logged out. |
| Session Duration | Displays the total Session Duration of the user from Session Start till Session End. |
| Session End Reason |
Displays the reason for the user session Logout. Following are the Logout Reasons for the user session -
|
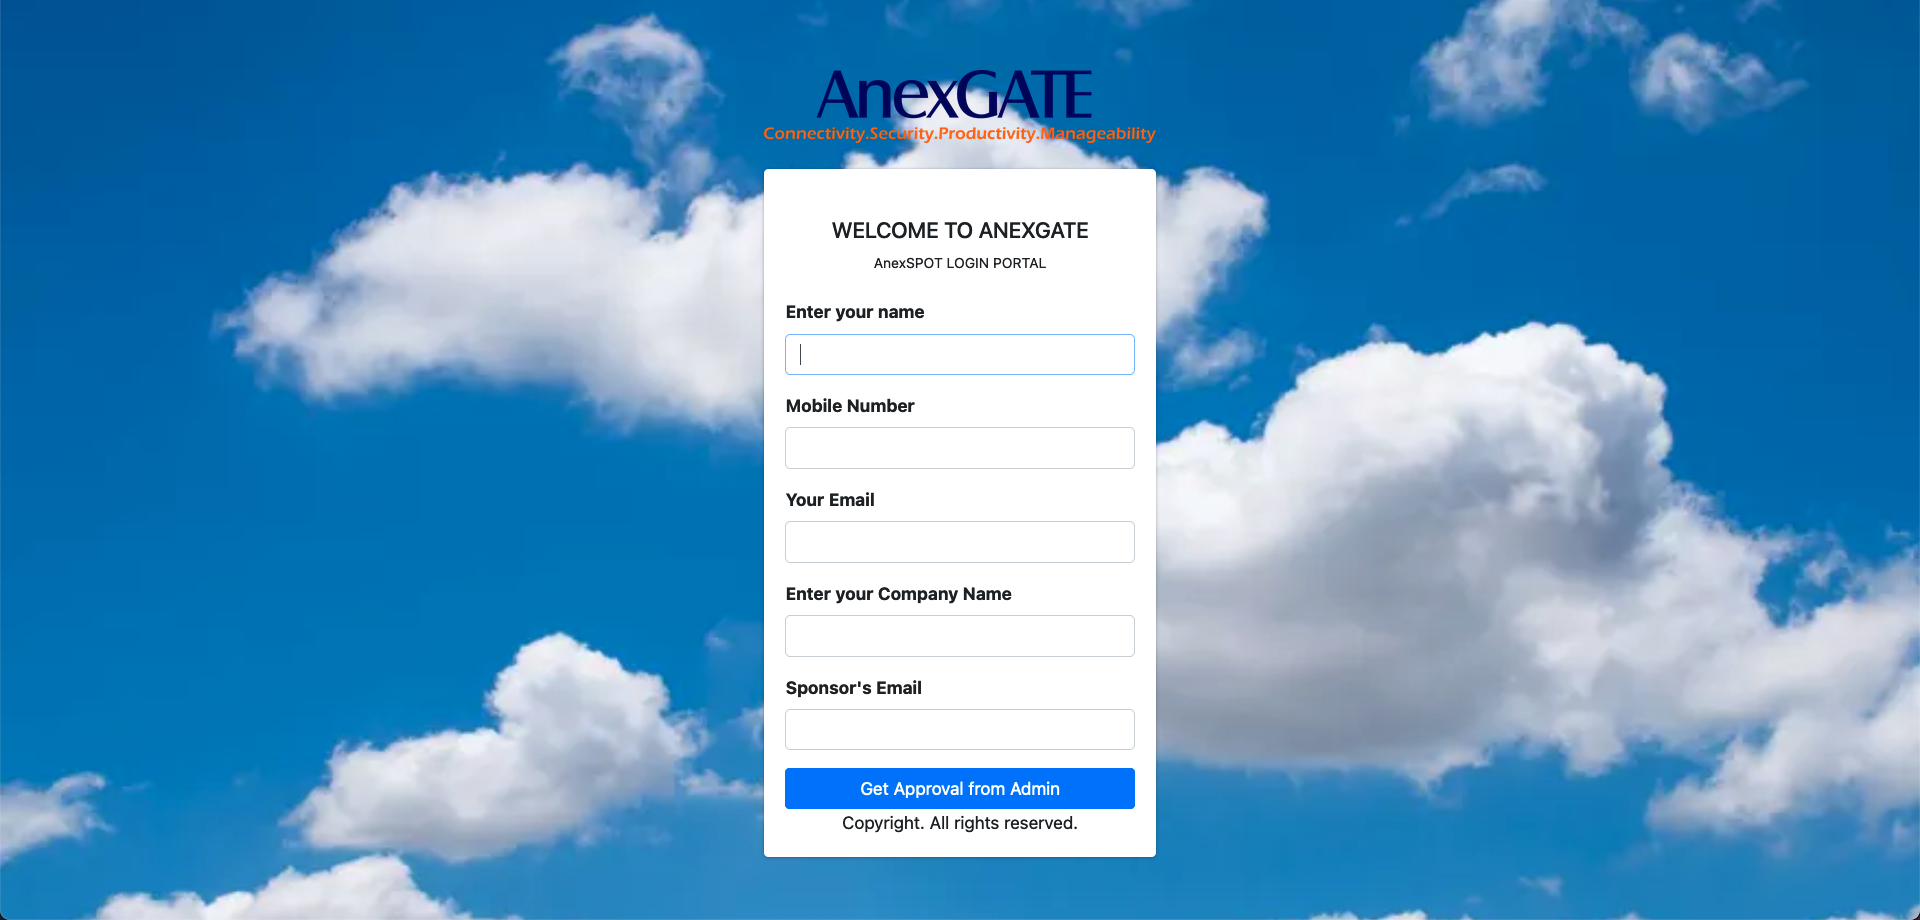
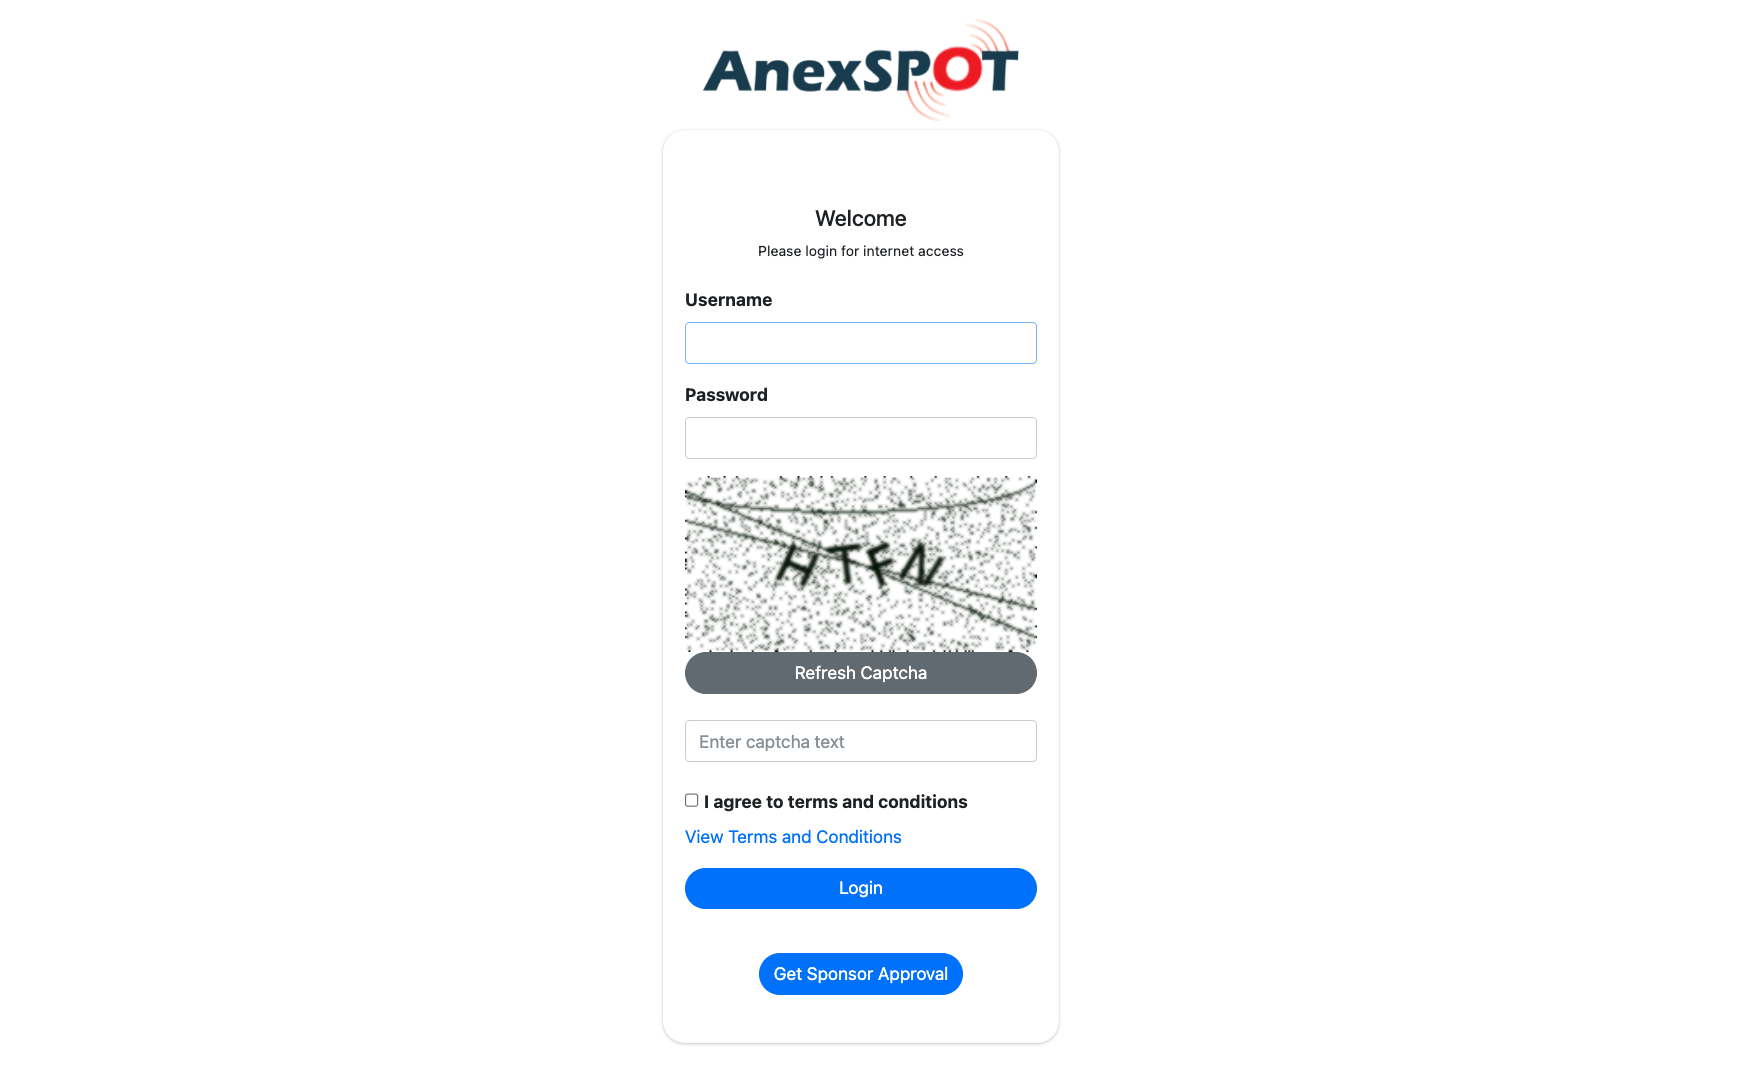
¶ CAPTIVE PORTAL LANDING PAGE
The image shows the default Landing page with Username and Password field as default. This can be modified by adding extra set of verfication such as Captcha and enable Terms and conditions for the user to agree upon before accessing the network by authenticating.
The user may provide their information by clicking on Get Sponsor Approval Option and get approved by the sponsors for accessing the internet.
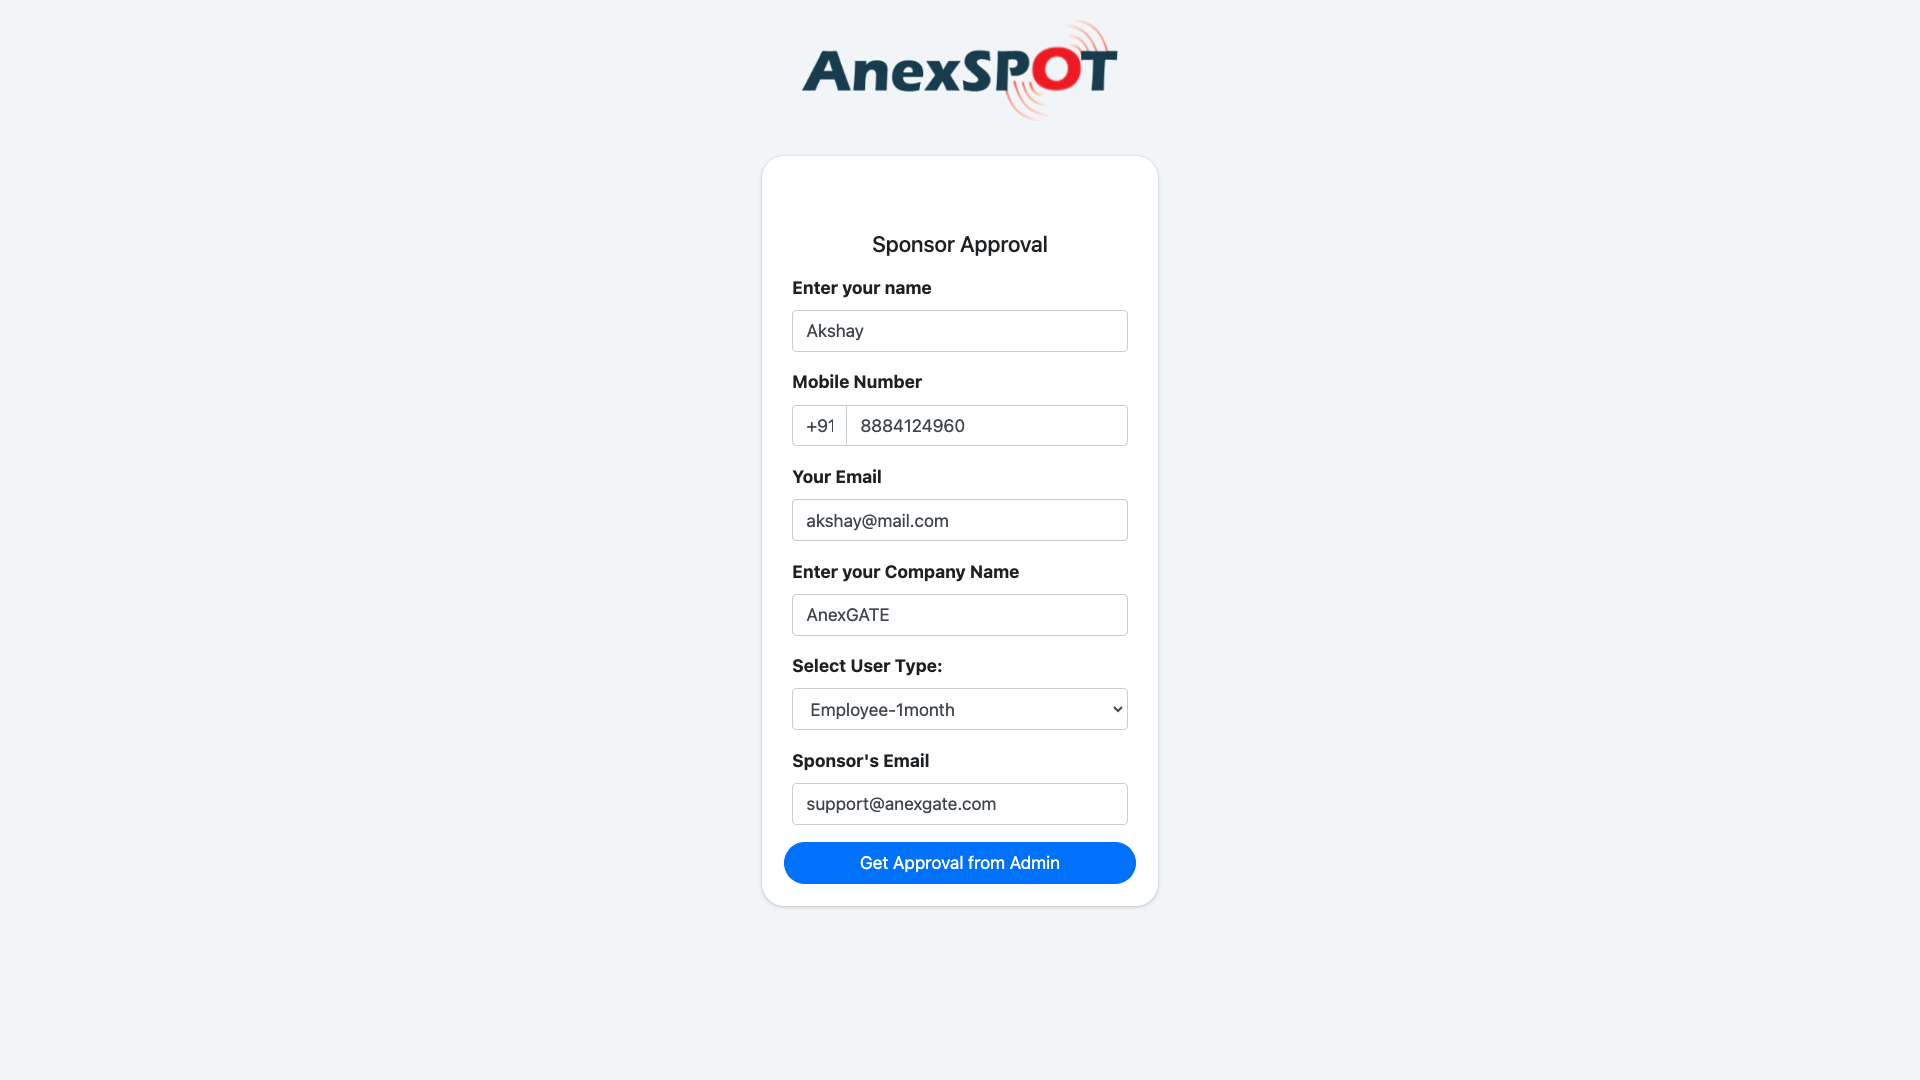
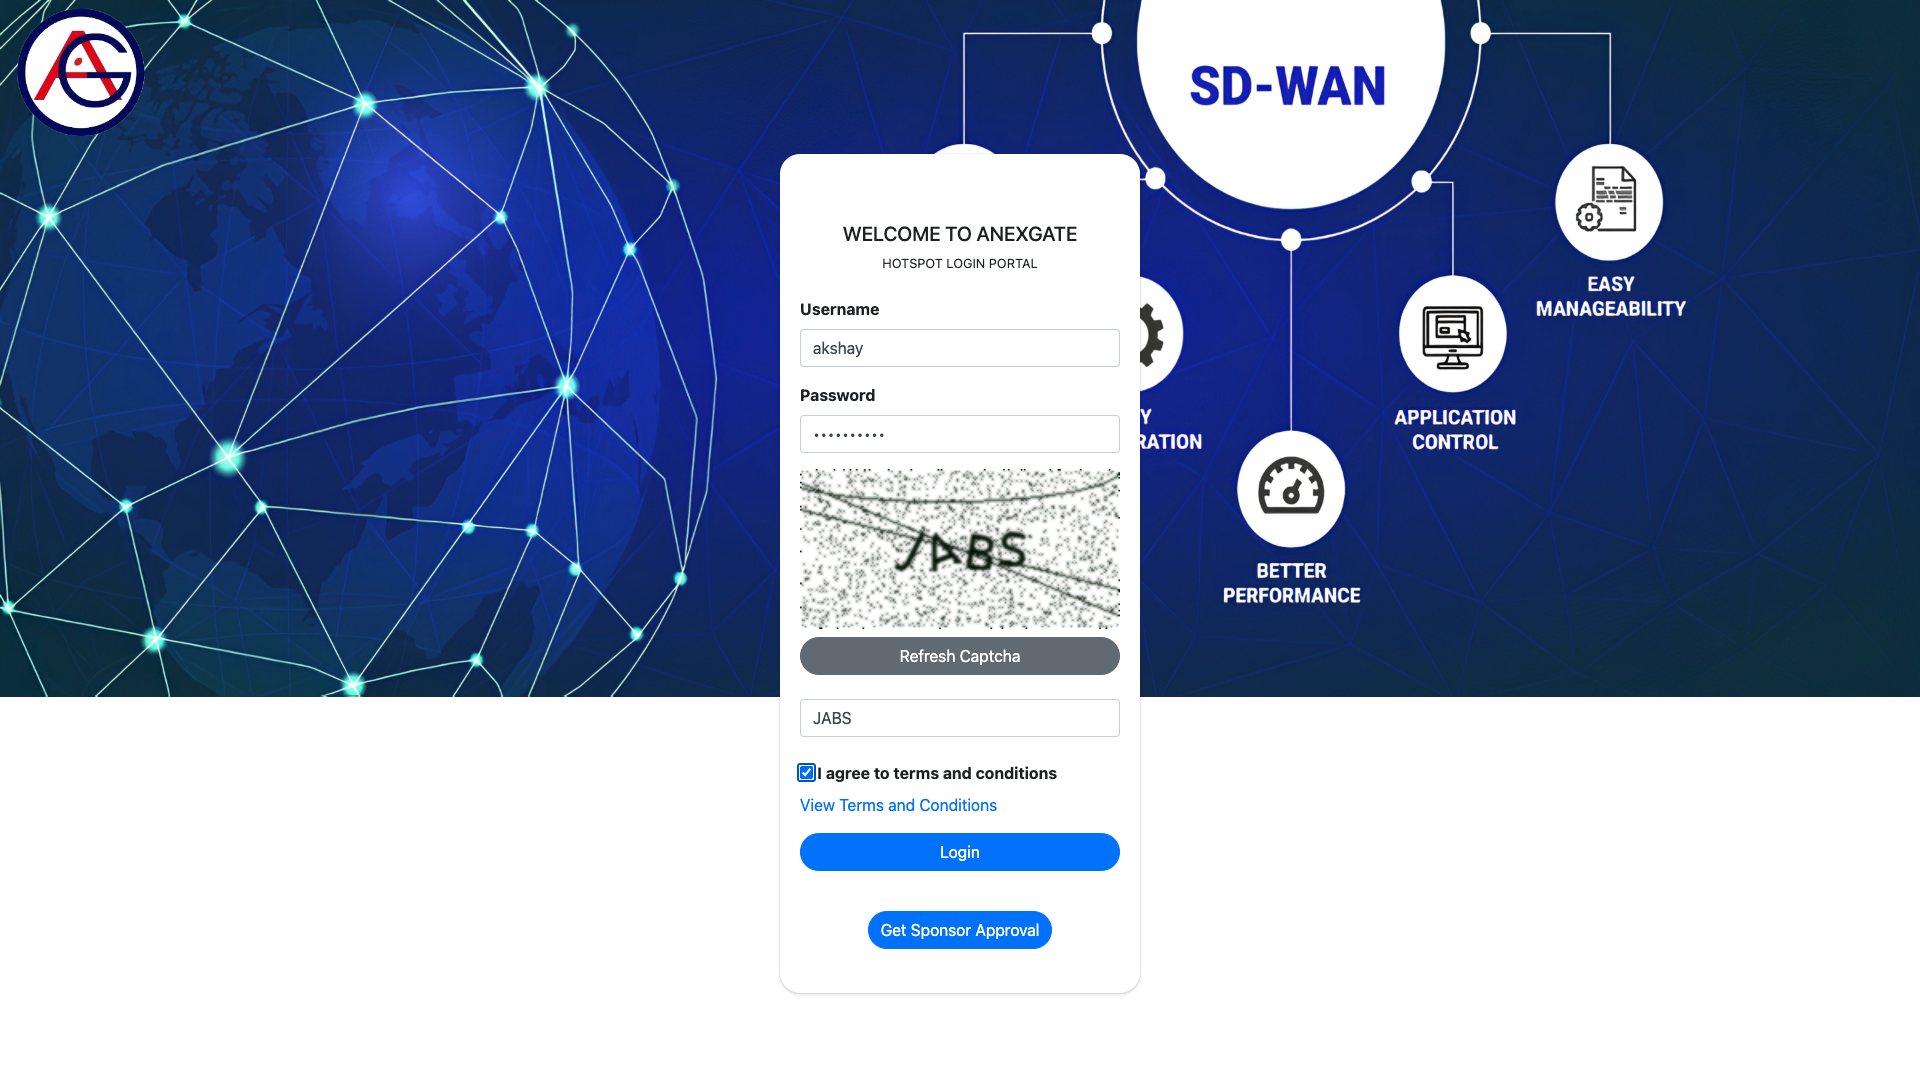
¶ LANDING PAGE [SPONSOR APPROVAL]
The image shows the Login Page where user has selected the Get Sponsor Approval option to get authenticated from the Sponsor end to access the network. In order to do so, the user requires to fill the required information in the fields as shown below.
¶ TEST CASE FLOW
¶ CAPTIVE PORTAL DEFAULT LOGIN
The user gets prompted with default Captive Portal Login Page with options with Login using various Login methods such as Username/Password based Auth, MAC Address based Auth, Sponsor Approved Auth etc…
By enabling Auto Redirect to Sponsor Approval Page under GATEWAYS the user will be redirected to the Sponsor Approval directly instead of having to go to Default Captive Portal Login Page and Clicking on Get Sponsor Approval.
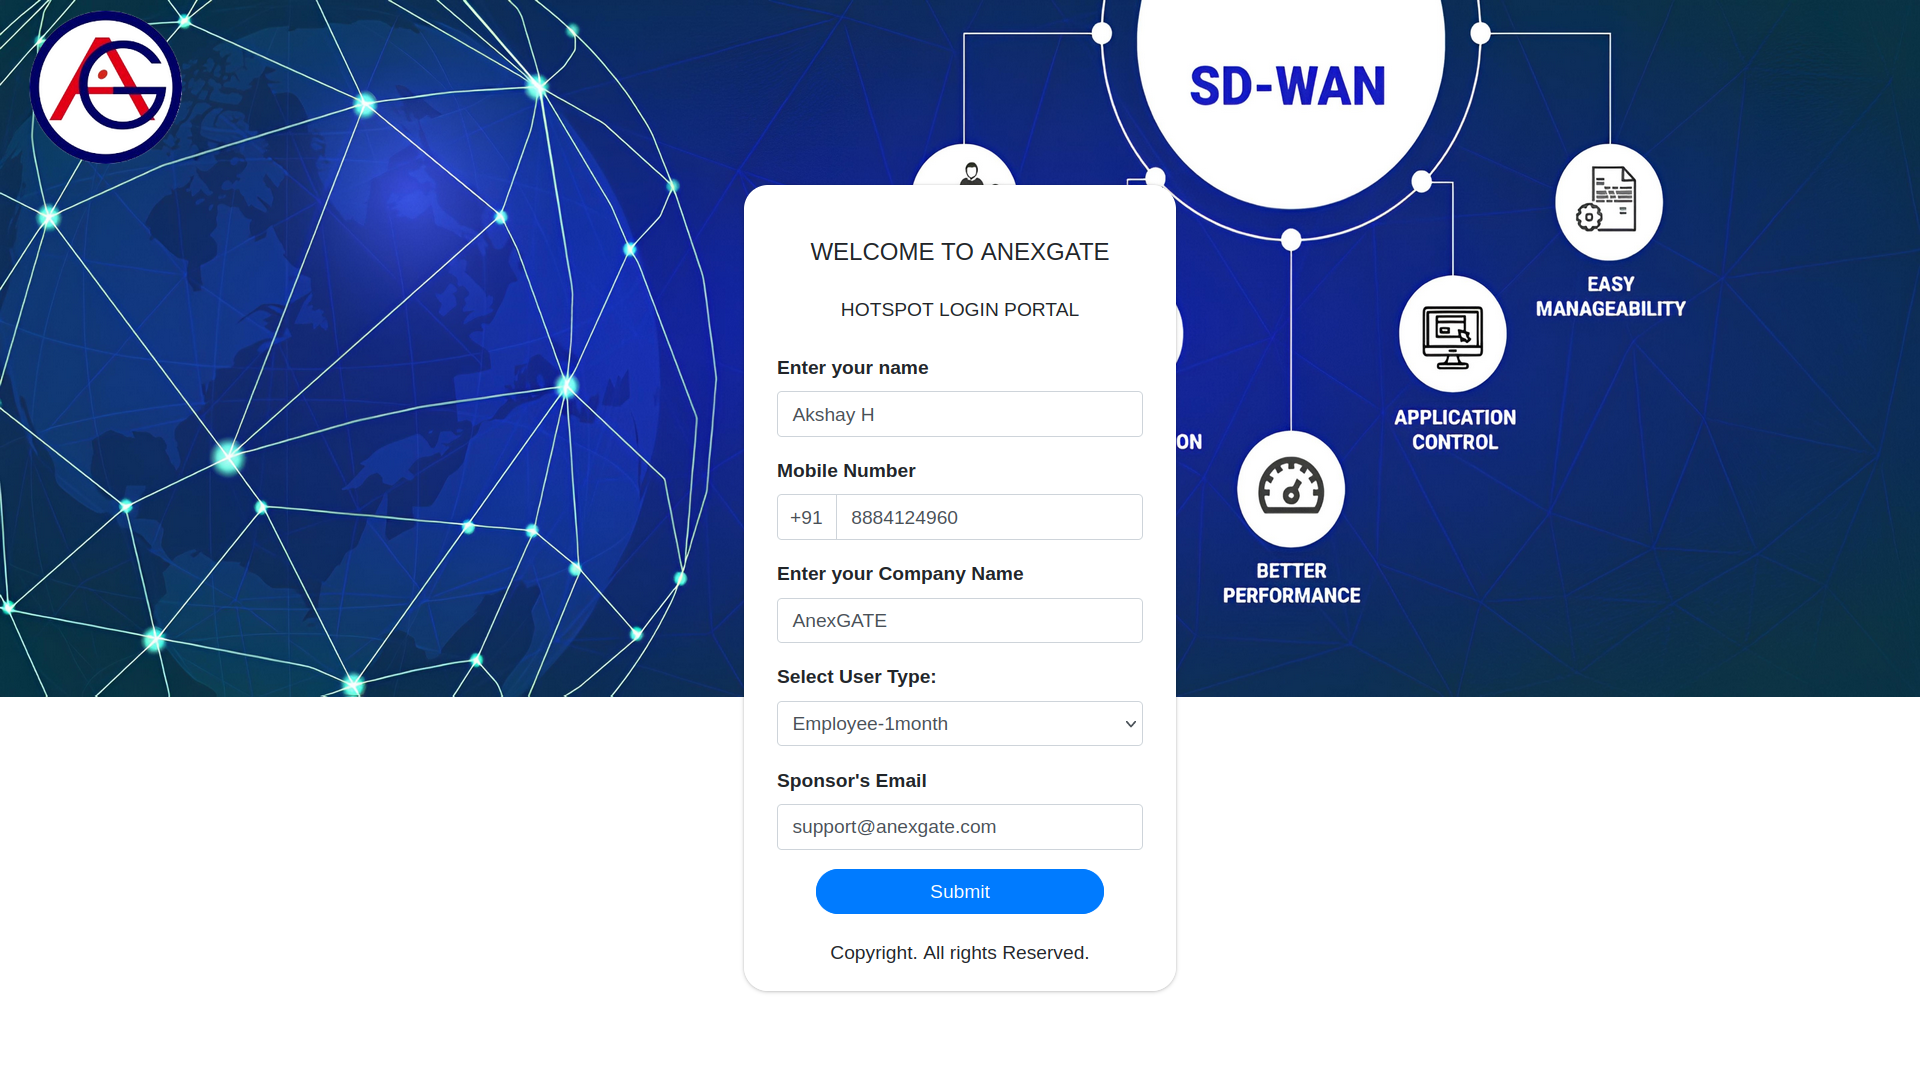
¶ CAPTIVE PORTAL SPONSOR LOGIN
User submits the required information to specific Sponsor Email ID requesting for the Internet Access.
¶ SPONSOR APPROVAL
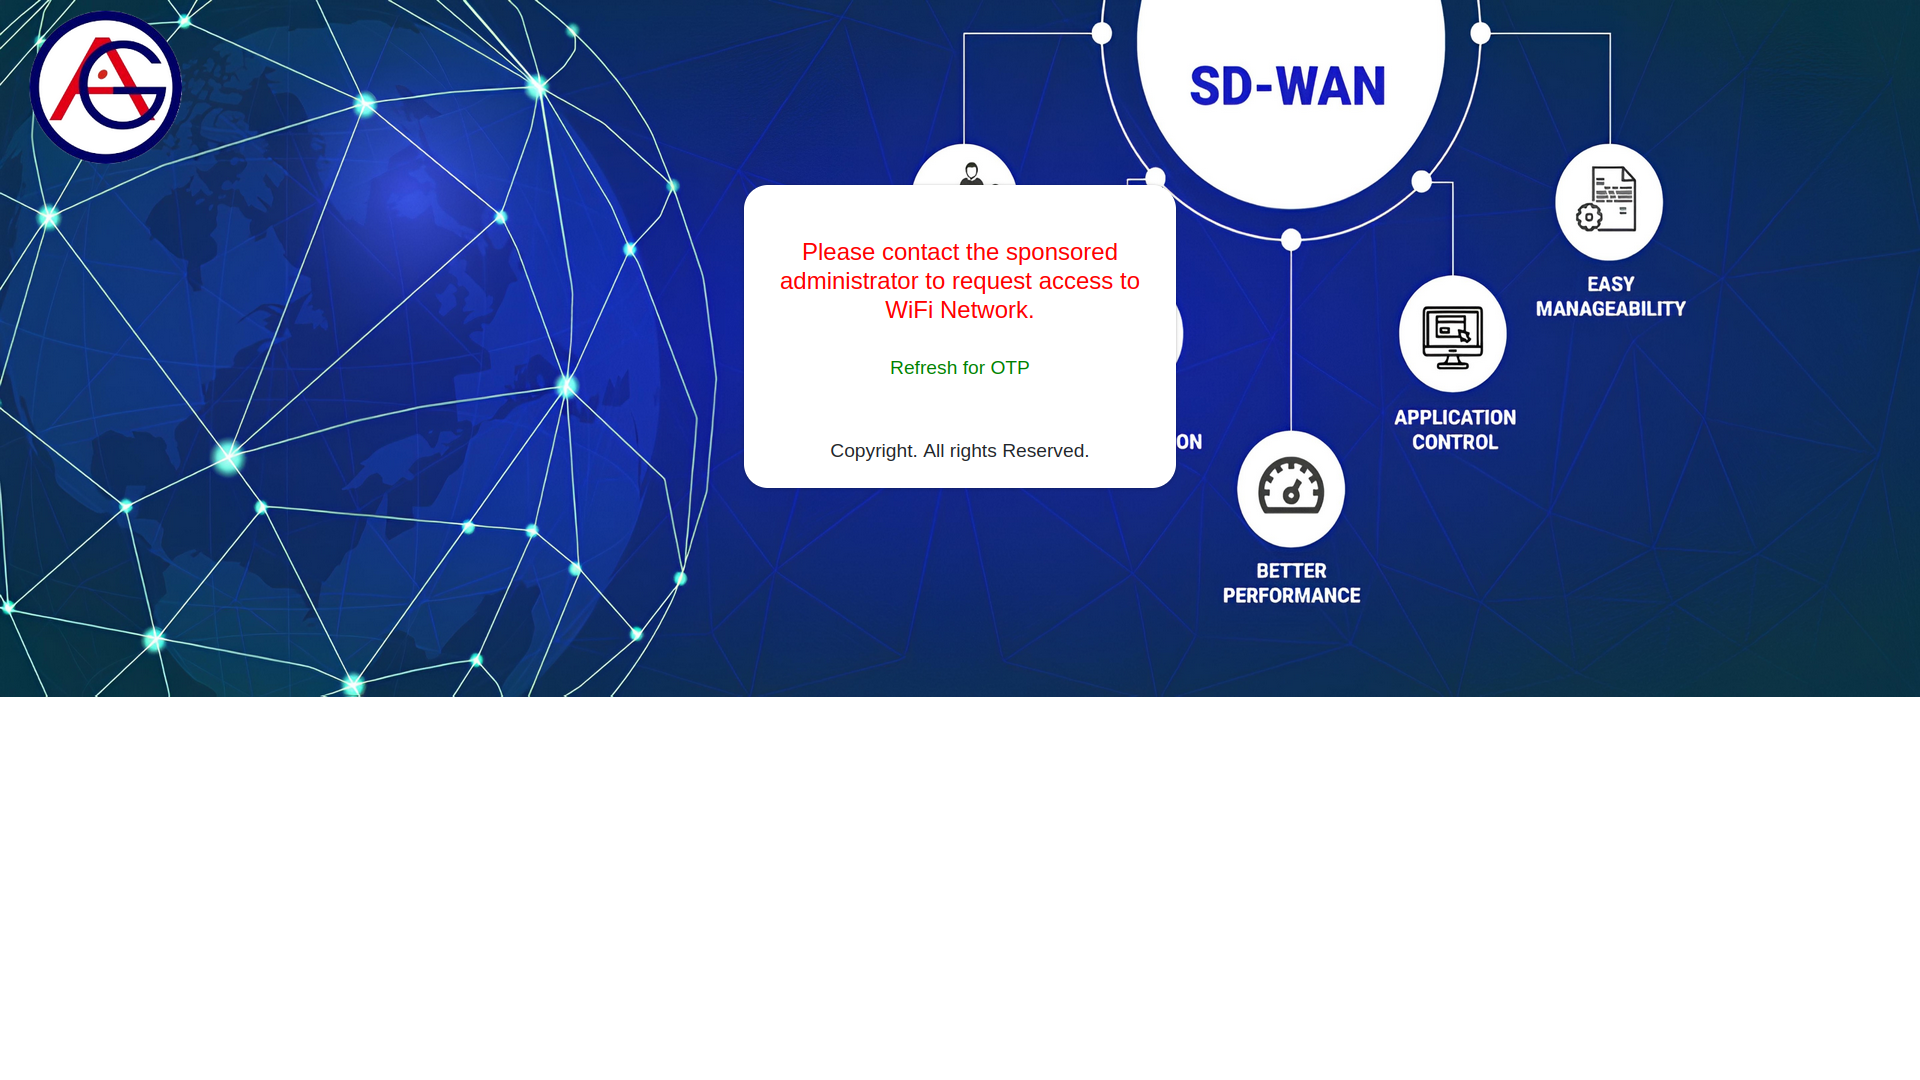
User needs to wait for Sponsor Approval, Once the Sponsor approves the request. The user is automatically redirected to OTP Verification page. If the redirect does not happen due to network issues, the user may click on Refresh for OTP field to manually go to OTP Verification page once the user has been approved.
¶ SPONSOR APPROVAL [SPONSOR PARTNER PORTAL]
The image shows the webpage received by the Partner Sponsor to approve the user who has submitted the request for user authentication to access the internet.
The Admin can select the timeline for the user from 1hour to 90 days depending on the requirement.
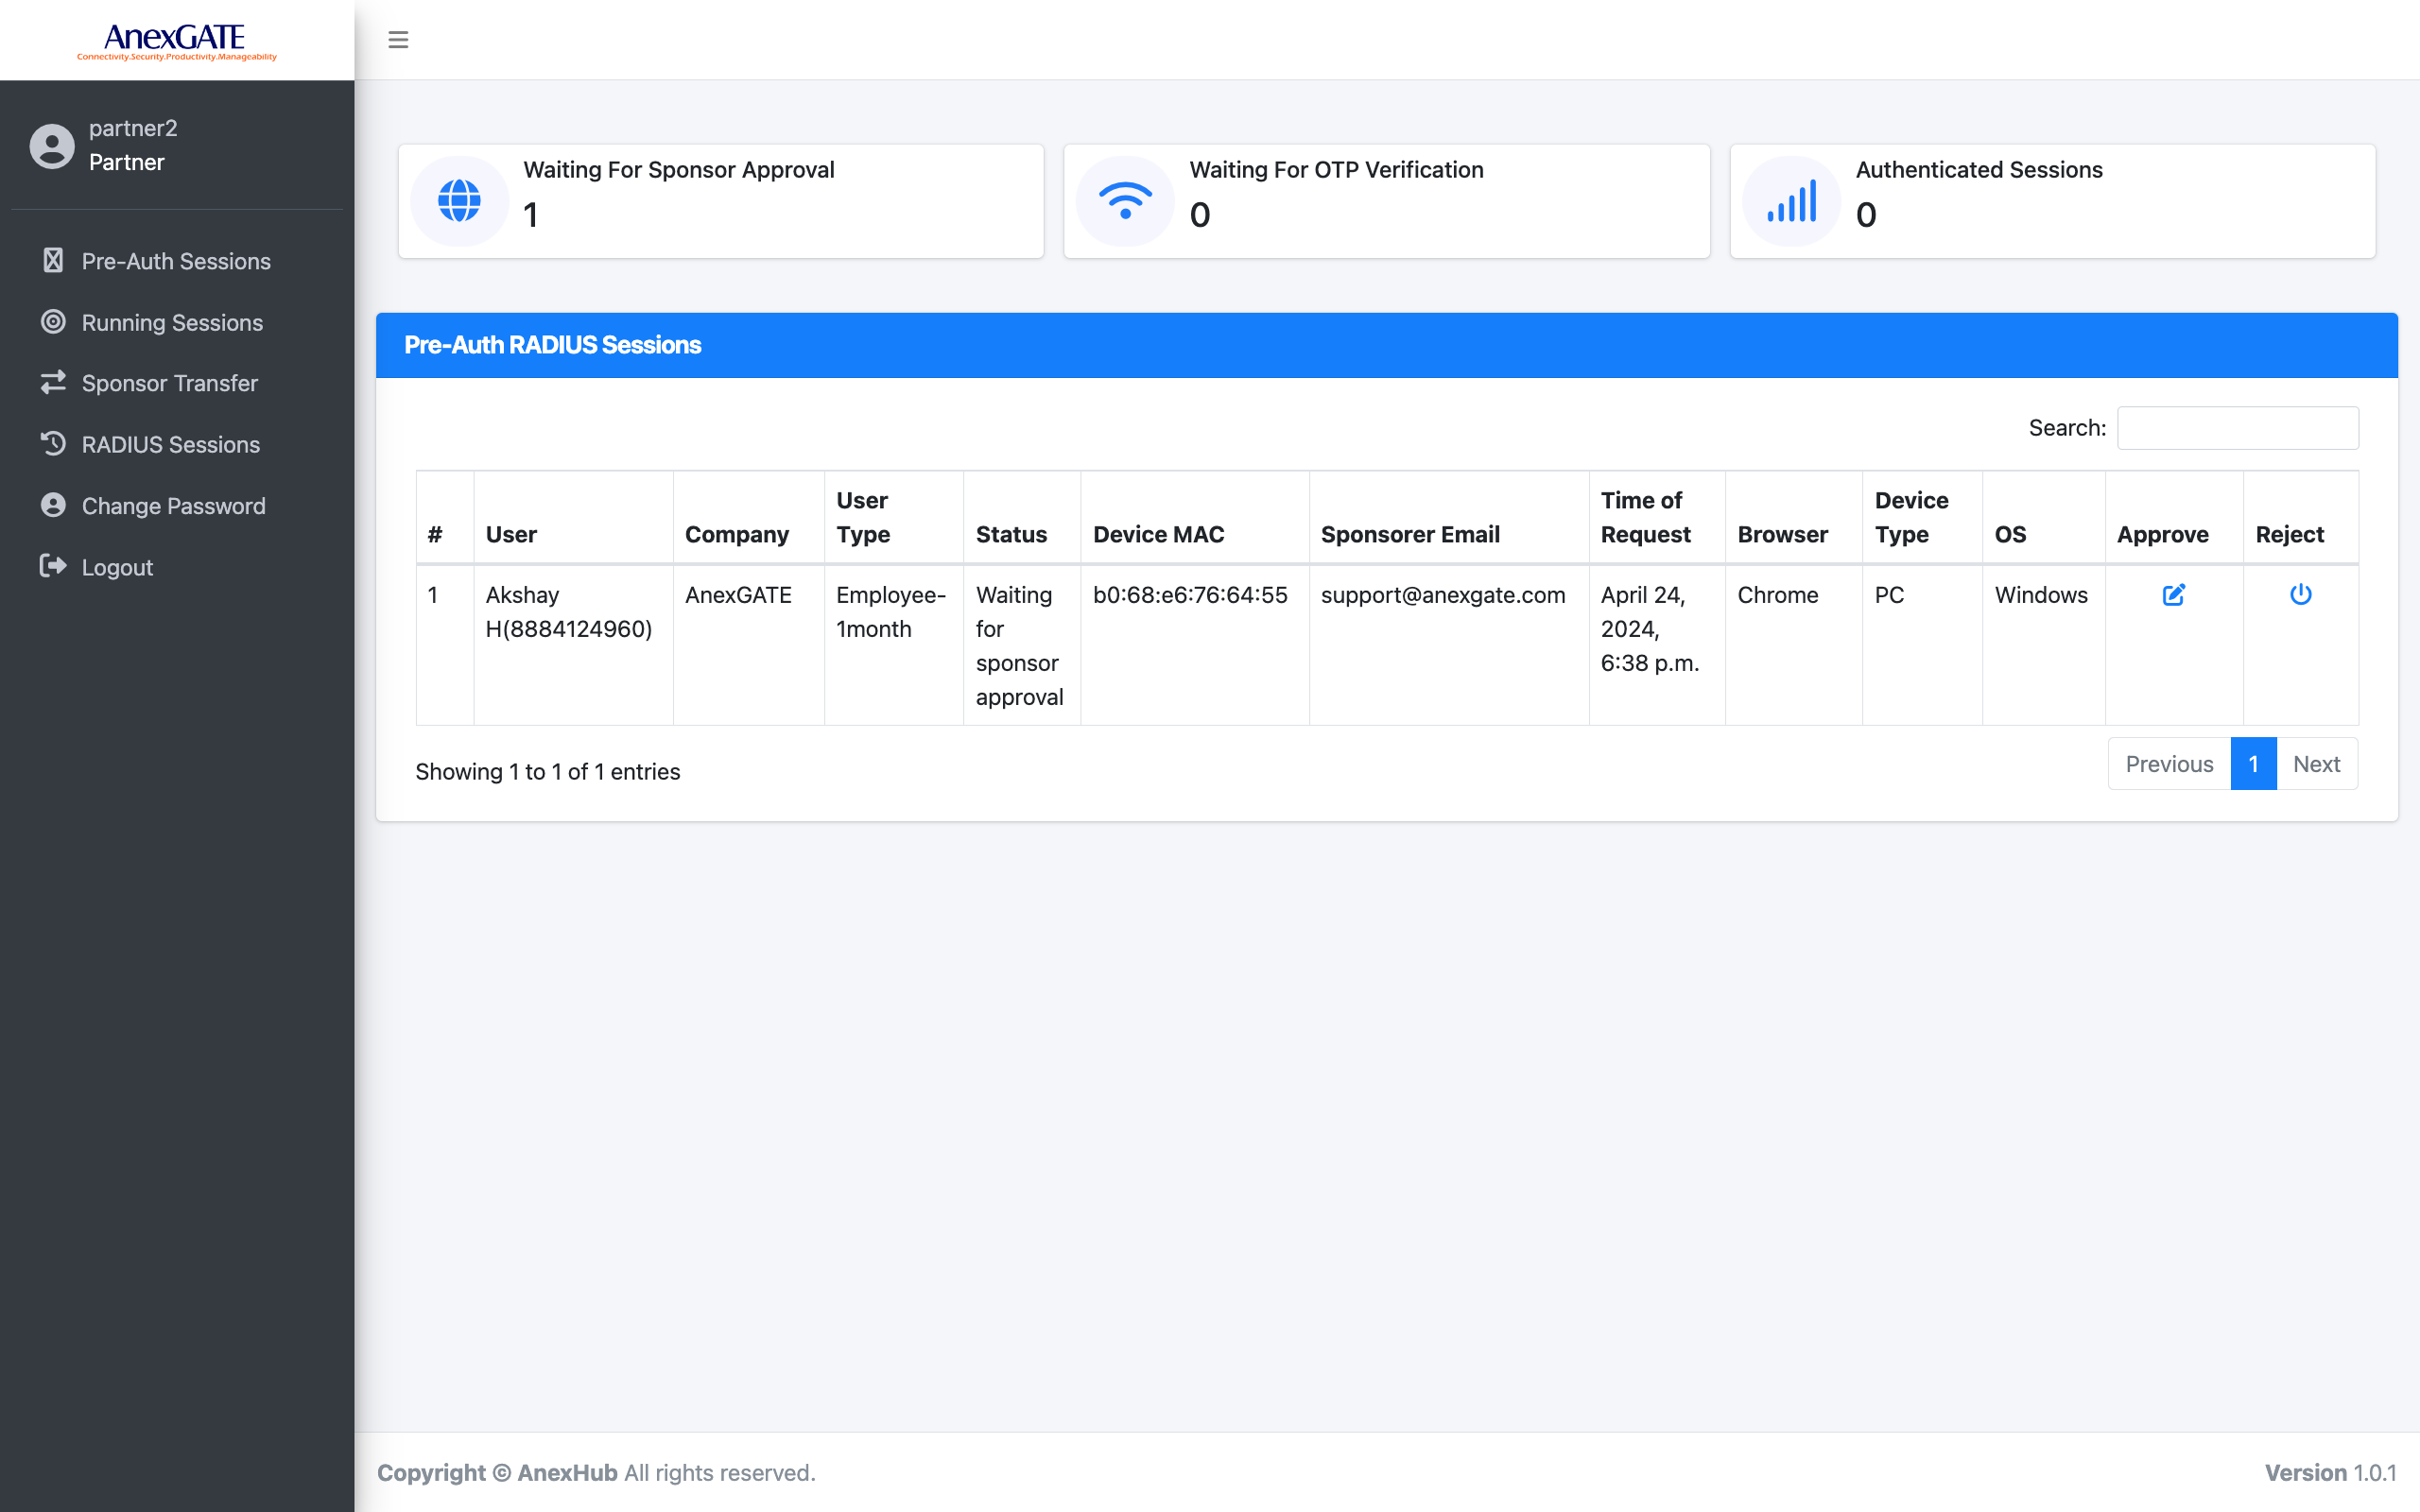
Once the sponsor has approved the request of the user. The Status is changed to WAITING FOR OTP Verification under Pre-Auth Sessions.

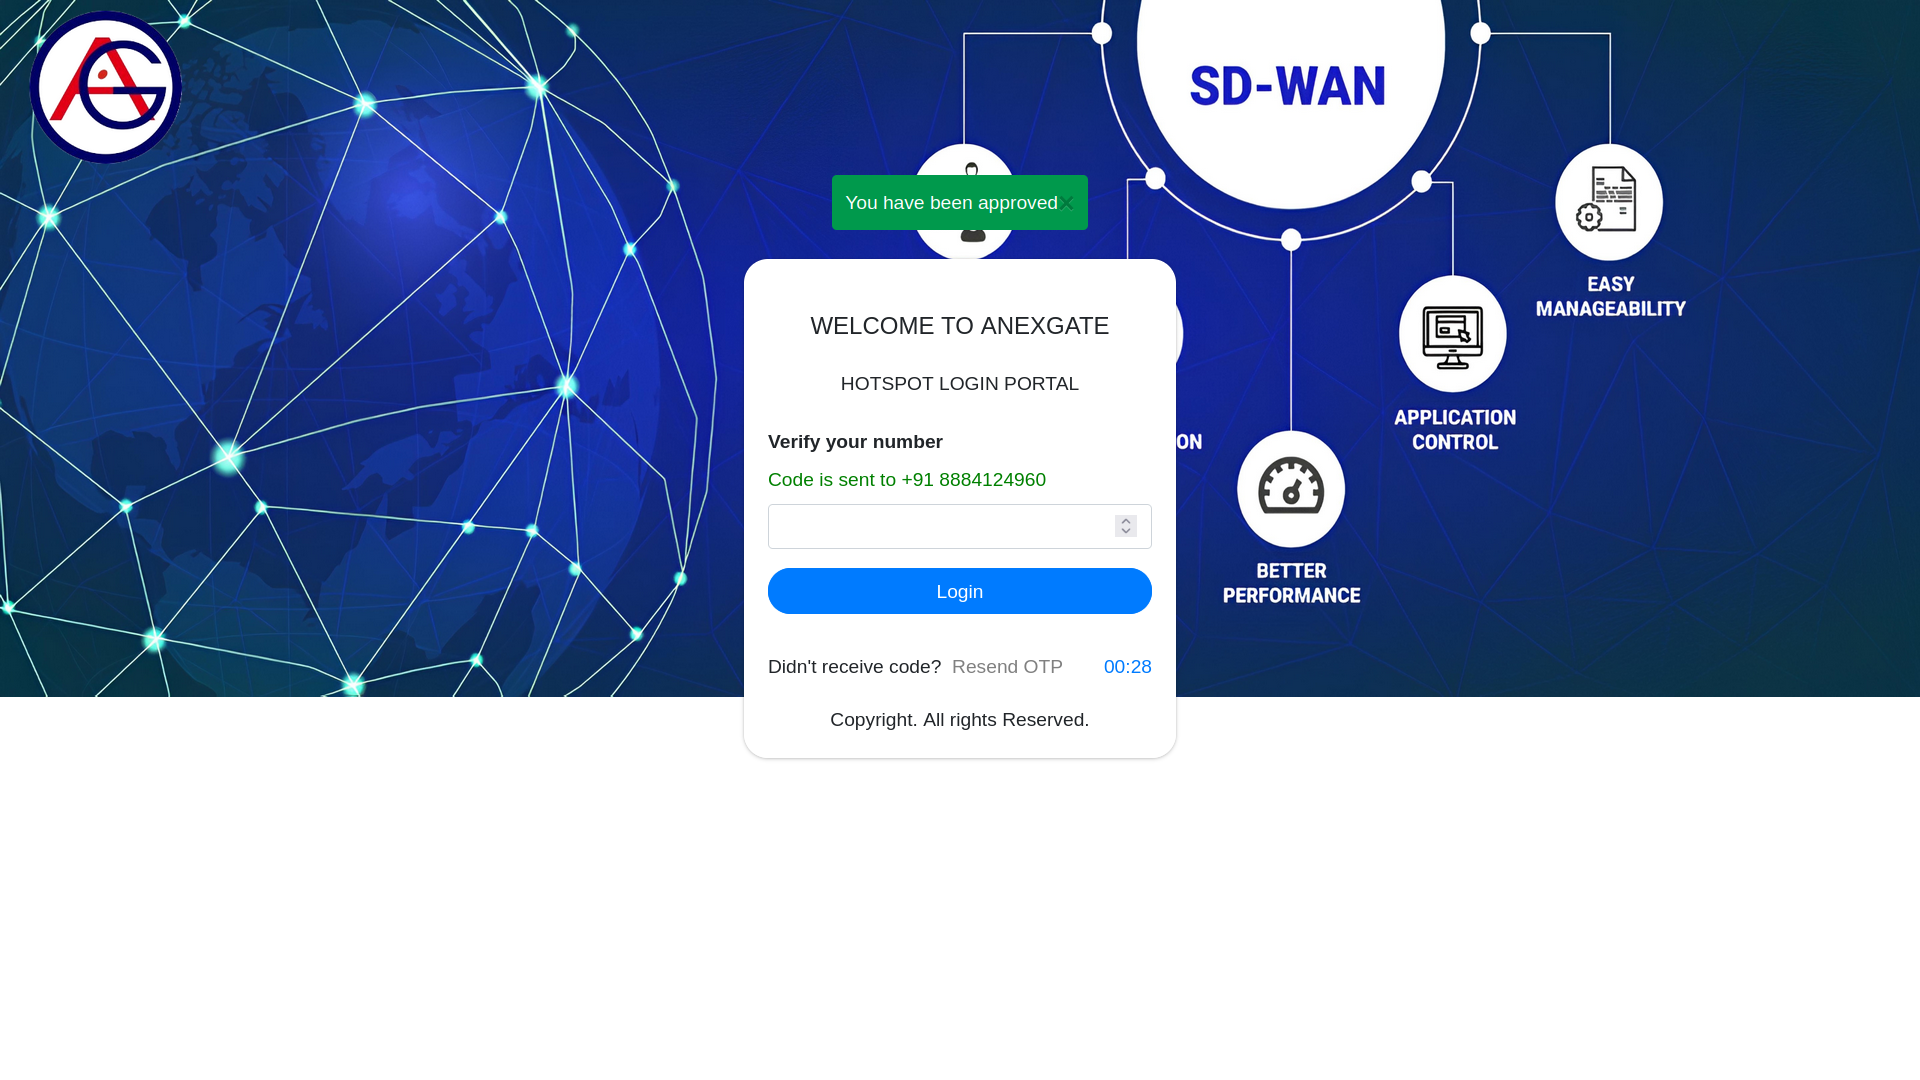
¶ SPONSOR APPROVAL [GENERATE OTP]
Once the sponsor has accepted the user authentication request. The user will be redirected to OTP Verification page.
The user will then get an OTP message on their phone number which was provided as an information during 1st login page. The user has to enter the valid OTP received on the phone.
If the user doesnt receive the OTP is for some reason. Either generate the OTP once again or contact the sponsored administrator to re-leave the exisiting sponsor requested by the user.
NOTE - Failing to add a valid OTP for ‘n’ number of time mentioned by the admin will result in barring of the user for ‘n’ period of time mentioned by the admin during the session plan/user type creation.
¶ LOGIN STATUS PAGE
The image shows the Status Page of the user, to have successfully Logged in prompting Login Successful
Note -
- Login status page will be displayed to user who login through browser. The pop up in Laptop/Mobile may display the login status page but will fade away quickly based on device
CAPTIVE Portalsettings. - The Login status page will not show up if
Redirect URLhas been specified underAnexSPOT>Landing Pages.

¶ LOGIN RENEWAL
Once the user session is over either in terms of time interval or data quota. The user session will be logged out.
The user will get a captive portal page as image shown below where the administrator has to either ALLOW or REJECT the user session for the second time.
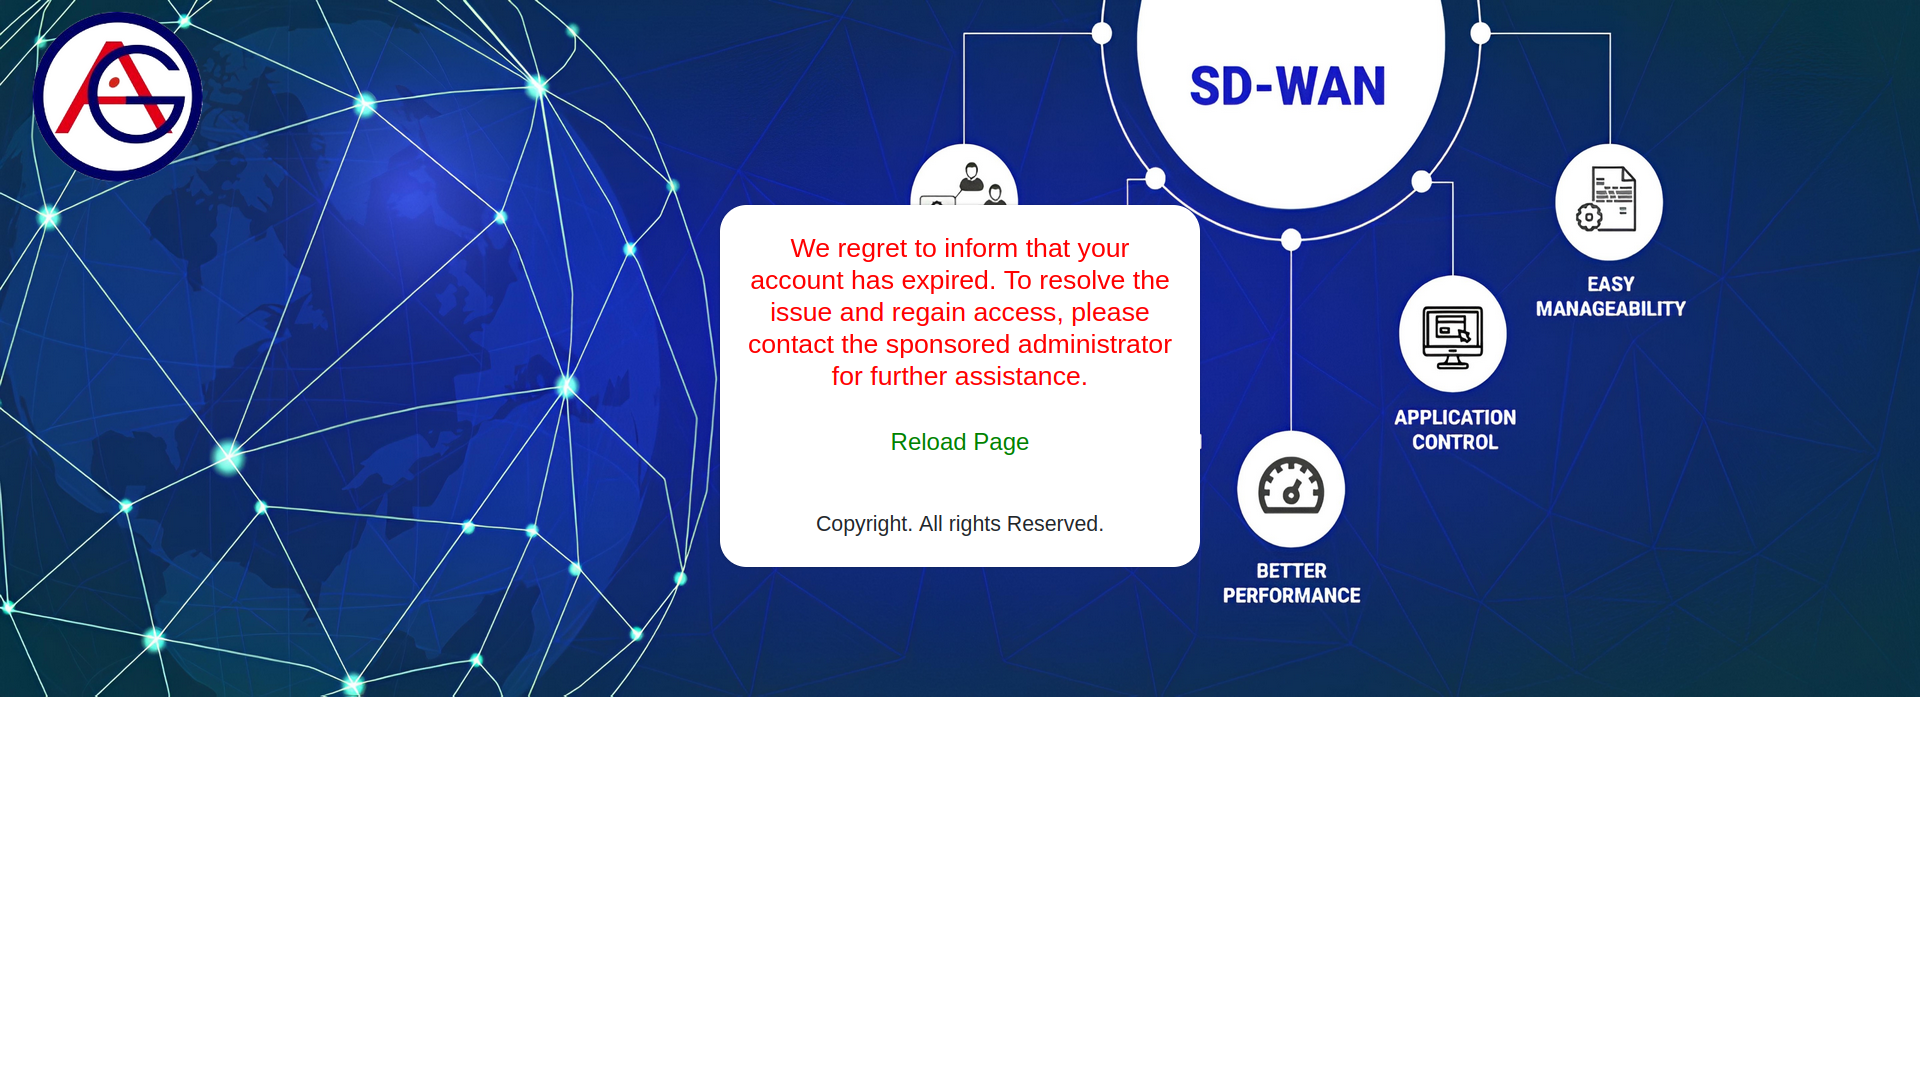
¶ LOGIN RENEWAL [PARTNER PORTAL]
When the user requests for the second session for internet access. The user gets prompted to contact the Sponsored Administrator.
The Sponsor portal page will display the pre-auth session of the user with the status Waiting for Session Renewal. The partner portal admin can either Allow or Reject the session.